Service Manuals, User Guides, Schematic Diagrams or docs for : HP Publikacje 5989-0270EN
<< Back | HomeMost service manuals and schematics are PDF files, so You will need Adobre Acrobat Reader to view : Acrobat Download Some of the files are DjVu format. Readers and resources available here : DjVu Resources
For the compressed files, most common are zip and rar. Please, extract files with Your favorite compression software ( WinZip, WinRAR ... ) before viewing. If a document has multiple parts, You should download all, before extracting.
Good luck. Repair on Your own risk. Make sure You know what You are doing.
Image preview - the first page of the document

>> Download 5989-0270EN documenatation <<
Text preview - extract from the document
Non-Zero Noise Figure After Calibration

Application Note 1484

The increasing demand for wireless products combined with the availability
of modern easy-to-use measurement equipment mean that noise figure
measurements are more popular than ever. This is especially true in the
microwave region of the spectrum where more and more wireless standards
are being developed.

Noise figure measurements rely on a calibrated noise source as a reference.
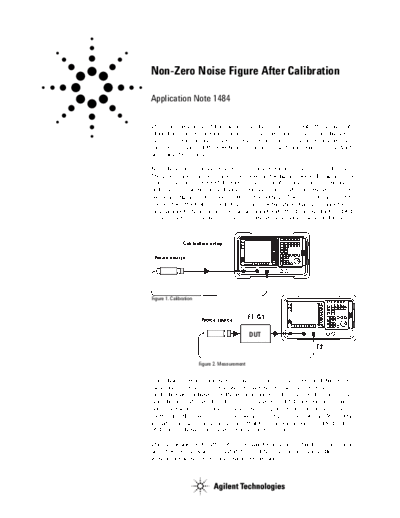
The general measurement process is shown in the figures below. In Figure 1, the
noise source is connected directly to the input of the measuring instrument
and a user calibration is performed. This measures and stores the instrument's
own noise figure at its various attenuator settings. These results are used to
remove the effect of "second-stage" noise contribution during a corrected
measurement. The measurement arrangement, with the device-under-test (DUT)
inserted between the noise source and the instrument is shown in Figure 2.


                Calibration setup

 Noice source


Figure 1. Calibration


                         Noice source
                                                F1, G1

                                                DUT
                                                               F2

                        Figure 2. Measurement


Immediately after calibration, the noise source is still connected directly to
the instrument, which automatically switches to the corrected measurement
mode. In this configuration the instrument would be expected to display a
noise figure and gain of 0 dB, because there is no DUT present. In practice
however, the instrument may show a noise figure of plus or minus a few
tenths of a dB as well as an even lower level of gain, but not zero. While this
is quite normal, some users assume that this zero-error will be added to their
DUT's noise figure, producing an inaccurate result.

This application note attempts to explain the reasons behind the zero-error
and shows with examples that it does not have a compromising effect on
instrument accuracy in a measurement situation.
    Theory
    Figure 2 along with the basic noise figure equation will be used as the basis
    of the explanation. The general equation for the noise factor of two cascaded
    stages as defined by Friis (Proceedings of the IRE, July 1944, pp.419-422) as:

                          (F2
◦ Jabse Service Manual Search 2024 ◦ Jabse Pravopis ◦ onTap.bg ◦ Other service manual resources online : Fixya ◦ eServiceinfo