Service Manuals, User Guides, Schematic Diagrams or docs for : LG Mobile Phone LG G5200 LG G5200 3
<< Back | HomeMost service manuals and schematics are PDF files, so You will need Adobre Acrobat Reader to view : Acrobat Download Some of the files are DjVu format. Readers and resources available here : DjVu Resources
For the compressed files, most common are zip and rar. Please, extract files with Your favorite compression software ( WinZip, WinRAR ... ) before viewing. If a document has multiple parts, You should download all, before extracting.
Good luck. Repair on Your own risk. Make sure You know what You are doing.
Image preview - the first page of the document
>> Download LG G5200 3 documenatation <<
Text preview - extract from the document
5. ASSEMBLY INSTRUCTION
5. ASSEMBLY INSTRUCTION
5.1 Disassembly
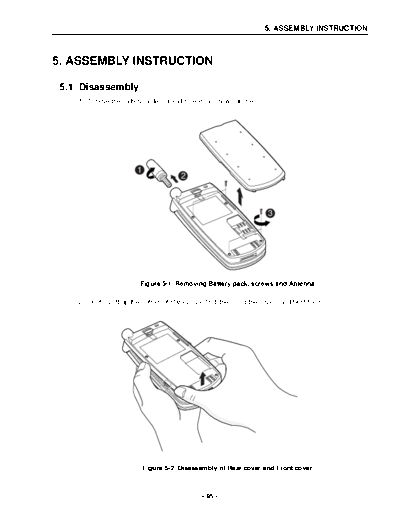
1. Remove the battery, antenna and screws as shown above.
1
2
3
Figure 5-1. Removing Battery pack, screws and Antenna
2. Carefully lift up the bottom of Rare Cover first, then hold the covers and twist them.
Figure 5-2. Disassembly of Rear cover and Front cover
- 95 -
5. ASSEMBLY INSTRUCTION
3.Finally carefully remove the rear-cover from the hooks on the top of front-cover.
Figure 5-3. Disassembly from the hooks
- 96 -
5. ASSEMBLY INSTRUCTION
4. Remove the pin shown below to unlock the PCB.
Figure 5-4. Unlocking and removing the PCB
- 97 -
5. ASSEMBLY INSTRUCTION
5. Use a sharp awl to push away the antenna-bushing.
Figure 5-5. Removing Antenna-bushing
6. Use a tweezers to remove the Battery Locker.
1
1
2
3
Figure 5-6. Removing battery locker
- 98 -
5. ASSEMBLY INSTRUCTION
7. Remove the buttons.
Figure 5-7. Removing buttons
8. Push away the hinge to remove the folder.
Figure 5-8. Detaching Folder
- 99 -
5. ASSEMBLY INSTRUCTION
9. Remove a hinge from the folder. Then detach screw caps and screws
Figure 5-9. Removing hinge and screws
10. Place the folder on a desk. Then hold the hinge and push it down carefully.
Finally, detach it from the rest hooks shown above.
Firure 5-10. Disassembly of Folder
- 100 -
5. ASSEMBLY INSTRUCTION
11. Detach the rest components as shown below.
Figure 5-11. Disassembly of Rest components
12. Use a ` - ' driver to lift up the end-side of sub-window.
Figure 5-12. Detaching sub-window.
- 101 -
◦ Jabse Service Manual Search 2024 ◦ Jabse Pravopis ◦ onTap.bg ◦ Other service manual resources online : Fixya ◦ eServiceinfo