Service Manuals, User Guides, Schematic Diagrams or docs for : Stanford Research Systems www.thinksrs.com-MPA160_firmwareUp
<< Back | HomeMost service manuals and schematics are PDF files, so You will need Adobre Acrobat Reader to view : Acrobat Download Some of the files are DjVu format. Readers and resources available here : DjVu Resources
For the compressed files, most common are zip and rar. Please, extract files with Your favorite compression software ( WinZip, WinRAR ... ) before viewing. If a document has multiple parts, You should download all, before extracting.
Good luck. Repair on Your own risk. Make sure You know what You are doing.
Image preview - the first page of the document
>> Download www.thinksrs.com-MPA160_firmwareUp documenatation <<
Text preview - extract from the document
1 of 2
Firmware 2.01 Update Instructions
This firmware update is available at no charge to all DigiMelt customers. Version 2.01 eliminates a
potential problem that limits maximum oven power. The problem is exacerbated by low ambient
temperature and some line voltage conditions. DigiMelts with this issue may have erratic Tube
Tapper intensity.
The current firmware version of your DigiMelt is displayed for 2 seconds immediately after power
is switched on. SRS recommends this update for all units that aren't already running firmware
version 2.00 or above, but it is not required. The update should not be applied to DigiMelts with
firmware higher than 2.01. The update has no effect on the warranty or calibration.
The Updater can be used on an unlimited number of DigiMelts. After you have updated the
firmware on all your DigiMelts, you may return the Updater to SRS, keep it as a souvenir, or
dispose of it properly at an "e-waste" facility.
Tools required
Phillips head #2 screwdriver
Updater circuit board supplied by SRS
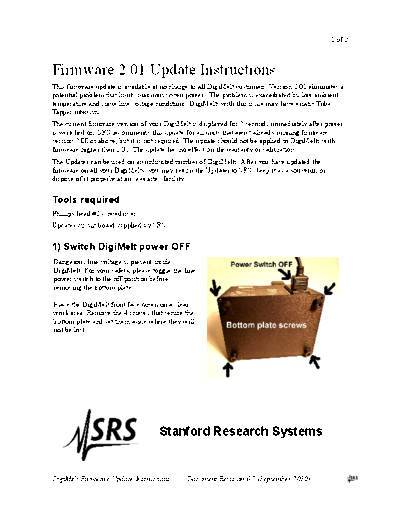
1) Switch DigiMelt power OFF
Dangerous line voltage is present inside
DigiMelt. For your safety, please toggle the line
power switch to the off position before
removing the bottom plate.
Place the DigiMelt front face down on a clear
work area. Remove the 4 screws that secure the
bottom plate and set them aside where they will
not be lost.
Stanford Research Systems
DigiMelt Firmware Update Instructions Document Revision 0.7 (September 2010)
2 of 2
2) Insert the Updater
The Updater has a connector at one end (J1)
that mates with a similar connector (J9) on the
underside of the DigiMelt circuit board. The
connectors can only mate in one orientation:
The ridge on the Updater must engage the slot
on the DigiMelt.
To fully seat the connector, it may be
necessary to rock the Updater gently from
side to side while pressing firmly.
3) Switch DigiMelt power ON
After a second or two, one LED on the Update circuit board will blink for about 9 seconds. Do not
interrupt power to DigiMelt or remove the Updater prematurely. Once the Update process has
begun, it must continue to successful completion or the DigiMelt may be rendered unusable!
If no LED lights on the Updater, switch the DigiMelt power off and verify that the Updater is fully
inserted into the DigiMelt connector before switching the DigiMelt back on.
4) Wait for both LEDs to light.
If the update is successful, both LEDs on the Updater circuit board will light and the DigiMelt will
reboot, displaying the new firmware version.
If the update fails, the Updater will try again until it succeeds. If the Updater does not indicate
success after several attempts, the unit must be returned to SRS for repair.
5) Switch DigiMelt power off
Do not reach inside the DigiMelt with the power on.
6) Remove the Updater
Rock the Updater gently side to side while pulling it out of the DigiMelt. Re-secure the bottom
plate of the DigiMelt with the 4 screws removed at step 1.
On power-up, the DigiMelt should display the firmware version. In the unlikely event that the
DigiMelt powers up indicating either "Err 9" or "Err 7", the unit is still usable but should be
returned to SRS for re-calibration.
DigiMelt Firmware Update Instructions Document Revision 0.7 (September 2010)
◦ Jabse Service Manual Search 2024 ◦ Jabse Pravopis ◦ onTap.bg ◦ Other service manual resources online : Fixya ◦ eServiceinfo