Service Manuals, User Guides, Schematic Diagrams or docs for : Samsung Audio MAX-DJ750 20050617095258859_DJ750_1Disa_TM
<< Back | HomeMost service manuals and schematics are PDF files, so You will need Adobre Acrobat Reader to view : Acrobat Download Some of the files are DjVu format. Readers and resources available here : DjVu Resources
For the compressed files, most common are zip and rar. Please, extract files with Your favorite compression software ( WinZip, WinRAR ... ) before viewing. If a document has multiple parts, You should download all, before extracting.
Good luck. Repair on Your own risk. Make sure You know what You are doing.
Image preview - the first page of the document
>> Download 20050617095258859_DJ750_1Disa_TM documenatation <<
Text preview - extract from the document
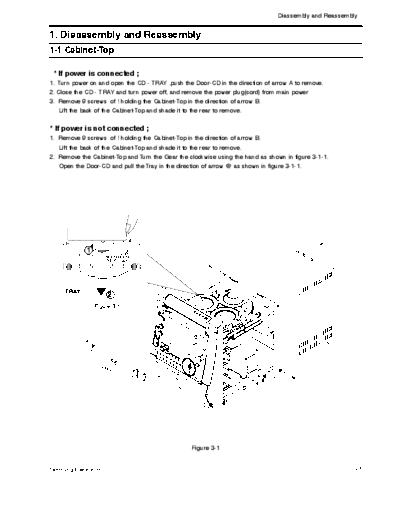
                                                                                Diassembly and Reassembly


1. Disassembly and Reassembly
1-1 Cabinet-Top

 * If power is connected ;
1. Turn power on and open the CD - TRAY ,push the Door-CD in the direction of arrow A to remove.
2. Close the CD - TRAY and turn power off, and remove the power plug(cord) from main power
3. Remove 9 screws of ! holding the Cabinet-Top in the direction of arrow B.
    Lift the back of the Cabinet-Top and shade it to the rear to remove.


* If power is not connected ;
1. Remove 9 screws of ! holding the Cabinet-Top in the direction of arrow B.
   Lift the back of the Cabinet-Top and shade it to the rear to remove.
2. Remove the Cabinet-Top and Turn the Gear the clockwise using the hand as shown in figure 3-1-1.
   Open the Door-CD and pull the Tray in the direction of arrow @ as shown in figure 3-1-1.


             1


     TRAY
                      2
                 Figure 3-1-1


                                                 Figure 3-1


Samsung Electronics                                                                                    1-1
Diassembly and Reassembly

1-2 CD-Mecha, Door-CD
1. Remove 4 screws of # .
2. Lift the back of the CD-Mecha to remove.


                                              Figure 3-2


1-2                                                        Samsung Electronics
                                                                                  Diassembly and Reassembly

1-3 Cabinet-Rear
1. Remove 21 screws of $.
2. Lift the Cabinet-Rear in the direction of arrow D and slide it to the rear
   by releasing the hook of Cabinet-Bottom.


                                                       Figure 3-3

1-4 Cabinet-Front , Cabinet-Bottom and main PCB
1. Remove3 screws of ^,Cabint-Front in the direction of arrow F and slide to the Cabinet-Bottom.
2. Remove 1 screws of % and slide the Main PCB to te rear to remove.
3. Remove 1 screws of & and slide the AMP PCB and DVD PCD to remove .


                                                       Figure 3-4

Samsung Electronics                                                                                      1-3
Diassembly and Reassembly                                                      Diassembly and Reassembly

1-5 Pick-up disassembly and reassembly
1-5-1 Disassembly                                        1-5-2 Assembly
1) Remove the power cable.                               1) Replace the Pick-up.
2) Switch LD SW1 on deck PCB to `OFF' before             2) Assemble the deck PCB.
   removing the FPC                                      3) Reassemble the deck.
   ( Inserted into Main PCB CN6. See Fig. 3-5)
3) Disassemble the deck.
4) Disassemble the deck PCB.

Note : If the assembly and disassembly are not done in correct sequence, the Pick-up may be damaged.


                                                 Figure 3-5


1-4                                                                                       Samsung Electronics
◦ Jabse Service Manual Search 2024 ◦ Jabse Pravopis ◦ onTap.bg ◦ Other service manual resources online : Fixya ◦ eServiceinfo