Service Manuals, User Guides, Schematic Diagrams or docs for : Samsung LCD TV LW20M22CP 05_Operation Instruction & Installation
<< Back | HomeMost service manuals and schematics are PDF files, so You will need Adobre Acrobat Reader to view : Acrobat Download Some of the files are DjVu format. Readers and resources available here : DjVu Resources
For the compressed files, most common are zip and rar. Please, extract files with Your favorite compression software ( WinZip, WinRAR ... ) before viewing. If a document has multiple parts, You should download all, before extracting.
Good luck. Repair on Your own risk. Make sure You know what You are doing.
Image preview - the first page of the document
>> Download 05_Operation Instruction & Installation documenatation <<
Text preview - extract from the document
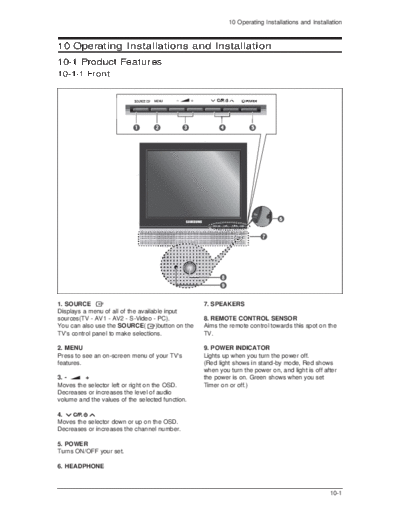
                                                              10 Operating Installations and Installation


10 Operating Installations and Installation
10-1 Product Features
10-1-1 Front


1. SOURCE                                            7. SPEAKERS
Displays a menu of all of the available input
sources(TV - AV1 - AV2 - S-Video - PC).              8. REMOTE CONTROL SENSOR
You can also use the SOURCE(        )button on the   Aims the remote control towards this spot on the
TV's control panel to make selections.               TV.

2. MENU                                              9. POWER INDICATOR
Press to see an on-screen menu of your TV's          Lights up when you turn the power off.
features.                                            (Red light shows in stand-by mode, Red shows
                                                     when you turn the power on, and light is off after
3. -     +                                           the power is on. Green shows when you set
Moves the selector left or right on the OSD.         Timer on or off.)
Decreases or increases the level of audio
volume and the values of the selected function.

4.
Moves the selector down or up on the OSD.
Decreases or increases the channel number.

5. POWER
Turns ON/OFF your set.

6. HEADPHONE


                                                                                                    10-1
10 Operating Installations and Installation

10-1-2 Back


                             LW15M23CP,LW20M21CP


The Kensington lock is a device used to physically fix the system when using it in a public place. The
locking device has to be purchased separately. The appearance and locking method may differ from
the illustration depending on the manufacturer. Please refer to the manual provided with the Kensington
lock for proper use.


1. Insert the locking device into the Kensington slot on the LCD TV (Figure 1), and turn it in the locking
   direction (Figure 2).
2. Connect the Kensington lock cable.
3. Fix the Kensington lock to a desk or a heavy stationary object.


10-6
                                                            10 Operating Installations and Installation

10-2-2 Retractable Stand
Note:   The maximum tilt angle is 13 degrees in the backward direction.
        Please do not tilt the TV outside the specified range. Using excessive force
        to tilt the TV may cause permanent damage to the mechanical part of the stand.
        The 20" model swivels left and right.


                   LT-P1545P,1745P                                  LT-P2045P


                                                                                                  10-7
10 Operating Installations and Installation

10-2-3 Installing VESA compliant mounting devices


1                                             2


                                                               T
                                                            AR                                       T
                                                          SC                                    AR
                                                                                           SC


                     T
                  AR
                SC


                                                                 Mounting pad
                                              LW15M23CP, LW17M24CP           LW20M21CP


<1>     Fold the stand pressing the button on the back of the stand.
<2>     Align the mounting interface pad with the holes in the stand bottom and secure it with the four
        screws that come with the arm-type base, wall mount hanger or other bases.


Wall Mount Instructions


The following instructions apply to a hollow sheet-rock wall only. Tools/Hardware needed - Philips
screwdriver, four toggle bolts, 5/8in dia. Drill bit and drill. Contact Ergotron at (800) 888-8458 to
purchase the triple pivot direct mount adapter and wall mount bracket kit.
- LW15M23CP (15") : No. 47 - 007 - 099 (Pivot direct mount adapter)
                         No. 97 - 101 - 003 (Wall mount bracket kit)
- LW17M24CP (17") : No. 47 - 007 - 099 (Pivot direct mount adapter)
                         No. 97 - 101 - 003 (Wall mount bracket kit)
- LW20M21CP (20") : No. 47 - 007 - 099 (Pivot direct mount adapter)
                         No. 97 - 101 - 003 (Wall mount bracket kit)


Align the wall mount bracket on the wall at the desired height, making sure that the bracket will be
mounted between the wall studs. Mark the four corner openings and drill four 5/8-diameter holes.
Assemble the wall mount kit according to the instructions provided with it. Securely attach Ergotron's
flat panel, triple pivot direct mount adapter to the back of the TV using the four 4mm,
0.7 pitch x 10mm screws provided with the arm. Secure the assembly to the wall using four 3/16 by
3-inch long toggle bolts.


10-8
                                                                10 Operating Installations and Installation

10-2-4 Installing the Wall Mount Kit(LW15M23CP, LW17M24CP)
Note : This installation is to be used when attaching the wall mount to a concrete wall.
       When attaching to other building materials, please contact your nearest dealer.


              Bracket                   Anchors : 3EA        Anchors : 3EA        Installation Guide


How to assemble the Wall Mount Kit

1   1. Mark the location of hole on the wall using
       installation guide.


    2. Make over 35mm- depth- hole on the marked
       location using 5.0-diameter drill.


    3. Fix anchors on each hole on the wall.


    4. Connect bracket to the wall with screws after fit
       ting anchors into the bracket holes.


    Note : If the bracket is not firmly fixed to the wall,
           LCD TV can fall off.


2   You may use LCD TV right after fixing it to the wall
    since stand is wrapped already turned over as
    shown in the picture below.


3   When using LCD TV in stand-based form, place
    the product on a cushion or other soft materials.
    Then turn over stand following the arrow direction
    below only after pressing button on the connected
    part where LCD TV is attached to stand.
    (Turn over stand in the opposite direction after
    pressing button when using LCD TV in wall-mount-
    ed form as well.)


                                                                                                       10-9
10 Operating Installations and Installation

4    Adjust LCD TV to the hook on the bracket and move in the direction of the arrow(Left) so that LCD
     TV can be completely fixed to the bracket.


When bracket is assembled                How to hang monitor up on a hook             When installation is completed
on the wall


5    Remove Installation Guide after completing setup of LCD TV on the wall.


6    Push the LCD TV up and shift to the right to detach it from bracket.
     When moving or transferring to other areas, reverse No. 4 procedure so as to disconnect LCD TV
     with ease.

- How to adjust an angle


(1) Angle adjustment section                   (2) Angle abjustment section               (3) Angle adjustment section
of general stand-besd LCD                      while converting the form                  of wall-mounted LCD TV
TV                                             (1->3, 3->1)


1. Picture (1) shows the adjustment angle (0       ~ 13     ) when you use LCD TV in its general form (stand-
    based LCD TV).
2. Excessive tilting can turn LCD TV over which might cause damage to LCD TV.
    Picture (2) shows the adjustment angle (13       ~ 80    ) when you convert stand-based LCD TV into wall-
    mounted one.
3. Picture (3) shows the adjustment angle (0       ~ 10     ) when you use wall-mounted LCD TV after fixing it to
    wall.
Note :      Picture (2) shows the angle adjustment section while LCD TV is being converted from stand-based
            one to wall-mounted one or vice versa.


10-10
                                                                10 Operating Installations and Installation

10-2-5 Installing the Wall Mount Kit(LW20M21CP)
Note : This installation is to be used when attaching the wall mount to a concrete wall.
       When attaching to other building materials, please contact your nearest dealer.


              Bracket                   Anchors : 4EA        Anchors : 4EA        Installation Guide


How to assemble the Wall Mount Kit

1   1. Mark the location of hole on the wall using
       installation guide.


    2. Make over 35mm- depth- hole on the marked
       location using 5.0-diameter drill.


    3. Fix anchors on each hole on the wall.


    4. Connect bracket to the wall with screws after fit
       ting anchors into the bracket holes.


    Note : If the bracket is not firmly fixed to the wall,
           LCD TV can fall off.


2   You may use LCD TV right after fixing it to the wall
    since stand is wrapped already turned over as
    shown in the picture below.


3   When using LCD TV in stand-based form, place
    the product on a cushion or other soft materials.
    Then turn over stand following the arrow direction
    below only after pressing button on the connected
    part where LCD TV is attached to stand.
    (Turn over stand in the opposite direction after
    pressing button when using LCD TV in wall-mount-
    ed form as well.)


                                                                                                       10-11
10 Operating Installations and Installation

4    Adjust LCD TV to the hook on the bracket and move in the direction of the arrow(Left) so that LCD
     TV can be completely fixed to the bracket.


When bracket is assembled                How to hang monitor up on a hook             When installation is completed
on the wall


5    Remove Installation Guide after completing setup of LCD TV on the wall.


6    Push the LCD TV up and shift to the right to detach it from bracket.
     When moving or transferring to other areas, reverse No. 4 procedure so as to disconnect LCD TV
     with ease.

- How to adjust an angle


(1) Angle adjustment section                   (2) Angle abjustment section               (3) Angle adjustment section
of general stand-besd LCD                      while converting the form                  of wall-mounted LCD TV
TV                                             (1->3, 3->1)


1. Picture (1) shows the adjustment angle (0       ~ 13     ) when you use LCD TV in its general form (stand-
    based LCD TV).
2. Excessive tilting can turn LCD TV over which might cause damage to LCD TV.
    Picture (2) shows the adjustment angle (13       ~ 80    ) when you convert stand-based LCD TV into wall-
    mounted one.
3. Picture (3) shows the adjustment angle (0       ~ 10     ) when you use wall-mounted LCD TV after fixing it to
    wall.
Note :      Picture (2) shows the angle adjustment section while LCD TV is being converted from stand-based
            one to wall-mounted one or vice versa.


10-12
◦ Jabse Service Manual Search 2024 ◦ Jabse Pravopis ◦ onTap.bg ◦ Other service manual resources online : Fixya ◦ eServiceinfo