Service Manuals, User Guides, Schematic Diagrams or docs for : Samsung LCD TV LW20M22CP 06_Disassembly & Reassembly
<< Back | HomeMost service manuals and schematics are PDF files, so You will need Adobre Acrobat Reader to view : Acrobat Download Some of the files are DjVu format. Readers and resources available here : DjVu Resources
For the compressed files, most common are zip and rar. Please, extract files with Your favorite compression software ( WinZip, WinRAR ... ) before viewing. If a document has multiple parts, You should download all, before extracting.
Good luck. Repair on Your own risk. Make sure You know what You are doing.
Image preview - the first page of the document

>> Download 06_Disassembly & Reassembly documenatation <<
Text preview - extract from the document
                                                                                       11 Disassembly and Reassembly


11 Disassembly and Reassembly
This section of the service manual describes the disassembly and reassembly procedures for the LW15M23CP/ LW17M24CP/LW20M21CP
LCD TV.
     WARNING: This monitor contains electrostatically sensitive devices. Use caution
              when handling these components.

11-1 LW15M23CP, LW15M25CP Disassembly
    Cautions: 1. Disconnect the monitor from the power source before disassembly.
              2. Follow these directions carefully; never use metal instruments to pry apart the cabinet.


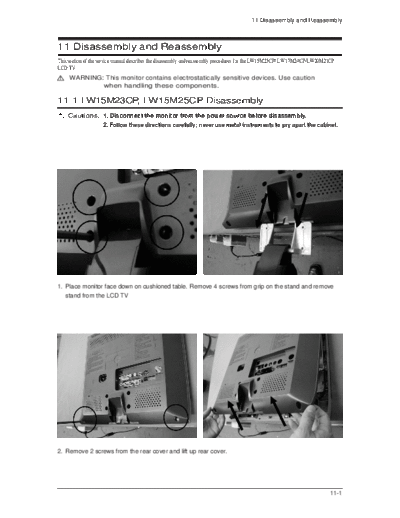
1. Place monitor face down on cushioned table. Remove 4 screws from grip on the stand and remove
   stand from the LCD TV


2. Remove 2 screws from the rear cover and lift up rear cover.


                                                                                                                          11-1
11 Disassembly and Reassembly


3. Remove 11 screws from the boards and disconnect inverter cables from the boards.


4. Disconnect LVDS cable, function cable and speaker cable from the board.


5. Lift up the boards and remove 8 screws from the panel shield.


11-2
                                                                     11 Disassembly and Reassembly


6. Lift up the panel shield and disconnect panel from the front.


11-2 LW17M24CP Disassembly


1. Place LCD TV face down on cushioned table. Remove 4 screws from the stand.


2. Remove 3 screws from the rear cover and lift up the rear cover.


                                                                                              11-3
11 Disassembly and Reassembly


3. Remove 13 screws from the boards and remove 2 hold inverter from the boards.
   Disconnect inverter cable, speaker cable, control cable, BRKT AC cable and LVDS cable
   from the boards.


4. Disconnect cables and Lift up the boards and remove 8 screws from the shield panel.


5. Lift up the panel shield and lift up the panel.


11-4
                                                                           11 Disassembly and Reassembly


6. This picture shows cover front after disconnecting the panel from it.


11-3 LW20M21CP, LW20M25CP Disassembly


1. Place LCD TV face down on cushioned table. Remove 4 screws from the grip on the stand.


                                                                                                    11-5
11 Disassembly and Reassembly


2. Remove 3 screws on stand and disconnect cover rear after inserting stand completely into stand.
   (Note : If stand is loosely inserted into stand, cover rear can be damaged when disconnected.)


3. Disconnect inverter holder wire from the board and carefully reomve the silicon glue on the LVDS
   cable with a nipper.


4. Disconnect function cable, speaker cable, inverter cable and LVDS cable from the board.


11-6
                                                                       11 Disassembly and Reassembly


5. Remove 8 screws from the shield panel and lift up the panel.


11-4 Replacement Order of Lamp Assemblies


                                                     1. After confirm there is nothing on the desk, turn the
                                                        LCD module over and put it on a flat desk set to the
                                                        ground.


                                                     2. Remove 2 screws for the lamp unit.


                                                                                                       11-7
11 Disassembly and Reassembly


                   Slide the lamp unit out.              3. Slide the lamp unit out. Please take out the lamp
                                                            unit from the LCD module.


                   Slide the lamp unit out.


                                                         4. Please fix the new lamp units on the LCD module :
                                                            opposite process 2 and 3.


11-5 Reassembly
Reassembly procedures are in the reverse order of disassembly procedures.


11-8
◦ Jabse Service Manual Search 2024 ◦ Jabse Pravopis ◦ onTap.bg ◦ Other service manual resources online : Fixya ◦ eServiceinfo