Service Manuals, User Guides, Schematic Diagrams or docs for : Samsung Laptop NP-Q1 4.Disassembly and Assembly
<< Back | HomeMost service manuals and schematics are PDF files, so You will need Adobre Acrobat Reader to view : Acrobat Download Some of the files are DjVu format. Readers and resources available here : DjVu Resources
For the compressed files, most common are zip and rar. Please, extract files with Your favorite compression software ( WinZip, WinRAR ... ) before viewing. If a document has multiple parts, You should download all, before extracting.
Good luck. Repair on Your own risk. Make sure You know what You are doing.
Image preview - the first page of the document
>> Download 4.Disassembly and Assembly documenatation <<
Text preview - extract from the document
This Document can not be used without Samsung's authorization.
4. Disassembly and Assembly
1) Q1 Disassembly and Assembly
Part Picture Explanation
1. Separate the AC adaptor and the battery
certainly before disjoint system.
2. Push out the battery on like figure 2 after
have pushed latches with figure 1 to both side.
1 1
2 2
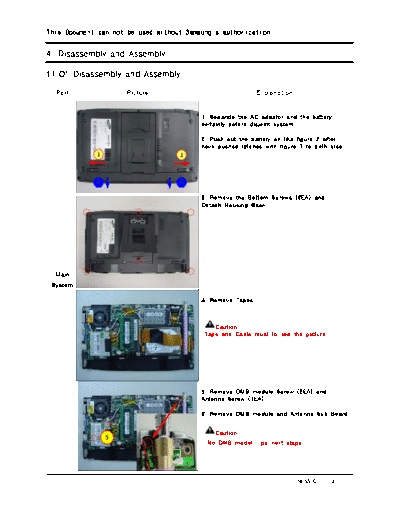
3. Remove the Bottom Screws (6EA) and
Detach Housing-Back.
Main
System
4. Remove Tapes.
Caution
Tape and Cable must fix like the picture.
5. Remove DMB module Screw (2EA) and
Antenna Screw (1EA)
6. Remove DMB module and Antenna Sub Board.
Caution
5
No DMB model : go next stage
SENS Q-1 < 4 - 1 >
This Document can not be used without Samsung's authorization.
4. Disassembly and Assembly
Part Picture Explanation
7. Remove Antenna Screw 1EA and Remove
7 Wireless LAN module and Antenna
8. Open Latch and Remove HDD.
Main
System
9. Disconnect Fan Connector, Speaker
Connector(2), Left Sub Board FPC, LCD FPC,
Mic Connetor.
10. Remove Fan Screw (2EA).
11. Remove Main Board Screw (7EA).
12. Remove Fan.
13. Disconnect Right Sub Board FFC.
14. Lift up Main Board and Disconnect Inverter
Cable.
15. Remove MainBoard.
SENS Q-1 < 4 - 2 >
This Document can not be used without Samsung's authorization.
4. Disassembly and Assembly
Part Picture Explanation
16. Disconnect LCD Power Connector.
17. Remove Invertor Board Screw (2EA) and
Remove Invertor Board.
18. Remove Mg Shield Screw (4EA) and Lift up
Mg Shield.
Main
System
19. Disconnect connectors.
(Check Next stage Description.)
19-1. Disconnect Right Sub Board FFC & TSP
FPC.
19-2. Remove Right Sub Board Screw (1EA)
and Lift Right Sub Board.
Assembly Caution
TSP FPC must be over LCD Bracket
SENS Q-1 < 4 - 3 >
This Document can not be used without Samsung's authorization.
4. Disassembly and Assembly
Part Picture Explanation
19-3. Disconnect Left Sub Board FPC.
16-4. Disconnect LED FPC.
16-5. Remove Left Sub Board Screw (1EA) and
Bluetooth Screw (1EA)
Lift Left Sub Board and Bluetooth Module.
20. Detatch LCD FPC Gasket.
Main
System
21. Detatch Tape, and Open latch.
Disjoint LCD FPC.
22. Remove Cover_Top (Lift and push like
picture).
SENS Q-1 < 4 - 4 >
This Document can not be used without Samsung's authorization.
4. Disassembly and Assembly
23. Unlatch 6 point and Lift LCD Bracket.
24. Lift LCD.
Main
System
25. Lift User Define button.
Assembly Caution
User define button assemble like picture.
26. Lift Left Sub Board and Lift 4Way-Slide
Button.
Assembly Caution
Inner Slide button part attach to Sub board.
Check Indicator direct down like picture.
SENS Q-1 < 4 - 5 >
This Document can not be used without Samsung's authorization.
4. Disassembly and Assembly
Part Picture Explanation
27. Remove RHE Screw 4EA and Lift RHE.
28. Disconnect RCT Battery Connector and
Detatch RCT Battery.
Main Assembly Caution
RCT Battery and cable location like picture.
System
29. Disassembled Main Board.
SENS Q-1 < 4 - 6 >
◦ Jabse Service Manual Search 2024 ◦ Jabse Pravopis ◦ onTap.bg ◦ Other service manual resources online : Fixya ◦ eServiceinfo