Service Manuals, User Guides, Schematic Diagrams or docs for : Samsung Laptop samsung nc10

<< Back | Home

Most service manuals and schematics are PDF files, so You will need Adobre Acrobat Reader to view : Acrobat Download Some of the files are DjVu format. Readers and resources available here : DjVu Resources
For the compressed files, most common are zip and rar. Please, extract files with Your favorite compression software ( WinZip, WinRAR ... ) before viewing. If a document has multiple parts, You should download all, before extracting.
Good luck. Repair on Your own risk. Make sure You know what You are doing.


Image preview - the first page of the document
samsung nc10


>> Download samsung nc10 documenatation <<

Text preview - extract from the document
                  -          -
                  - This Document can not be used without Samsung's authorization -


                  3. Disassembly and Reassembly

                  3-1. NC10 Disassembly and assembly
                                                                                                         [Caution] Attention to red sentence.

                      Part                         Picture                                                Description

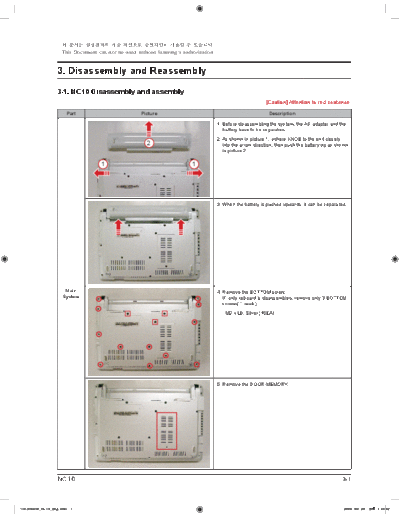
                                                                                  1. Before disassembling the system, the AC adapter and the
                                                                                     battery have to be separated.
                                                                                  2. As shown in picture 1, adhere KNOB to the end closely
                                                      2                              into the arrow direction, then push the battery up as shown
                                                                                     in picture 2.

                                   1                                    1


                                                                                  3. When the battery is pushed upwards, it can be separated.


                     Main                                                         4. Remove the BOTTOM screw.
                    System                                                           IF only keboard is disassembled, remove only 3 BOTTOM
                                                                                     screws( mark).
                                                                                      M2 x L8, Silver (15EA)


                                                                                  5. Remove the DOOR-MEMORY.


                  NC10                                                                                                                       3-1


Winchester_NC10_Eng.indb 1                                                                                                                   2008-09-20  1:36:02
             -          -
             - This Document can not be used without Samsung's authorization -


             3. Disassembly and Reassembly

                   Part                       Picture                                                   Description

                                                                             6. Remove the memory by pushing the fixed-tap out.


                                                                             7. Push the Hook up inwards by using a pin-set as shown in
                                                                                the picture, and then lift the key board up.


                                                                             [Notice]
                                                                             When you push the hook up, you have to be careful not to
                                                                             scratch Topdp.


                                                                                 As shown in the picture, lift the top side of keyboard up and
                                                                                 then disassemble keyboard.


                 Main
                System


                                                                             8. Lift the Keyboard up, and then take the FPC out after
                                                                                lifting the Connector Lock.


                                                                                 Take Keyboard FPC cable out after opening Keyboard
                                                                                 connector Lock.


             3-2                                                                                                                      NC10


Winchester_NC10_Eng.indb 2                                                                                                                       2008-09-20  1:36:13
                  -          -
                  - This Document can not be used without Samsung's authorization -


                  3. Disassembly and Reassembly

                      Part                         Picture                                                  Description

                                                                                  9. As shown in the picture, separate the BOTTOM-
                                                                                     COVER(LAN Connector side first) by widening the gap
                                                                                     between the BOTTOM-COVER and the TOP. (Be careful
                                                                                     not to make scratch in the gap using a wooden-driver.)


                                                                                      As shown in the picture, separate the BOTTOM-COVER
                                                                                      by widening the gap between the BOTTOM-COVER and
                                                                                      the TOP. (Be careful not to make scratch in the gap using a
                                                                                      wooden-driver.)


                                                                                  10. After removing the Screw for fixing HDD remove the
                                                                                      INSULATOR by lifting the HDD up to about 70 degrees
                                                                                      direction.
                                                                                  [Notice]
                                                                                  When you life the HDD up, you shall not enforce excessive
                     Main
                                                                                  strength.
                    System


                                                                                  11. Speaker CONN. INT Mic CONN., Power S/W CONN.
                                                                                      Touch-Pad FPC.


                  NC10                                                                                                                        3-3


Winchester_NC10_Eng.indb 3                                                                                                                     2008-09-20  1:36:22
             -          -
             - This Document can not be used without Samsung's authorization -


             3. Disassembly and Reassembly

                   Part                       Picture                                                 Description

                                                                             12. Remove the Antenna Cable which is connected with
                                                                                 wireless LAN, and then remove the Screw which fixes
                                                                                 WLAN. [Aux(Black)]
                                                                                 M2 x L4, Black (1EA)
                                                                                 1. White, Main
                                                                                 2. Black, Aux


                                                                             13. Remove the Bluetooth Camera Cable and the LCD cable
                                                                                 CONN. and disassemble the W/L Antenna Cable.


                                                                             14. Remove the Screw which fixes the Main Board and the
                                                                                 TOP and then separate Main Board from TOP.
                                                                                 M2 x L4, Black (2EA)


                 Main
                System


                                                                             15. Remove the both sides of Screw, which fasten the Hinge
                                                                                 and the TOP.
                                                                                 M2 x L4, Black (4EA)


                                                                             16. Stand the Top Ass'y in a vertical direction.


             3-4                                                                                                                 NC10


Winchester_NC10_Eng.indb 4                                                                                                                2008-09-20  1:36:32
                  -          -
                  - This Document can not be used without Samsung's authorization -


                  3. Disassembly and Reassembly

                      Part                         Picture                                               Description

                                                                                  17. Separate the Top Ass'y from the LCD.


                                                                                  18. Remove the Screw which fixes the SIM Card Sub-board
                                                                                      and the Main-Board, and then separate them.
                                                                                      M2 X L4, Black (2EA)


                     Main
                    System
                                                                                  19. Remove the Screw (3 EA) which connects the RHE and
                                                                                      the Main board and separate them.
                                                                                      M2 X L4, Black (3EA)


                                                                                  20. Remove the RHE as shown in the picture.


                  NC10                                                                                                                 3-5


Winchester_NC10_Eng.indb 5                                                                                                              2008-09-20  1:36:41
             -          -
             - This Document can not be used without Samsung's authorization -


             3. Disassembly and Reassembly

                   Part                       Picture                                                Description

                                                                             21. Remove the RHE as shown in the picture.
                                                                                 M2 X L4 (4EA)

                                                                             [Notice]
                                                                             When you remove the Rubber-LCD-Cap, be careful not to
                                                                             scratch the Front..


                                                                             22. Insert your hand into the gap of the LCD Back and the
                                                                                 LCD front and then separate first, the upper part of the
                                                                                 LCD Front and second, the both sides of the LCD Front
                                                                                 then finally the bottom part of it.
                                                                                 M2 X L4 (4EA)


                 LCD
                                                                             23. Remove the both sides of Hinge Cover.
                 Ass'y


                                                                             24. Conditions after removing the both sides of Hinge Cover.


             3-6                                                                                                                   NC10


Winchester_NC10_Eng.indb 6                                                                                                                  2008-09-20  1:36:42
                  -          -
                  - This Document can not be used without Samsung's authorization -


                  3. Disassembly and Reassembly

                      Part                         Picture                                               Description

                                                                                  25. Remove the Screw as shown in the picture.
                                                                                      M2 X L4 (4EA)


                                                                                  26. Separate the Hinge and the LCD-Panel as shown in the
                                                                                      picture. (When you separate the Hinge, remove the
                                                                                      Hinge after lifting the LCD-Panel up.)


                     LCD
                     Ass'y
                                                                                  27. Dis-assemble the LCD-Cable and then remove the LCD
                                                                                      Panel.


                                                                                  28. Separate the Camera Module and the Cable as shown in
                                                                                      the picture.


                  NC10                                                                                                                  3-7


Winchester_NC10_Eng.indb 7                                                                                                               2008-09-20  1:36:45
             -          -
             - This Document can not be used without Samsung's authorization -


             3. Disassembly and Reassembly

                   Part                       Picture                                                Description

                                                                             29. Remove the Tape inside the circle.


                                                                             30. Pull the LCD cable up to the arrow direction and then
                                                                                 separate it.


                                                                             21-2. Method to disassemble LCD without disassembling
                                                                                   Main System. As shown in the picture, Stand the Top
                                                                                   Ass'y in a vertical direction. remove 4 Rubber-LCD-
                                                                                   Cap and 4 screws

                 LCD                                                              M2 X L4 (4EA)
                 Ass'y


                                                                             22-2. Insert your hand into the gap of the LCD Back and the
                                                                                   LCD front and then separate first, the upper part of the
                                                                                   LCD Front and second, the both sides of the LCD Front
                                                                                   then finally the bottom part of it. After that, remove
                                                                                   screw(4ea) as shown in the picture.
                                                                                   M2 X L4 (4EA)


                                                                             22-3. As shown in the picture, LCD can be disassembled
                                                                                   from LCD Cable and Camera moduel also can be
                                                                                   disassembled.
                                                                                   LCD Cable and Camera moduel disassembling method
                                                                                   refer to No 28.


             3-8                                                                                                                    NC10


Winchester_NC10_Eng.indb 8                                                                                                                    2008-09-20  1:36:56
                  -          -
                  - This Document can not be used without Samsung's authorization -


                  3. Disassembly and Reassembly

                      Part                         Picture                                              Description

                                                                                  31. Remove the Bluetooth Module.


                                                                                  32. Remove the Speaker Cable and the Speaker.


                     TOP
                     Ass'y
                                                                                  33. Remove the MIC.


                                                                                  34. Remove the Molding.


                  NC10                                                                                                            3-9


Winchester_NC10_Eng.indb 9                                                                                                        2008-09-20  1:37:02
             -          -
             - This Document can not be used without Samsung's authorization -


             3. Disassembly and Reassembly

                  Part                        Picture                                               Description

                                                                             35. Remove the Power S/W Ass'y.


                                                                             36. Confirm the arrow mark for assembly direction on the
                                                                                 Power S/W Sub board.


                 TOP
                 Ass'y                                                       37. Check the Guide in which the Power S/W at bottom will
                                                                                 be inserted, then you have to assemble the Power S/W.


             3-10                                                                                                                NC10


Winchester_NC10_Eng.indb 10                                                                                                              2008-09-20  1:37:04
                  -          -
                  - This Document can not be used without Samsung's authorization -


                  3. Disassembly and Reassembly

                      Part                         Picture                                               Description

                                                                                  38. Remove the Touch-PAD FFC (BA41-00972A, BA41-
                                                                                      00973A).


                                                                                  39. Remove the Shield-Touch PAD (BA81-05892A).


                     TOP
                     Ass'y

                                                                                  40. Remove the Touch-Pad (BA58-02418A).


                                                                                  41. During assembly, check the arrow direction, and then
                                                                                      assemble the Touch 


◦ Jabse Service Manual Search 2024 ◦ Jabse PravopisonTap.bg ◦ Other service manual resources online : FixyaeServiceinfo