Service Manuals, User Guides, Schematic Diagrams or docs for : Samsung Laptop samsung r520
<< Back | HomeMost service manuals and schematics are PDF files, so You will need Adobre Acrobat Reader to view : Acrobat Download Some of the files are DjVu format. Readers and resources available here : DjVu Resources
For the compressed files, most common are zip and rar. Please, extract files with Your favorite compression software ( WinZip, WinRAR ... ) before viewing. If a document has multiple parts, You should download all, before extracting.
Good luck. Repair on Your own risk. Make sure You know what You are doing.
Image preview - the first page of the document
>> Download samsung r520 documenatation <<
Text preview - extract from the document
- -
- This Document can not be used without Samsung's authorization -
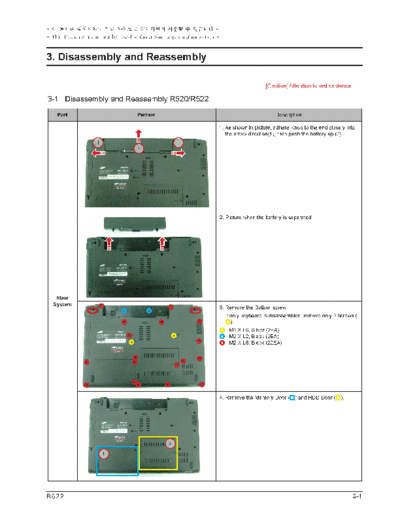
3. Disassembly and Reassembly
[Caution] Attention to red sentence
3-1. Disassembly and Reassembly R520/R522
Part Picture Description
1. As shown in picture, adhere Knob to the end closely into
the arrow direction(1), then push the battery up (2).
1 1
2
2. Picture when the battery is separated
Main
System
3. Remove the Bottom screw.
If only keyboard is disassembled, remove only 2 screws (
)
: M2 X L6, Silver (2EA)
: M2 X L2, Black (2EA)
: M2 X L8, Black (22EA)
4. Remove the Memory Door ( ) and HDD Door ( ).
2
1
R522 3-1
- -
- This Document can not be used without Samsung's authorization -
3. Disassembly and Reassembly
Part Picture Description
5. Remove the memory by pushing the fixed-tap out and
Remove the WLAN Antenna.
6. INSULATOR by lifting the HDD up to about 70 degrees
direction.
Main
System
7.Remove the DVD to the arrow direction as shown in the
picture
8. Remove Bottom Screw
: M2 X L2, Black (2EA)
3-2 R522
- -
- This Document can not be used without Samsung's authorization -
3. Disassembly and Reassembly
Part Picture Description
9. Push the HOOK up inwards by using a pin-set and then
lift the keyboard up.
[Caution]
Be careful not to scratch on top of the keyboard or LCD
panel when you push the hook up.
10. Lift the top side of the keyboard up carefully as shown in
the picture
Main
System
11. Lift the keyboard up, and then take the FPC out after
lifting the Connector Lock.
12. Remove the speaker cable connector.
R522 3-3
- -
- This Document can not be used without Samsung's authorization -
3. Disassembly and Reassembly
Part Picture Description
13. Separate the Touch Pad by pushing the connector to the
arrow direction
14. Separate it by lifting up by holding the center part of the
Top as shown in the Front cover picture.
Main
System
15. Remove 7 cables (LCD, microphone, DC In, USB sub
board, camera, Bluetooth, RJ11).
16. Camera Cable for Tape off when you listen to the will to
separate.
3-4 R522
- -
- This Document can not be used without Samsung's authorization -
3. Disassembly and Reassembly
Part Picture Description
17. Cable the status of separation.
18. Separate USB Sub board by removing the screw (2 EA)
as shown in the picture.
Main
System 19. After you remove the Hinge Screw gojeongyong Bottom
Lift it up and separate the top LCD Assembly.
20. After separate status LCD Assembly.
R522 3-5
- -
- This Document can not be used without Samsung's authorization -
3. Disassembly and Reassembly
Part Picture Description
21. ODD Sub board Main board and lift the right to
separation.
22. Main board of the separate
Main
System
23. ODD Connector Module Connector to separate the lock
of the picture (Lock) and then, FFC will detach.
24. WLAN Fixed Screw (1EA) to separate and then in the
direction of the arrow.
3-6 R522
- -
- This Document can not be used without Samsung's authorization -
3. Disassembly and Reassembly
Part Picture Description
25. FAN connector of separate deuleoolrinda Themral
module by separating the Screw.
Main
System 26. Screw fixed to the left of the CPU contains the following
turned up completely separate.
27. Remove the screw (6 EA) after removing Rubber-LCD
Cap as shown in the picture.
[Caution]
Be careful not to make scratch on the LCD Panel when you
removing Rubber-LCD Cap.
LCD
Ass'y 28. From inside the LCD Front deuleoolrinda carefully.
[Caution]
If necessary, and to use the LCD on the front namukal
geulhimyi to avoid.
R522 3-7
- -
- This Document can not be used without Samsung's authorization -
3. Disassembly and Reassembly
Part Picture Description
29. Satin in the Hinge Screw Hinge each of the two
gaessikeul deuleoolrinda decomposition.
30. LCD Panel to Hinge deuleoolrinda removed from the
bottom.
LCD
Ass'y 31. Inverter for CCFL Type LCD Screw 1 EA, so more must
be separate.
When you lift the LCD module should be separate with
Inverter.
32. Screw 2 contains a shake up the top of the reinforcement
plate.
3-8 R522
- -
- This Document can not be used without Samsung's authorization -
3. Disassembly and Reassembly
Part Picture Description
33. Camera module Camera module and the connector to
disconnect the deuleoolrinda.
34. For the cover of the Mic Mic Cable, and then will
disconnect.
35. Remove from Camera Cable for LCD Back.
TOP
Ass'y
36. LCD Panel LCD Cable disconnect back to back.
CCFL Type LCD on top, and the Connector, Inverter-side
connector shall be a separation.
R522 3-9
- -
- This Document can not be used without Samsung's authorization -
3. Disassembly and Reassembly
Part Picture Description
37. LCD Panel LCD Bracket jwawoocheuk Screw for each
part to separate the three gaessikeul.
LCD
Ass'y
38. Touchpad FFC is separate and the Speaker.
TOP
Ass'y
39. Screw 2 EA will take to remove the DC in Jack cable.
Bottom
Ass'y
40. The push in the direction of the arrow Hook Lift up
separate Bluetooth.
41. Separate RJ11 lifted.
3-10 R522
- -
- This Document can not be used without Samsung's authorization -
3. Disassembly and Reassembly
Part Picture Description
42. After the complete decomposition of Bottom Assembly.
Bottom
Ass'y
R522 3-11
- -
- This Document can not be used without Samsung's authorization -
3. Disassembly and Reassembly
3-12 R522
◦ Jabse Service Manual Search 2024 ◦ Jabse Pravopis ◦ onTap.bg ◦ Other service manual resources online : Fixya ◦ eServiceinfo