Service Manuals, User Guides, Schematic Diagrams or docs for : Samsung Plasma PS42V6S chassis D73A disassembly_and_reassembly_168
<< Back | HomeMost service manuals and schematics are PDF files, so You will need Adobre Acrobat Reader to view : Acrobat Download Some of the files are DjVu format. Readers and resources available here : DjVu Resources
For the compressed files, most common are zip and rar. Please, extract files with Your favorite compression software ( WinZip, WinRAR ... ) before viewing. If a document has multiple parts, You should download all, before extracting.
Good luck. Repair on Your own risk. Make sure You know what You are doing.
Image preview - the first page of the document
>> Download disassembly_and_reassembly_168 documenatation <<
Text preview - extract from the document
Disassembly & Reassembly
12. Disassembly & Reassembly
12-1 Overhaul Disassembly & Reassembly
Caution
- Be sure to separate the power cord before disassembling the unit.
- Discharge the capacitors first when separating PCB's with high capacity capacitors such as SMPS, X Drive Board, Y Drive
Board, etc. (Sparks may be generated by an electric charge, and there is a danger of electronic shock.)
- Check that the cables are properly connected referring to the circuit diagram, when disassembling or assembling the unit and
take care not to damage the cables.
- Take care not to damage the Glass Filter at the front.
- Assemble the boards in the reverse order of the disassembly.
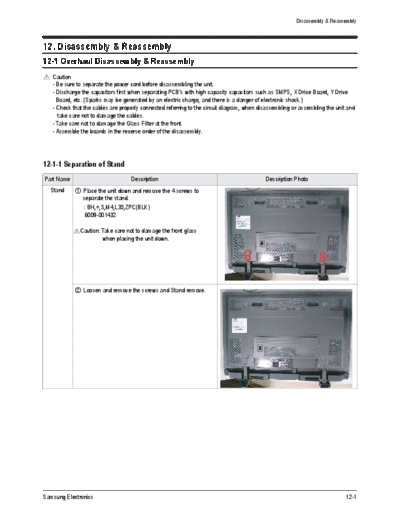
12-1-1 Separation of Stand
Part Name Description Description Photo
Stand Place the unit down and remove the 4 screws to
separate the stand.
: BH,+,S,M4,L35,ZPC(BLK)
6009-001432
Caution: Take care not to damage the front glass
when placing the unit down.
Loosen and remove the screws and Stand remove.
Samsung Electronics 12-1
Disassembly & Reassembly
12-1-2 Separation of Sub Cover Back
Part Name Description Description Photo
Sub Cover Remove all marked screws
Back
Loosen and remove the screws and Cable
Holder remove.
12-2 Samsung Electronics
Disassembly & Reassembly
12-1-3 Separation of Main Board
Part Name Description Description Photo
Audio Separate the cables connected to the Main Board
Board remove
Loosen and remove the 4 screws.
Separation of Power Button, IR Receiver PCB.
Samsung Electronics 12-3
Disassembly & Reassembly
12-1-4 Separation of Back Cover
Part Name Description Description Photo
Back Remove all marked screws
Cover
Take care not to damage the back cover when
removing it.
12-1-5 Separation of Function Key
Part Name Description Description Photo
Function Key Remove all marked screws
12-4 Samsung Electronics
Disassembly & Reassembly
12-1-6 Separation of Audio Board Sub Back
Part Name Description Description Photo
Audio Remove all marked screws
Board Sub
Back
Remove the Sub Back.
12-1-7 Separation of Power Inlet socket
Part Name Description Description Photo
Power Inlet Loosen and remove the 3 screws.
socket
Samsung Electronics 12-5
Disassembly & Reassembly
12-1-8 Separation of Speaker
Part Name Description Description Photo
Speaker Remove all marked screws.
Remove the speaker by carefully pulling it out with your
hands the speaker may cause damage to it.
12-1-9 Separation of Main SMPS, DC-DC SMPS
Part Name Description Description Photo
Separate the cables connected to the Main SMPS first
and then remove the screws.
Separate the cables connected to the DC-DC SMPS
and then remove the screws.
12-6 Samsung Electronics
Disassembly & Reassembly
12-1-10 Separation of LogicBoard, X DriveBoard, Y Drive Board, Buffer Board , Address Buffer Board
Part Name Description Description Photo
Board Separate the cables connected to the Logic Board and
then remove the screws.
Separate the cables connected to the X Drive Board
and remove the screws.
Separate the cables connected to the Y Drive Board
and remove the screws.
Separate the Y Buffer Board and the Address Buffer
Board depending on the problem
Samsung Electronics 12-7
MEMO
12-8 Samsung Electronics
◦ Jabse Service Manual Search 2024 ◦ Jabse Pravopis ◦ onTap.bg ◦ Other service manual resources online : Fixya ◦ eServiceinfo