Service Manuals, User Guides, Schematic Diagrams or docs for : Samsung Range Electric NE597R0ABSR Troubleshooting

<< Back | Home

Most service manuals and schematics are PDF files, so You will need Adobre Acrobat Reader to view : Acrobat Download Some of the files are DjVu format. Readers and resources available here : DjVu Resources
For the compressed files, most common are zip and rar. Please, extract files with Your favorite compression software ( WinZip, WinRAR ... ) before viewing. If a document has multiple parts, You should download all, before extracting.
Good luck. Repair on Your own risk. Make sure You know what You are doing.


Image preview - the first page of the document
Troubleshooting


>> Download Troubleshooting documenatation <<

Text preview - extract from the document
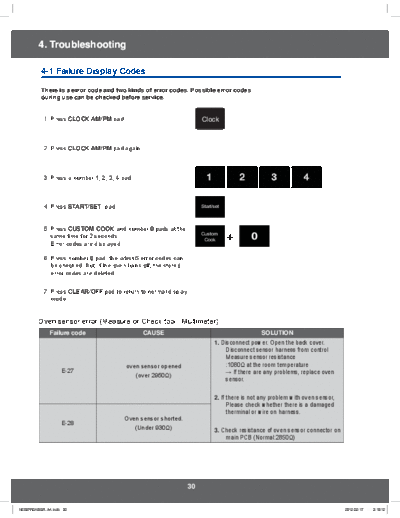
4. Troubleshooting

4-1 Failure Display Codes

There is a error code and two kinds of error codes. Possible error codes
during use can be checked before service.


 1. Press CLOCK AM/PM pad.                                    Clock


 2. Press CLOCK AM/PM pad again.


 3. Press a number            pad.


 4. Press START/SET pad.                                      Start/set


 5. Press CUSTOM COOK and number 0 pads at the
    same time for 2 seconds.
    Error codes are displayed.
                                                              Custom
                                                               Cook       +
 6. Press number 0 pad, the latest 5 error codes can
    be checked. But, if the oven turns off, the stored
    error codes are deleted.


 7. Press CLEAR/OFF pad to return to normal display
    mode.


Oven sensor error (Measure or Check tool : Multimeter)
   Failure code                       CAUSE                                           SOLUTION
                                                                    1. Disconnect power. Open the back cover.
                                                                        Disconnect sensor harness from control
                                                                        Measure sensor resistance
                                oven sensor opened                      :1080 at the room temperature
       E-27                                                                If there are any problems, replace oven
                                   (over 2950 )
                                                                        sensor.

                                                                    2. If there is not any problem with oven sensor,
                                                                          Please check whether there is a damaged
                                                                          therminal or wire on harness.
                               Oven sensor shorted.
       E-28
                                  (Under 930 )                      3. Check resistance of oven sensor connector on
                                                                        main PCB (Normal:2850 )


                                                         30
4. Troubleshooting

4-1 Failure Display Codes

Safety error
   Failure code            CAUSE                                    SOLUTION

                                                 1. Disconnect power. Open the back cover.
                                                    Disconnect sensor harness from control.
                                                    Measure sensor resistance:1080 at
       E-08           Oven heating error            the room temperature If there are any
                                                    problems, replace oven sensor.
                                                 2. Check the broil, bake and convection heater.
                                                    Check the resistance of the each heater.
                                                 3. Check whether DLB of Main PCB, Broil, Bake
                                                    and Convection heater relay are being worked
                                                    normally.
                                                 4. Check whether there is any disconnection of
      E-0A            Oven heating over             harness which is linked with main PCB on sub
                                                    PCB.
                                                 5. Check the resistance of oven sensor
                                                    connector on main PCB. (Normal : 2850 )

                                                 1. Check whether cable of keypad has been
                                                    inserted into connector of Sub PCB.
                                                 2. Check whether between Sub PCB and
                                                    connector or keypad and cable have a short
      - SE -             Shorted key
                                                    circuit.
                                                 3. If there is not a problem occurred with
                                                    connector on Sub PCB and cable of keypad,
                                                    replace the Sub PCB.
                                                 1. Disconnect power. Open the back cover.
                                                    Check wether harness has been connected
                                                    with door lock switch and motor.
                                                 2. Con rm whether resistance value of door lock
                                                    motor is to be normal one or not.
      E-0E            Door locking error         3. With operating door lockout, measure a
                                                    voltage of connector on harness which is
                                                    linked with door lock motor.
                                                    (Normal Voltage : AC 120V)
                                                 4. Check whether door locking switch is being
                                                    worked normally.


                     oven sensor opened          1. After 20 seconds from starting to work of
       E-27
                        (over 2950 )                oven, buzzer is beeping 10 times long and
                                                    then nally it displays "E-27" or "E-28" as
                                                    Error message.
                                                 2. If a series of function for error is not performed
                     Oven sensor shorted.           at all, please make sure through the method
       E-28                                         of 4-1 on 31 page.
                        (Under 940 )


                                            31
4. Troubleshooting

4-1 Failure Display Codes


                       "E-27"
                         or
                       "E-28"


                                                                 oven sensor
                  Disconnect power


           Measure sensor resistance.                   No
                                                             Replace oven sensor
           (1080 at the room temperature)


                              Ok                                   END


       Check the connecting condition of harness             *reconnect
                                                        No
       (Oven sensor and No CN02 of Main PCB)                 *repair damaged
                                                              harness replace.
                              Ok
                                                                  (Main PCB)
                                                                    (Main PCB)
         Measure resistance of connector CN02
         of Main PCB (Nomal : 2850 )

                              No

       Make sure the pattern, soldering, damaged
       parts related to oven sensor of Main PCB,
       and repair them or replace Main PCB
       according to case.


                        END
                                                                       CN02


                                                   32
4. Troubleshooting

4-1 Failure Display Codes

Safety error
   Failure code           CAUSE                                   SOLUTION
                                               1. It will display "E-08" after buzzer is beeping 10
                                                  times long if it could not reach 100 F(38 c)
                                                  within 10 minutes during oven is working.

       E-08          oven heating error
                                               2. Please make sure through the method of
                                                  4-1 on 31 page, if if those series of working
                                                  for informing error take long time or not
                                                  functioned.
                                               1. It will display "E-0A" after beeping 10 times Bz
                                                  long, if temperature is more than 600 F(316 c)
                                                  during oven is working excluding the case of
                                                  self-cleaning.
      E-0A           Oven heating over
                                               2. Please make sure through the method of
                                                  4-1 on 31 page, if those series of working
                                                  for informing error take long time or not
                                                  functioned.


                                          33
4. Troubleshooting

4-1 Failure Display Codes

Safety error


                   "E-08" or
                   "E-0A" or
                   "E-0E"


         Disconnect power and sub PCB


      * DLB, Bake, Broil,convection relay
        check.(Nomal:     )                                          * Replace Sub PCB
                                                    No
      * Check whether there is any damaged                           * Solder again if pattern is damaged
        parts of sub PCB pattern.                                      or parts is wrong contacted.


                         Ok
                                                                                   END

      * Measure oven sensor resistance.
        (1080 at the room temperature)              No               *Reconnect after replacing the oven
      * Check the connecting condition of                             sensor.
        harness related with oven sensor.

                                                                                   END
                         Ok


      * Check connector and harness connected to Sub PCB.       No
      * Check whether harness on connector
        (CN04, CN05) of main PCB is connected nomally
        into the connector(CN04, CN05) or not.


                                                                                CN04          CN05

                         Ok


                                                                No
       With replacing sub PCB or main PCB, and make set work.
                                                                            Replace or repair the harness.


                     END                                                    Replace sub PCB or main PCB


                                                      34
4. Troubleshooting

4-1 Failure Display Codes
  Failure code                          CAUSE                                                   SOLUTION
                                                                            *Control lockout(press cooking time and Delay
                                                                            start pads at the same time for 3 seconds.)

                                                                            When 1 minute elapsed, It will display "E-
                                                                            0E" after buzzer is beeping 10 times long, if
                                                                            locking is occurred continually, or door locking
     E-0E                         Door locking error                        is not working during self-cleaning or steam is
                                                                            being operated.

                                                                            Please make sure through the method of
                                                                            4-1 on 31 page if those series of working
                                                                            for informing error take long time or not
                                                                            functioned.


                      E-0E


       *Disconnect power.
       *Get rid of harness connected with Lock motor
                                                                                                NO
                                                                                                     COM
                                                                                           Door lock motor
       * Micom switch check (com-NC,com-NO)
       * Measure resistance of Lock motor                         No
                                                                                 * Replace micro switch or Lock motor.
         Coil.(1750~1850 at the room temperature)


                                                                                                END
                          Ok


       *Check whether                                                  No
       *Check whether voltage(AC 120V) is offered to lock motor
        with letting lock work or not.


                          Ok


        *Check whether harness connected normally into CN501       No
         of main PCB.
                                                                                    * Repair damaged harness or
                                                                                      replace


        *Measure resistance CN501 of main pcb.                                      * Replace main PCB.
                                                                            No      * Solder again if pattern is
        (COM-NO: at the room temperature)
         *COM : black color                                                           damaged or parts is wrong
         *NO : yellow color                                                           contacted.


                                                                                                END


                                                            35
4. Troubleshooting

4-1 Failure Display Codes
  Failure code                        CAUSE                                             SOLUTION
                                                                  When 10 seconds elapses, It will display
                                                                  "-SE-" after buzzer is beeping 10 times long
                                                                  if between main PCB and cable connector or
                                                                  keypad and cable have a short circuit.
     -SE-                            short key
                                                                  Please make sure through the method of
                                                                  4-1 on 31 page if those series of working
                                                                  for informing error take long time or not
                                                                  functioned.


                                                      Key
                                                      Connector
                      - SE -                          (CN01)


        *Disconnect power.
        *Take out keypad cable from the main PCB.
                                                                       Sub PCB (Back)
                                                                  * Repair the area of circuit
                                                                    having short between
                                                                    connector(CN01) pins on sub
        * Check whether between connector(CN01)       No            PCB.
          pin and pin on sub PCB have a short                     * Repair after confirming
          circuit.                                                  whether pattern is between
                                                                    micom and connector have
                                                                    a short circuit or get damaged.

                           Ok
                                                                               END


         *Make sure whether between keypad and         No
                                                                    * Replace or repair keypad
          cable have a short circuit.


                           Ok
                                                                               END

         *Replace Control PCB. (Touch Control PCB+Glass)


                       END


                                                                           Control PCB


                                                           36
4. Troubleshooting

4-1 Failure Display Codes

Control PCB Operation
Sort of Control PCB


      Main PCB


                      ( Front )        ( Back )


      Sub PCB


                      ( Front )        ( Back )


      Membrane


                                  37
4. Troubleshooting

4-1 Failure Display Codes

* Explain of primary parts of Main PCB


                                                                                               IC02
                                                                                               (7812)
                                                                                                IC03
      CN06                                                                                      (7805)

                                                                                                CN10


                                                                                                 ZNR1
                                                                                                 (Varistor)


                CN04,CN05      CN02 CN01                                     CN03
                                                                              CN08, CN09


Explatin of the function of primary parts.
              This is connector which is connected with Door plunger switch and Door lock switch.
    CN01
              (COM-NO)
    CN02      This is connector which is connected with oven sensor.
              This is to stop operating self-cleaning and steam mode if hot indicator lamp on cooktop is
    CN03
              lighted with being supplied with AC120V(L1, N).
 CN04,CN05    This connector is to get all operating of relay on sub PCB to be connected.
              This is consisted of 15 pin and take a role of getting a cable on keypad to connect with touch
    CN06
              PCB.
              This is to supply power with primary on Low voltage transformer, and AC120V with main PCB
 CN08,CN09    through harness.
              It won t be problem even though CN08 and CN09 has been changed when you insert housing.
              This is connector which take a role of supplying secondary voltage of Low voltage transformer
    CN10
              with main PCB.
              This is the element to protect main PCB, getting varistor to work if over voltage is supplied with
   ZNR1
              varistor.
    IC02      This is to supply DC12V with main PCB by voltage regulator.
    IC03      This is to supply DC5V with main PCB by voltage regulator.


                                                      38
4. Troubleshooting


   SYMPTOM                          DIAGNOSIS                                             REMEDY

                     *   Measure an input voltage. (240 120V
                                                                      *   check circuit breaker.
                         or 208 120V)
                                                                      *   Make sure that the state of wire is
                     *   Measure an input voltage of terminal
                                                                          connected with Terminal block.
                         block.

                     *  Measure voltage of
                        connector(CN08,CN09) on main                  *   Replace of repair if harness has been
                        PCB L1~N : 120V                                   loosen or disconnected.
                     * Measure secondary voltage of Low               *   Replace if resistance of Low voltage
                        Voltage Transformer.                              transformer primary coil is over M .
                       Red + Red color : 13.5V                            (Thermal Fuse out)
                      Yellow + Yellow color : 8V
                                                                      *   Replace sub PCB if relay has been
                     *   Make sure that the relay on sub PCB              damaged or there is any cracking on the sub
oven not operating       is being worked normally.                        PCB.
(No power,                                                            * Repair harness is connected main PCB with
                                                                          sub PCB.
No display)          *   Make sure whether harness between
                         connector (CN04,CN05) on sub                 * After con rming whether harness has been
                         PCB and connector (CN04,CN05)                    inserted into relay on sub PCB or not, take
                         on main PCB has been loosen or                   action follow as;
                         disconnected.                                - Replace or repair harness.
                                                                      - Replace or repair sub PCB.
                     *    Measure resistance both ends of
                          terminal on thermostat.
                          (normal : 0 ohoms)
                     * Check whether harness is connected             *   Replace the thermostat.
                          terminal on thermostat has been             *   Replace or repair harness.
                          loosen or disconnected.
                                                                      *   Replace or repair after con rming the state
                     * Measure voltage regulator                          of working of main PCB.
                          (IC02,IC03) on main PCB.
                     - IC02 : 7812(DC 12V)
                     - IC03 : 7805(DC 5V)
                     *   It will display "E-08" if it fail to reach   *   Replace after checking whether there is
                         100 F(38 C) within 10 minute in a                any problem with oven sensor.
                         state of room temperature.                       (1080 at the Room temperature)
                     *   Make sure whether harness is
                         connected with Broil, Bake and
                                                                      *   Repair and replace harness.
                         convection heater has been loosen
Oven temperature         or disconnected.
is risen slowly.
                                                                      *   After taking out terminal from each heater,
                     *   Make sure whether Broil, Bake,
                                                                          measure resistance of heater and then
                         and convection heater has been
                                                                          replace that if it is not a normal resistance
                         disconnected.
                                                                          value.
                     *   Make sure that heater relay and              *   Replace or repair relay.
                         pattern on sub PCB.                          *   Replace or repair sub PCB.


                                                            39
4. Troubleshooting


   SYMPTOM                        DIAGNOSIS                                        REMEDY


                    *   Check whtether temperature is risen
                                                                *   Replace or repair it if relay on sub PCB or
                        over 400 F(202 C) within 10 minutes
                                                                    main have a short circuit.
                        in a state of room temperature.
Oven temperature
is risen fast.
                    *   Check whether harness has been
                                                                *   Replace or repair harness.
                        misconnected or have a short circuit.
                    *   Measure resistance values of each
                        heater are within a normal extent or    *   Replace heater is in a abnormal state.
                        not.
The self-cleaning
feature will not
                                                                *   The self-cleaning feature will not operate
operate when
                    *   This is in normal state.                    when warming center or warming drawer
warming center or
                                                                    is on.
warming drawer
is on.
                    Make sure that keypad cable on touch        Replace after con rming whether it has been
                    PCB is in normal state.                     loosen or disconnected.
Keypad is not
worked normally     Make sure connector (CN07) on main          Replace or repair after con rming whether
in partially or     PCB or PCB pattern.                         keypad cable has been loosen or disconnted.
entirely.
                    Check whether touch control PCB has         Replace assembly of touch control pcb. ( PCB
                    been damaged.                               + Glass touch)
                    *   Check warmer drawer relay (Ry06)        * Replace terminal(T03) or relay(Ry06).
Warmer drawer           on sub PCB and terminal(T03).           * Replace sub PCB.
heating is not      *   Measure whether resistance value
working.                of warmer drawer heater is in normal    * Replace warmer drawer heater.
                        extent or not.
                                                                *   Replace or repair if harness has been
                                                                    loosen or disconnected.
                    *   Check the oven lamp relay (Ry09) on
                                                                *   Replace oven lamp relay(Ry09) or Ry-
Oven lamp is not        sub PCB and connector (CN01).
                                                                    source relay.(Ry01)
working.
                                                                *   Replace Sub PCB.
                    Measure the resistance value of both        *   Replace lamp if it has been disconnected.
                    ends of lamp terminal.                          (120V 40W)


                                                      40
4. Troubleshooting


    SYMPTOM                         DIAGNOSIS                                      REMEDY

                      *   Make sure that Radiant element
                          or In nite switch corresponded
                                                                *   Replace In nite switch or Radiant element.
                          RR(Right Rear), RF(Right Front),
                          LR(Left Rear), LF(Left Front).

                      *   Check whether harness is
                          connected with radiant element or
Cooktop is not            In nite switch has been loosen or
working or being          disconnected.                         *   Replace or repair harness
occurred a            *   Check whether there is any crack or
abnormal working.         the area of being disconnected of
                          harness.
                                                                *   Replace or repair Warming Center.
                      *   Measure whether RC(Rear Center)           relay(Ry07)
                          Heater has been connected with        *   Replace or repair Warming Ry-source relay.
                          warming center relay(Ry07) on sub     *   Replace sub PCB.
                          PCB normally or not.                  *   Replace or repair if harness has been
                                                                    loosen or disconnected.
                      Check whether Convection fan              *   Replace or repair Relay.
                      relay (Ry08) on sub PCB and
                      connector(CN01) is in normal.             *   Replace or repair connector.
Convection fan is
not rotated.          Make sure whether harness between         *   Replace or repair harness.
                      connector(CN04, CN05) on sub PCB
                                                                *   Replace or repair connector.
                      and connector(CN04, CN05) on main
                      PCB has been connected normally.          *   Replace sub PCB.
                                                                *   It has smell or smoke with burning dirt in
It has smell or                                                     oven or a foreign substance when oven has
smoke when oven                                                     been working initially.
                      This is in normal state.
has been started
initially.                                                      *   Ventilate after getting self cleaning mode to
                                                                    work.
LED display
is a little bit
                      *   LED display is inferior.              *   Replace main PCB.
dim partially or
invisible entirely.
There is not
buzzer beep           Check the state of buzzer on main PCB
sound when            and whether PCB pattern have a short      *   Replace or repair main PCB.
keypad is being       circuit or has been open.
worked.


                                                       41
4. Troubleshooting

4-2 Electrical Malfunction

Safety error


                                                             (Terminal Block)

                            No power                                                                 L1    L2 : 240V
                                                        L1                                L2         L1    N : 120V
                               or                                                         (Red)
                                                        (Black)                                      L2    N : 120V
                            No display
                                                                             N
                                                                             (White)


                  *Check terminal block voltage.                   No                  * Reset the circuit breaker
                  AC 240V/120V or AC208V/120V
                                                                                         or check main power.
                                  Yes
                                                                                                     END
               *Thermostat open check. (150


◦ Jabse Service Manual Search 2024 ◦ Jabse PravopisonTap.bg ◦ Other service manual resources online : FixyaeServiceinfo