Service Manuals, User Guides, Schematic Diagrams or docs for : apple Apple Studio Display M2454 Repairing-USB-Ports-2093
<< Back | HomeMost service manuals and schematics are PDF files, so You will need Adobre Acrobat Reader to view : Acrobat Download Some of the files are DjVu format. Readers and resources available here : DjVu Resources
For the compressed files, most common are zip and rar. Please, extract files with Your favorite compression software ( WinZip, WinRAR ... ) before viewing. If a document has multiple parts, You should download all, before extracting.
Good luck. Repair on Your own risk. Make sure You know what You are doing.
Image preview - the first page of the document
>> Download Repairing-USB-Ports-2093 documenatation <<
Text preview - extract from the document
Repairing Apple Studio Display M2454 USB Ports
Repairing Apple Studio Display M2454 USB Ports
Tools used in this guide
2mm Hex Screwdriver
Phillips #2 Screwdriver
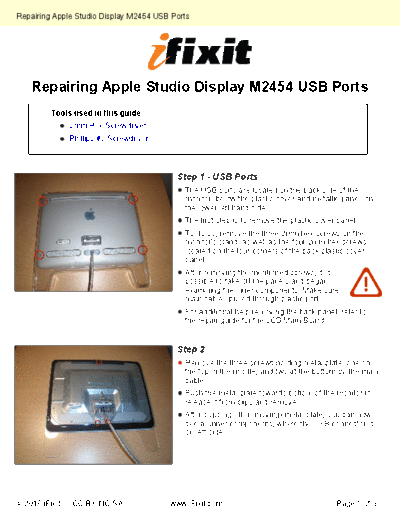
Step 1 - USB Ports
The USB ports are located on the back side of the
monitor, below the plastic cover and metallic panel; on
the lower left hand side.
The first step is to remove the plastic cover panel.
To do so, remove the three 2mm hex screws on the
monitor's stand, as well as the four 2mm hex screws
located on the four corners of the back plastic cover
panel.
After removing the mentioned screws, it is
possible to take off the panels and began
examining the inner components. Make sure
main cable i pulled through plastic port.
For additional help removing the back panel, refer to
the repair guide for the LCD Main Board.
Step 2
Remove the three screws holding metal plate, one on
the top in the middle, and two at the bottom by the main
cable.
Push the metal plate towards bottom of the monitor to
release it from clips and remove.
After popping off (removing) metal plate, you can now
see all inner components, where the USB connector is
on left side.
◦ Jabse Service Manual Search 2024 ◦ Jabse Pravopis ◦ onTap.bg ◦ Other service manual resources online : Fixya ◦ eServiceinfo