Service Manuals, User Guides, Schematic Diagrams or docs for : panasonic Audio SA-PTX7EB MD0704019CE doc 7jiwma1
<< Back | HomeMost service manuals and schematics are PDF files, so You will need Adobre Acrobat Reader to view : Acrobat Download Some of the files are DjVu format. Readers and resources available here : DjVu Resources
For the compressed files, most common are zip and rar. Please, extract files with Your favorite compression software ( WinZip, WinRAR ... ) before viewing. If a document has multiple parts, You should download all, before extracting.
Good luck. Repair on Your own risk. Make sure You know what You are doing.
Image preview - the first page of the document
>> Download 7jiwma1 documenatation <<
Text preview - extract from the document
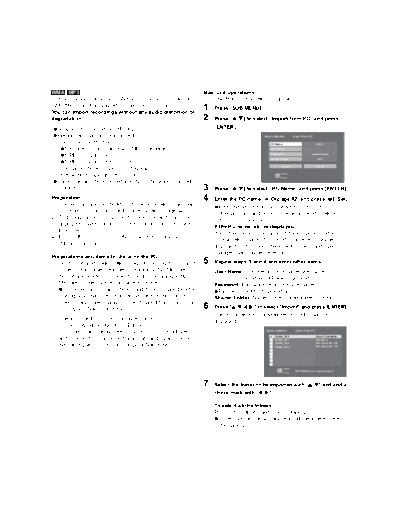
WMA MP3                                                            Main unit operations
With a network connection (LAN home network), you can save         From the Main Screen (    OI page 24)
WMA/MP3 data from your PC in the HDD of this unit.
You can import recordings without any audio distortion or
                                                                   1   Press [SUB MENU].

degradation.                                                       2   Press [      ] to select "Import from PC" and press

  Supported OS: Windows XP SP2                                         [ENTER].
  File formats that can be imported                                                          Music Collection            Impor t fr om PC

   extensions: WMA,MP3                                                                           PC Name                                     ADGJ
      MP3 files in compliance with MP3 standards                                                 User Name
                                                                                                 Passwo rd
      MPEG-1 Audio Layer III
                                                                                                 Shared Folder                                F40
      MPEG-2 Audio Layer III (LSF)
                                                                                                          Impor t                            Cancel
   compatible bitrate: 32 kbps to 192 kbps
                                                                                                          ENTER
   files without copyright restrictions                                                                    Cancel

  Tracks can also be Imported from NAS (Network Attached
  Storage).                                                        3   Press [      ] to select "PC Name" and press [ENTER].
Preparation                                                        4   Enter the PC name (       OI page 62) and press [ ] (Set).
1 Connect this unit and the PC to the network ( OI page 94),
                                                                          Enter the name that you checked in step 2 of
   or connect this unit and the PC directly ( OI page 84).
                                                                          "Preparations and items to check on the PC" ( left)
2 To display the picture turn on the television and select the            (Up to 15 characters).
   appropriate video input to suit the connections to this unit.
                                                                       If the PC name, etc. is displayed
3 Press [ ].
                                                                       If you have previously imported data or performed a
4 Press [MUSIC COLLECTION] to switch the selector to                   backup ( OI page 81), then PC name, etc. may be
   "Music Collection".
                                                                       displayed. In this case, check the PC name and make any
                                                                       changes that may be necessary.
Preparations and items to check on the PC
                            C
1 Set the "Shared Folder " ( OI page 45,Setting the "Shared        5   Repeat steps 3 and 4 and enter other items.
   Folder"), and move the folder containing WMA/MP3 files to           User Name: The user account name used when
   the "Shared Folder", or move the folder containing WMA/                        Windows XP was registered.
   MP3 files to the "Shared Documents" folder.                         Password: Password set for the user name
     It is necessary to name the PC and the PC Shared Folder            Passwords will be displayed as " *************** ".
     using only characters that can be used on this unit. If           Shared Folder: Name of the shared folder on the PC.
     necessary, make changes to the "Shared Name" and "Full
     Computer Name" on the PC.                                     6   Press [           ] to select "Import" and press [ENTER].
                                                                       The list inside the shared folder on the PC will be
2 Checking the PC name (Computer name).
                                                                       displayed.
  e.g., For "Windows XP Home Edition"
                                                                                              Music Collection            Impor t fr om PC
  From the "Start" menu, select "System" in "Control Panel",
                                                                                                      Folder_003                             Impor t Complete
  and click on the "Computer Name" tab, and make note of                                              Folder_001                             Updatin g
                                                                                                      Folder_002                             Not Impor ted Yet
  the name given in the "Full Computer Name" field.                                                   Folder_004                             Not Impor ted Yet


                                                                                                             ENTER
                                                                                                                           [LEFT/RIGHT] to c heck/unc heck
                                                                                                                Cancel


                                                                   7   Select the folder to be imported with [                                 ] and add a
                                                                       check mark with [         ].

                                                                       To select all the folders
                                                                       Press [SUB MENU] and select "Mark All".
                                                                        To remove the check marks from all the folders, select
                                                                         "Unmark All".
◦ Jabse Service Manual Search 2024 ◦ Jabse Pravopis ◦ onTap.bg ◦ Other service manual resources online : Fixya ◦ eServiceinfo