Service Manuals, User Guides, Schematic Diagrams or docs for : . Car Manuals Subaru Forester 1999-2004 Approved Subaru Forester 1999-2000 AUTOMATIC TRANSMISSION MSA5T0128A34688
<< Back | HomeMost service manuals and schematics are PDF files, so You will need Adobre Acrobat Reader to view : Acrobat Download Some of the files are DjVu format. Readers and resources available here : DjVu Resources
For the compressed files, most common are zip and rar. Please, extract files with Your favorite compression software ( WinZip, WinRAR ... ) before viewing. If a document has multiple parts, You should download all, before extracting.
Good luck. Repair on Your own risk. Make sure You know what You are doing.
Image preview - the first page of the document

>> Download MSA5T0128A34688 documenatation <<
Text preview - extract from the document
                                        DRIVE PINION SHAFT
Automatic Transmission

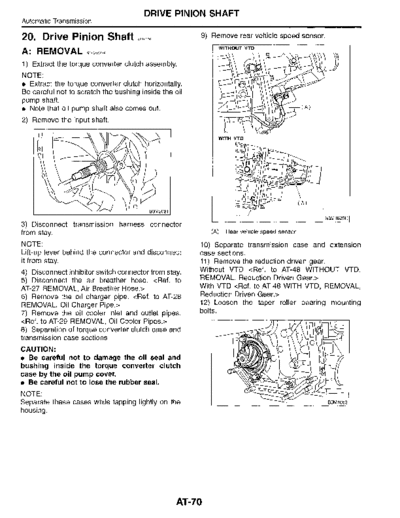
20 . Drive Pinion Shaft              x,02,6            9) Remove rear vehicle speed sensor.

A : REMOVAL 55,oz,sA,e
1) Extract the torque converter clutch assembly .
NOTE:
  Extract the torque converter clutch horizontally.
Be careful not to scratch the bushing inside the oil
pump shaft.
  Note that oil pump shaft also comes out.
2) Remove the input shaft.


3) Disconnect transmission harness connector
from stay.                                                (A)   Rear vehicle speed sensor

NOTE :                                                 10) Separate transmission case and extension
Lift-up lever behind the connector and disconnect      case sections .
it from stay.                                          11) Remove the reduction driven gear.
4) Disconnect inhibitor switch connector from stay.    Without VTD
AT-27 REMOVAL, Air Breather Hose.>                     With VTD
REMOVAL, Oil Charger Pipe .>                           12) Loosen the taper roller bearing mounting
7) Remove the oil cooler inlet and outlet pipes.       bolts.

8) Separation of torque converter clutch case and
transmission case sections
                                                                                            O
CAUTION:
* Be careful not to damage the oil seal and
bushing inside the torque converter clutch
case by the oil pump cover.
9 Be careful not to lose the rubber seal .
NOTE :
Separate these cases while tapping lightly on the                                               B3M1063
housing .


                                                  AT70
                                           DRIVE PINION SHAFT
                                                                                              Automatic Transmission

13) Place two wooden blocks on the workbench,                 CAUTION :
and stand the transmission case with its rear end             Be careful not to damage O-ring .
facing down .                                                 17) Remove the drive pinion assembly.
CAUTION:
. Be careful not to scratch the rear mating sur-              B : INSTALLATION              S510276A11

face of the transmission case .                               1) Assemble the drive pinion assembly to the oil
  Note that the parking rod and drive pinion                  pump housing .
protrude from the mating surface.
                                                              CAU TIO N.
                                                              " Be careful not to bend the shims.
                                                              " Be careful not to force the pinion against the
                                                              housing bore .
                                                              2) Tighten four bolts to secure the roller bearing .
                                                              Tightening torque:
                                                                  41 N~m (4.2 kgf-m, 30.4 ft-Ib)
                                   55 mm
                                   (2 .17 in)

                                            B3M1064A


14) Remove the oil pump housing .
CAUTION:
Be careful not to lose the total end play adjust-
ing thrust washer.


                                                              3) Attach the O-ring to the oil seal retainer with
                                                              vaseline . Install the seal to the oil pump housing
                                                              bore .
                                                              CAUTION:
                                                              Always discard old O-rings and install new
                                                              ones .


   (A)   Oil pump housing                                                       -~oL' O
15) Remove the oil seal retainer .
Also remove the O-ring and oil seal (air breather) .                   o        (A>
                                                                                   \~J
◦ Jabse Service Manual Search 2024 ◦ Jabse Pravopis ◦ onTap.bg ◦ Other service manual resources online : Fixya ◦ eServiceinfo