Service Manuals, User Guides, Schematic Diagrams or docs for : . BIOS HP !HP DMI TOOL! NbDmiFit11D
<< Back | HomeMost service manuals and schematics are PDF files, so You will need Adobre Acrobat Reader to view : Acrobat Download Some of the files are DjVu format. Readers and resources available here : DjVu Resources
For the compressed files, most common are zip and rar. Please, extract files with Your favorite compression software ( WinZip, WinRAR ... ) before viewing. If a document has multiple parts, You should download all, before extracting.
Good luck. Repair on Your own risk. Make sure You know what You are doing.
Image preview - the first page of the document
>> Download NbDmiFit11D documenatation <<
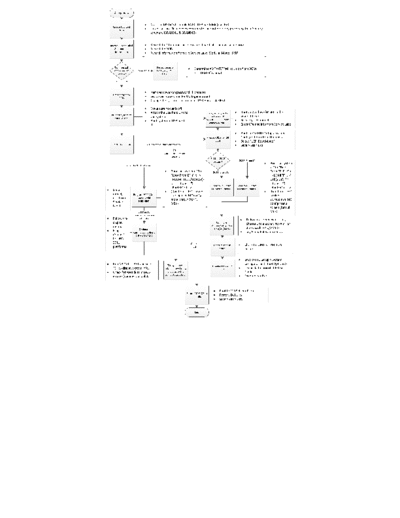
Text preview - extract from the document
Start process
Make an MS-DOS bootable FAT32 USB hard disk (use 4GB)
Create USB tool
drive
Unzip the tool file and copy contents to the root directory preserving the directory
structure (BRAND11 & BRAND12)
Record Service Label Record the CT number on the system board label below the memory
& CT number Record the PCID
information Record information from the Service Label (Serial #, Model, SKU)
Commercial Record security
Determine AMT/AT/TPM inclusion from BOM
or Consumer Commercial (AMT/AT/TPM)
system? status TPM off (China)
Consumer
Remove Power-on password (if present)
Prepare system
BIOS
Set system date/time (for UUID generation)
Change the system boot-order to "USB Hard Disk FIRST"
Make sure power is off.
Attach the USB hard disk to Program any 2012 Boot to Windows/WinPE and run
Prepare system to wndmifit.exe
run DOS tool
the system. system with
Boot system to USB hard WNDMIFIT.EXE from Select system model
Windows/WinPE
disk. Enter CT# and info from Service Label
Boot to F10 BIOS Setup > System
Prepare BIOS for EFI Configuration > Boot Options >
boot Select "UEFI Boot Mode"
Run NBDMIFIT.BAT 2012 Commercial systems only Save > Yes > Exit.
2011
Commercial systems
security
2011 or 2012
system? 2012: Brand12
Boot the system
All 2007-2011 systems
> F9 > "Boot
Boot the system > F9 > 2011: Brand11 From EFI File" >
"Boot From EFI File" > "NBDMIFIT, .../
"NBDMIFIT, .../Usb(2.0)/ Usb(2.0)/..." >
..." > "Brand11"> "Brand12">
Boot to USB drive Boot to USB drive
"Bootx64.efi" > EFI mode Brand11 EFI mode Brand12
"Bootx64.efi" >
Serial, (Don't press ESC to skip (Don't press ESC
model, Program 2007-2011 startup.nsh) ME config to skip
etc. from systems with
menu screen (for Full startup.nsh) ME
Service NBDMIFIT
ME) > config menu
Label screen (for Full
2007-2010 ME) >
Commercial systems
Follow the security
Follow on-screen instruction,
display Configure
choose 1 to enable vPro/AMT or
menu. commercial options
Configure (TPM/AT/AMT) 3 to disable vPro/AMT >
Program key 9 and Enter, to reboot.
commercial options
ConfigID (TPM/AT/AMT)
for bNB
2011 Consumer
Confirm system Check for AMT & TPM BIOS
platforms systems
state entries.
Boot to F10 Setup > System
Run NBDMIFIT.BAT and select The system will Configuration > Boot Options >
Disable EFI boot in
"D" to display system info. reboot a few times, BIOS
Uncheck the box of "UEFI Boot
Check for AMT & TPM BIOS and display the Mode"
config state at final. Save > Yes > Exit.
entries (commercial only).
Boot to F10 Setup > File >
Return F10 BIOS to
defaults
Restore Defaults
Save > Yes > Exit.
End
◦ Jabse Service Manual Search 2024 ◦ Jabse Pravopis ◦ onTap.bg ◦ Other service manual resources online : Fixya ◦ eServiceinfo