Service Manuals, User Guides, Schematic Diagrams or docs for : . Rare and Ancient Equipment NEA NEAPSUInstallationInstructions
<< Back | HomeMost service manuals and schematics are PDF files, so You will need Adobre Acrobat Reader to view : Acrobat Download Some of the files are DjVu format. Readers and resources available here : DjVu Resources
For the compressed files, most common are zip and rar. Please, extract files with Your favorite compression software ( WinZip, WinRAR ... ) before viewing. If a document has multiple parts, You should download all, before extracting.
Good luck. Repair on Your own risk. Make sure You know what You are doing.
Image preview - the first page of the document
>> Download NEAPSUInstallationInstructions documenatation <<
Text preview - extract from the document
`````
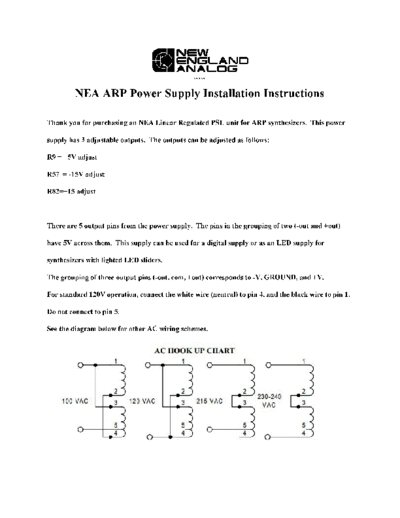
NEA ARP Power Supply Installation Instructions
Thank you for purchasing an NEA Linear Regulated PSU unit for ARP synthesizers. This power
supply has 3 adjustable outputs. The outputs can be adjusted as follows:
R9 = +5V adjust
R57 = 15V adjust
R82=+15 adjust
There are 5 output pins from the power supply. The pins in the grouping of two (out and +out)
have 5V across them. This supply can be used for a digital supply or as an LED supply for
synthesizers with lighted LED sliders.
The grouping of three output pins (out, com, +out) corresponds to V, GROUND, and +V.
For standard 120V operation, connect the white wire (neutral) to pin 4, and the black wire to pin 1.
Do not connect to pin 5.
See the diagram below for other AC wiring schemes.
To install this PSU in an Odyssey, the old PSU must be removed to make room for the new
one. The holes for the old PSU can be filled with either the old nuts and bolts, or can be left
empty. The NEA PSU mounts in the base of the Odyssey. In early Odysseys, the base is
vinyl and detachable, and on newer units, the base is an integral part of the case. To make
the 4 mounting holes needed to mount the PSU, use an awl, or other sharp instrument to
mark started holes where you are going to drill. This is easily done by placing the PSU
where it is going to be mounted, and while firmly holding the assembly in place, poking an
awl through the PSU base mounting holes to mark your starter holes. The PSU ships with
the screws attached to the base in the manner that they are to be mounted to the base of the
Odyssey. The power switch can be wired in the same manner as on the original ARP PSU.
Remember to leave enough slack in the PSU input and output wires to make servicing
possible. Spade jacks (as used in speaker systems) can be used for ease of disconnection.
Always be sure that the PSU is going to fit in the spot you are mounting it. Take care to
mount the PSU in a manner where it doesn't make unwanted contact with PCBs or pins
from the power switch. Take your time when doing this installation. Thanks for your
purchase!
◦ Jabse Service Manual Search 2024 ◦ Jabse Pravopis ◦ onTap.bg ◦ Other service manual resources online : Fixya ◦ eServiceinfo