Service Manuals, User Guides, Schematic Diagrams or docs for : . Various CHINA TV TV Div Service Mode`s chinese TV`s china_ctv37v10_ch_3401_3y01__ctv55v10_ch_4401_4y01___with_la8633xx_la7681__-_adj_937
<< Back | HomeMost service manuals and schematics are PDF files, so You will need Adobre Acrobat Reader to view : Acrobat Download Some of the files are DjVu format. Readers and resources available here : DjVu Resources
For the compressed files, most common are zip and rar. Please, extract files with Your favorite compression software ( WinZip, WinRAR ... ) before viewing. If a document has multiple parts, You should download all, before extracting.
Good luck. Repair on Your own risk. Make sure You know what You are doing.
Image preview - the first page of the document
>> Download china_ctv37v10_ch_3401_3y01__ctv55v10_ch_4401_4y01___with_la8633xx_la7681__-_adj_937 documenatation <<
Text preview - extract from the document
CHASSIS ALIGNMENT
1. PIF Adjustment
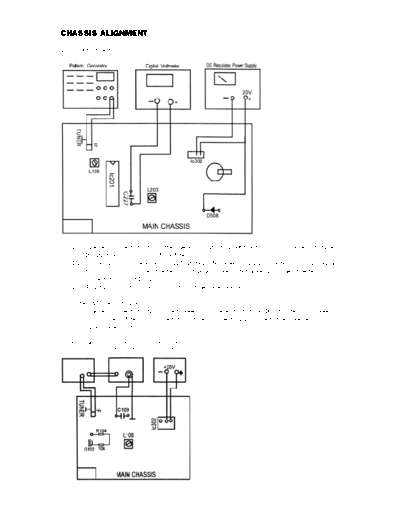
1-1 Tuner AGC connects to GND. Pattern Generator outputs 38.9MHz R.F. signal and connects to tuner
IF output terminal or pin 5 of saw filter.
1-2 Connect Digital voltmeter across C227. DC Regulated power supply positive terminal output +20V
to pin 1 of IC302 and negative terminal of D608. DC Regulated power supply negative terminal
connects to pin 2 of IC302.
1-3 Adjust L203 coil to obtain 3.6V Digital voltage meter reading.
2. System NTSC Adjust(L108)
2-1 Tuner AGC connects to GND. Connect Sweep Signal Generator to tuner IF output terminal. Sweep
oscilloscope V-IN terminal connects to C109. And connect Q102 'b' pole to the power terminal of
R104. (shown in FIG.2)
Sweep Signal Sweep DC Regulated
Generator Osciloscope Power Supply
2-2 Apply +20V DC across IC302 as shown in FIG.2.
2-3 Adjust L108 to obtain waveform as following. There will be no alignment to it without NTSC
system.
3. B+ adjustment
3-1 Disconnect horizontal load. Connect a light bulb (100 W) AC 250V across C321.
3-2 Connect 220V AC 50 Hz to CN601 and switch on power switch.
3-3 Test the voltage with digital voltage meter between C321 two terminals.
3-4 Adjust VR601 to obtain +110V +/- 0.5V.
4. AGC alignment
4-1 Receive 60dB +/- 2dB RF signal. Connect Digital voltmeter positive terminal to AGC terminal of
TUNER and negative terminal to GND.
4-2 Press "MENU" key twin, till the PICTURE MENU appears, then press "Q.VIEW" key, "MUTE" key to
turn on CPU. TV SET will go to factory mode. Press "TIMER" key to go to the next factory menu. Go
to "MENU 3" status by this means.
4-3 Select RF.AGC by pressing "CH+" or "PROG+" and "CH." or "PROG-" keys. Adjust "VOL+" and
"VOL-" keys to obtain 4V Digital voltage meter reading.
4-4 Press "MENU" key to exit factory mode.
COMPLETE MACHINE GENERAL ADJUSTMENT
1. Go to factory mode according to 4-4-2 before warm up line,
2. Focus Adjustment.
2-1 Receive monoscope pattern.
2-2 Set TV to work in dynamic status.
2-3 Adjust the focus knob of FBT to get the clearest picture.
3. Screen Voltage Adjustment.
3-1 Go to factory mode "MENU 2" status according to 4-4-2.
3-2 Select "V-KILL" by pressing "CH+" or "PROG+" and "CH-" or "PROG-" keys..
3-3 Press "VOL+" key all the time, Adjust the screen knob of FBT to get a horizontal faintness beam
line. Then loose "VOL+" key.
4. White Balance Adjustment (Applied In factory only)
4-1 Set the TV set to AV mode. Receive black white pattern (Color Temperature test pattern). 4-2
Insert 6 Pin Service flat cable into CN002. Press adjustment keys, and then go to automatic white
balance adjustment.
4-2 After adjusting well, remove the 6 Pin Service flat cable.
4. (1) White Balance adjustment (Applied when servicing)
4-1 (1) Set the TV set to AV mode. Receive black white pattern (Color Temperature test pattern),
4-2 (1) Put the test probe 1 of CRT color analyzer (CA-100) on the Low Bright area and the test probe
2 on the High Bright area. Adjust bright and contrast to get 5nit of low bright area and 80 nit of
high bright area.
4-3 (1) Go to factory mode "MENU2" according to 4-4-2. Obtain Low Bright area to x=281and y=311
by adjusting R.bias and B.bias. Obtain High Bright area to x=281and y=311 by adjusting R.drive
and B.drive. Obtain both area to x=281 and y=311 by adjusting the two status repeatedly.
5. Sub-bright adjustment
5-1 Receive GREY SCALE signal.
5-2 Set TV at normal mode.
5-3 Get into factory mode, adjust sub-bright option to make the picture same as below.
The first bar is totally dark. Brightness will begin to appear from the second bar.
6. Vertical Size and PinCushion Adjustment
6-1 Receive monoscope pattern. Set TV standard status. Adjust V.size to obtain picture's vertical
redisplay ratio more than 90% in factory mode "MENU1".
6-2 Receive cross hatch pattern. Set TV standard status. Adjust V.LINE and V.SC to obtain picture's
vertical pin cushion a good status in factory mode "MENU1".
6-3 Receive cross hatch pattern. Set TV standard status. In factory mode "MENU1" adjust V.POSITION
to obtain picture's vertical center at the center of CRT screen.
7. Horizontal Center Adjustment
Receive PHILIPS PATTERN. Set TV standard status. Adjust H.PHASE to obtain horizontal center at the
center of CRT screen.
8. Secam color decoder alignment.
Receive the GREY SCALE /COLOR BAR signals. Enter into the factory mode. Adjust the values of Secam
R-Y DC and Secam B-Y DC to make the gray scale to the normal color.
◦ Jabse Service Manual Search 2024 ◦ Jabse Pravopis ◦ onTap.bg ◦ Other service manual resources online : Fixya ◦ eServiceinfo