Service Manuals, User Guides, Schematic Diagrams or docs for : . Various Guildline eMOSS-TEST
<< Back | HomeMost service manuals and schematics are PDF files, so You will need Adobre Acrobat Reader to view : Acrobat Download Some of the files are DjVu format. Readers and resources available here : DjVu Resources
For the compressed files, most common are zip and rar. Please, extract files with Your favorite compression software ( WinZip, WinRAR ... ) before viewing. If a document has multiple parts, You should download all, before extracting.
Good luck. Repair on Your own risk. Make sure You know what You are doing.
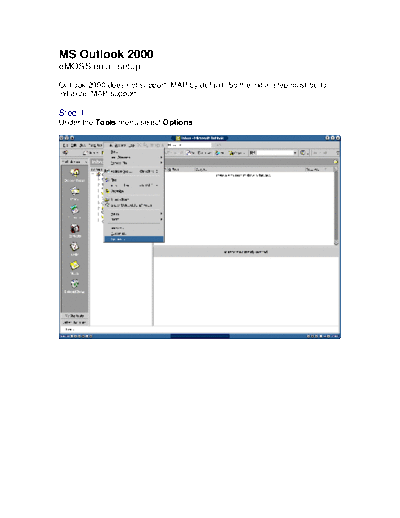
Image preview - the first page of the document
>> Download eMOSS-TEST documenatation <<
Text preview - extract from the document
MS Outlook 2000
eMOSS email setup
Outlook 2000 does not support IMAP by default. So the initial step must be to
initialize IMAP support.

Step 1:
Under the Tools menu select Options.
Step 2:
Select Reconfigure Mail Support.
Step 3:
Select Internet Only and click Next to continue.


Step 4:
Click Yes and restart Outlook 2000.
Step 5:
Enter the display name for the new email account and click Next to continue.
Step 6:
Enter your email address and click Next to continue.
Step 7:
Select IMAP from the pull-down Incoming mail server type menu.
Enter the following information:
Incoming mail (IMAP) server: imap.cata.ca
Outgoing mail (SMTP) server: frost.cata.ca
Click Next to continue.
Step 8:
Enter the username and password and click Next to continue.
(Username and password was sent via email).
Step 9:
Choose your appropriate internet connection type and click Next to continue.
Step 10:
Click Finish.


At this point IMAP support is enabled and you should notice that the Services
option from the tools menu has been replaced by an Accounts option.
Step 11:
Select Accounts from the Tools menu.
Step 12:
Select the newly created mail account and click Properties.
Step 13:
Select the Servers tab from the properties window.
Select the My server requires authentication check box and click Settings.


Step 14:
Select Log on using and enter the login information (sent via email).
Click OK to continue.
Step 15:
Select the IMAP tab from the properties window and enter INBOX. as the Root
folder path.
Step 16:
Select the Advanced tab from the properties window and enter the following
information:
Outgoing mail (SMTP) port 587
Select This server requires a secure connection.
Incoming mail (IMAP) port 993
Select This server requires a secure connection.
Click OK to complete the setup.
◦ Jabse Service Manual Search 2024 ◦ Jabse Pravopis ◦ onTap.bg ◦ Other service manual resources online : Fixya ◦ eServiceinfo