Service Manuals, User Guides, Schematic Diagrams or docs for : MAKITA 6912D-TE
<< Back | HomeMost service manuals and schematics are PDF files, so You will need Adobre Acrobat Reader to view : Acrobat Download Some of the files are DjVu format. Readers and resources available here : DjVu Resources
For the compressed files, most common are zip and rar. Please, extract files with Your favorite compression software ( WinZip, WinRAR ... ) before viewing. If a document has multiple parts, You should download all, before extracting.
Good luck. Repair on Your own risk. Make sure You know what You are doing.
Image preview - the first page of the document
>> Download 6912D-TE documenatation <<
Text preview - extract from the document
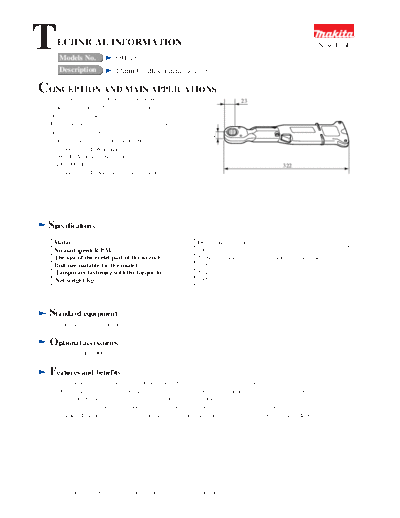
T   ECHNICAL INFORMATION
     Models No.            6912D
                                                                                                             New Tool


     Description           12mm Cordless ratchet wrench

CONCEPTION AND MAIN APPLICATIONS
  This product was developed to make temporary                                23
  fastening of bolts and nuts easier for constructing
  prefabricated houses.
  It can also be used as an ordinary ratchet wrench to
  finally tighten the bolts and nuts by swiveling its


                                                                  22
  handle clockwise with the ratchet mechanism.
  The model 6912DW is made up of
     6912D (Makita 12mm battery powered ratchet wrench)
     DC7000 (Boosting charger)                                                                 322
  The model 6912D does not include batteries.


 Specifications
   Motor                                                    DC 7.2 magnet motor
   No load speed(R.P.M.)                                    270
   The size of the eyelet part of the wrench                21 mm in thickness with two eyelet parts together
   Bolt size suitable for the model                         1/25 inches
   Temporary fastening with the torque by                   20 kg-cm
   Net weight(Kg)                                           0.85


  Standard equipment
   Socket adapter --- One piece.


  Optional accessories
   Battery model 7000


  Features and benefits
   1. The offset wrench type allows you to tighten bolts and nuts in the limited space.
   2. Great many fasteners can be tightened with one battery because the load current is effectively controlled with the
      function of a torque limiter (clutch) for fastening by the motor.
   3. You do not have to worry about rust as the housing is made of plastic and stainless steel.
   4. Standards sockets available in the market can be mounted with the use of the supplied socket adapter.


   The standard equipment for the tools shown may differ form country to country
Capacity
 Temporary tightening torque by the motor                     20kg-cm
 Number of fasteners to be tightened with one                 500 fasteners (if a bolt with the length under head of 20mm
 battery                                                      is temporarily tightened until the clutch slips.)
 Retightening allowance (Torque at which a bolt               500 kg-cm (Up to 1/2 inch regular bolt)
 can be tightened manually after the temporary
 tightening by the motor.)


Repair
 1) Replacement of the clutch


                                                              (2)Hexagon socket head cap screw


                 (1)Hexagon socket head cap screw                    Gripping position


                                                    (4)Sub-housing R
                                                                                   (6)Housing R
         Fig.1                             (3)Sub-housing L
                                                                            (5)Housing L


 (1) Loosen the hexagon socket head cap screws 1 (M4x18) and 2 (M4x25) with hexagon socket screw keys. and
     dismantle the sub-housing R and L, and housing R and L. (See the fig.1.)
                                          (12)            (13)
                     (7)                                                                  (20)       (22)
                                                                   (19)
       (8)


                                                   (14)


                                          (15)     (16)     (17)          (18)              (21)             (23)          (24)

     (9)


    (10)


    (11)

                                                                                 (27)
                                                          (25)                                                      (26)          (29)
                                                                                 (28)


                                                                                                               Fig.2


(7)Torsion spring           (8)Spring type catch           (9)Ratchet holder            (10)Socket 21                (11)Pin 4
(12)Ratchet pawl            (13)Torsion spring 7           (14)Sleeve 4                 (15)Collar                   (16)Needle bearing 1015
(17)Flat washer             (18)Spindle                    (19)Steel ball 3.5           (20)Compression spring 24    (21)Complete clutch cam
(22)Spur gear 16            (23)Internal spur gear 49      (24)Flat washer              (25)DC motor                 (26)Switch
(27)Compression spring 6    (28)Switch lever               (29)Battery holder


           (2) The parts from7 to 14 can be easily dismounted after the sub-housing R and L are taken off. Remove the housing
               R and then remove the parts from 15 to 29 out of the housing L. (Care must be taken not to misplace 27 the
               compression spring 6 in removing the parts.) (See fig.2.)

           (3) 18 the spindle, 19 steel ball 3.5 20 compression spring 2.4 and 21 complete clutch cam assembly are the clutch
               related parts. Other parts can be manually dismounted. (See the fig.2.)

           (4) Remove 21 the complete clutch cam assembly from 18 the spindle.(Be careful not to scatter19 steel balls around
               in removing the 21 complete clutch cam assembly as the 19 steel balls 3.5 are pressed against the 21 complete
               clutch cam assembly with the 21 compression spring 2.4.) See the fig. 2.

           (5) Replace the 20 Compression spring 2.4 and 21 complete clutch cam assembly together in replacing the clutch
 Assembling
 (1) Assemble the parts from 18 to 21.

                       Hold it down
                                                                Ditch


                             Grease
                   Hold it down
    (18)Spring                                               Fig.3
                 (21)Complete clutch cam assembly

    Put the 19 steel balls 3.5 with the 20 compression spring 2.4 installed between the balls into the 3.6 mm
    diameter bore at the end of the 18 spindle. Insert the steel balls aligned with the groove in the complete clutch
    cam assembly by holding the 19 steel balls down. (See the fig. 3.)

 (2) Mount the parts from (16) to (29) in the (5) housing L.


                    Place the needle bearing side on the motor side.


                                         (23)Internal spur gear 49 locking part

(5)Housing L                                                                 (28)Put the 28 switch lever through

                                             Bring the 16 needle bearing 1015 against this face.                   Fig.4


    Fit the 28 switch lever in together with the 26 switch and also the 27 compression spring 6. Insert the 17 flat
    washer 10 and 16 needle bearing 1015 in this order into the 18 spindle assembled in the above 1. Insert 3 pieces
    of the 22 spur gears 16 into the 21 complete clutch cam assembly and engage the gears with the 23 internal spur
    gear 49. Mount the 24 flat washer 15 at the same time.
    (In assembling the internal spur gear, engage one of its slots against the rotation lock. Mount the 16 needle
    bearing1015 by bringing it toward the left end as shown in the fig. 4.)(See the figs. 2, 3, & 4.)

 (3) Assemble the 6 housing R and sub-housing R. (Confirm the 18 spindle can rotate smoothly, and that there is a
     play in the axial direction after the housing and sub-housing are assembled.)
         (4) Turn the wrench upside down, and assemble the parts from 7 to 15.


(4)Sub-housing R
                                               Mount it on the main body.                              (10)Socket 21
              (5)Housing L
                                                                                                            Assemble the (10) socket 21
                                                                                                            by holding it down.

                                                                                                                      (11)Pin 4


                                                                    One with the longer
                                                                                                                        (7)Torsion spring5
                                                                    ground part.


                                                                                                                       (8)Spring type catch
                                              (15)Collar
(12)Ratchet pawl
                                  Assemble the parts from 7 to 10                                                  (9)Ratchet holder
    (13)Torsion spring            by holding them down.
                                                                                  One with the smaller diameter.
              (14)Sleeve 4


                             Fig. 5                                                            Fig.6


         Mount the 1 hexagon socket head cap screw (M4x18) in the 4 sub-housing R, insert the 14 sleeve 4, and assemble
         the 12 ratchet pawl and 13 torsion spring 7 as shown in the fig. 5.(Be careful not to catch the 14 torsion spring 7
         between the 14 sleeve and 4 sub-housing in the above assembling process.)
         Assemble the parts from 7 to 11 as shown in the fig.5, and mount the assembled one to the main body. (It is easier to
         assemble the parts with the 15 collar positioned to the other side to the 12 ratchet pawl.)

         (5) Mount the (3) sub-housing L and tighten the screws.(Install the spring washer on the nut for mounting the (1)
             hexagon socket head cap screw (M4x18).)
◦ Jabse Service Manual Search 2026 ◦ Jabse Pravopis ◦ onTap.bg ◦ Other service manual resources online : Fixya ◦ eServiceinfo