Service Manuals, User Guides, Schematic Diagrams or docs for : MAKITA 73027-WW-1

<< Back | Home

Most service manuals and schematics are PDF files, so You will need Adobre Acrobat Reader to view : Acrobat Download Some of the files are DjVu format. Readers and resources available here : DjVu Resources
For the compressed files, most common are zip and rar. Please, extract files with Your favorite compression software ( WinZip, WinRAR ... ) before viewing. If a document has multiple parts, You should download all, before extracting.
Good luck. Repair on Your own risk. Make sure You know what You are doing.


Image preview - the first page of the document
73027-WW-1


>> Download 73027-WW-1 documenatation <<

Text preview - extract from the document
TECHNICAL INFORMATION
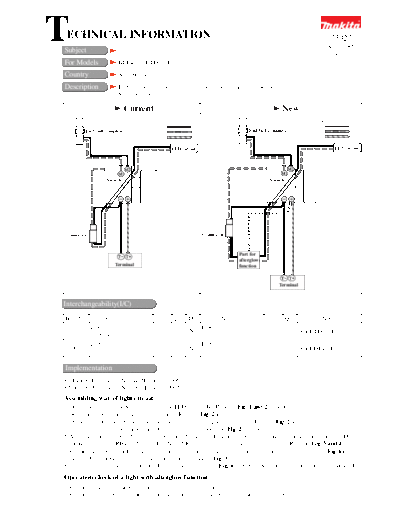
Subject                 Change of Light Circuit
                                                                                                                                  73027
                                                                                                                               April, 2005
                                                                                                                              (page 1 of 3)
For Models              BDF430F, BTD123F
Country                 All countries
Description             Light circuit has been changed for addition of afterglow function.
                        See illustration below.

                              Current                                                                New
                                  Color index of lead wires' sheath                                            Color index of lead wires' sheath
                                  Black                                                                        Black
          End bell complete       Red                                                 End bell complete        Red
                                  Orange                                                                       Orange


                                                    LED circuit                                                                     LED circuit


                   Switch                                                                      Switch


Connector                                                             Connector


                                                                                  Part for
                                                                                  afterglow
                       Terminal                                                   function


                                                                                                   Terminal


Interchangeability(I/C)
Item No.          Current part                       Q'ty I/C             New part                      Q'ty                Note
            Light Circuit                                         Light Circuit
    039                                                1       No                                         1    For BTD123F
            631579-6                                              631624-7
            Light Circuit                                         Light Circuit
    007                                                1       No                                         1    For BDF430F
            631537-2                                              631630-2

Implementation
BDF430F: From serial No. 6435E (April, 2005)
BTD123F: From serial No. 2823E (April, 2005)
Assembling way of light circuit
1. Disconnect connector A, and then remove LED circuit B. (Refer to Fig. 1 and 2 in page 2.)
2. Separate insulated terminal C from switch. (Refer to Fig. 2 in page 2.)
3. Detach orange colored lead wire from the root of the insulated terminal C (Refer to Fig. 2 in page 2.)
4. Strip the orange colored lead wire D in 7mm or 8mm. (Refer to Fig. 2 in page 2.)
5. After clamping a stripped end of orange colored lead wire E of new type light circuit and the stripped lead wire D with
   insulated terminal RBV1.25-3.5T (Part No. 654037-5), reassemble it to switch terminal. (Refer to Fig. 3 and 4 in page 3.)
6. Connect the connector Fa of the new type light circuit with the connector Fb of lead wire from switch as Fig 4 in page 3.
7. Set LED circuit G of the new type light circuit in place as Fig. 3 in page 3.
8. Install a part for afterglow function H into motor housing as Fig. 4 in page 3. And then fix housing R with housing L.
Operation check of a light with afterglow function
1. Check that the light turns on when pulling a trigger of switch.
2. Check that the light continues to illuminate for about 10 seconds after releasing the trigger.
                                                                                                         73027
                                                                                                       (page 2 of 3)
                          The current type cordless tool
Fig. 1


                                     Red colored lead wire must be slack in this point.


   Pin                                           Boss           LED circuit B


                                           Insert two lead wires for LED circuit
                                           into the bottom of lead wire holders.


                                                                                      Fig. 2
                                                                  Route a block colored lead wire (between
                                                          FET     Endbell complete and switch) to outside of the rib.
                                    Endbell complete


                                                                    DC
                                                                    Motor


                                     Pin


                                                                                                   Rib
                         Lead wire (red)                             Switch
                         from Switch


                                                                                         Insulated terminal C

         Hold the lead wires from Switch
         and LED circuit securely with
         these lead wire holders.                                                        Lead wire D
                                                                                   Insulated terminals should not
                                                                                   touch the boss.


                                                                                         Connector A


                                                        Terminal
                                                                                                                   73027
                                                                                                                  (page 3 of 3)
                                    The new type cordless tool
Fig. 3


                                            Red colored lead wire must be slack in this point.


                                                      Boss            LED circuit G

         Pin


                                                     Insert two lead wires for LED circuit
                                                     into the bottom of lead wire holders.

                                        Lead wire E


                                        Part for afterglow                                        Fig. 4
                                        function                        Route a block colored lead wire (between
                                                                    FET Endbell complete and switch) to outside of the rib.
                                                 Endbell complete


                                                                           DC
                                                                           Motor


                                           Pin


                                Lead wire (red)                                                            Rib
                                from Switch                                 Switch

                                                                                             After clamping a stripped end of
                                                                                             orange colored lead wire E (Re:
                                                                                             Fig. 3) and the stripped lead wire D
               Hold the lead wires from Switch                                               (Re: Fig. 2) with insulated terminal
               and LED circuit securely with                                                 RBV1.25-3.5T (Part No.654037-5),
               these lead wire holders.                                                      reassemble it to switch.

                                                                                             Insulated terminals should not
                                 Connector Fa                                                touch the boss.
                                                                                             Connector Fb

                                                                                             Lead wires should not touch
                                                                                             connector Fa and Fb to avoid
                Part for afterglow                            Terminal                       being pinched and damaged.
                function H


◦ Jabse Service Manual Search 2024 ◦ Jabse PravopisonTap.bg ◦ Other service manual resources online : FixyaeServiceinfo