Service Manuals, User Guides, Schematic Diagrams or docs for : MAKITA BO6030-TE

<< Back | Home

Most service manuals and schematics are PDF files, so You will need Adobre Acrobat Reader to view : Acrobat Download Some of the files are DjVu format. Readers and resources available here : DjVu Resources
For the compressed files, most common are zip and rar. Please, extract files with Your favorite compression software ( WinZip, WinRAR ... ) before viewing. If a document has multiple parts, You should download all, before extracting.
Good luck. Repair on Your own risk. Make sure You know what You are doing.


Image preview - the first page of the document
BO6030-TE


>> Download BO6030-TE documenatation <<

Text preview - extract from the document
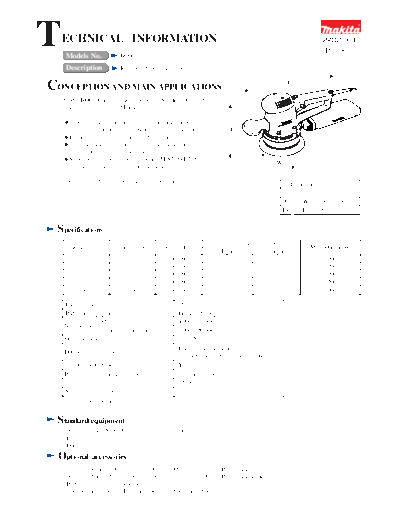
T ECHNICAL INFORMATION
     Models No.                   BO6030
                                                                                                                           PRODUCT
                                                                                                                            P1/8

     Description                  Random Orbit Sander 150mm (6")


CONCEPTION AND MAIN APPLICATIONS                                                                               L

    Model BO6030 is a new Random Orbit Sander 150mm (6")
    with two handles from Makita, featuring;

      Tough exterior construction - durable motor housing
      and sturdy aluminum fan housing - for pro's hard jobs                           H
      Ergonomic design for controlled operation
      Optimum speed selection and assorted accessories
      for a wide range of sanding jobs
      Superiority to the competing model, FESTO #ET2E
                                                                                                         W
      in sanding efficiency and dust extraction rate

    See page 2 and 3 for more detailed information.                                                             Dimensions : mm ( " )
                                                                                                              Length (L) 309 (12-1/8)
                                                                                                              Width (W) 150 (5-7/8)
                                                                                                              Height (H) 181 (7-1/8)


 Specifications
                                                                                    Continuous rating (W)
       Voltage (V)               Current (A)                Cycle (Hz)                                                 Max. Output(W)
                                                                                   Input             Output
            110                        3.0                    50 / 60               310                160                   200
            120                        2.7                    50 / 60               310                160                   200
            220                        1.5                    50 / 60               310                160                   200
            230                        1.4                    50 / 60               310                160                   200
            240                        1.4                    50 / 60               310                160                   200

    Pad diameter : mm (")                                         150 (6)
    Pad fastening system                                          Hook and Loop
                   Orbits (*min-1)                                4,000 - 10,000
    No load speed
                   Sanding stroke rate (*min-1)                   8,000 - 20,000
    Orbit diameter : mm (")                                       3.0 (1/8)
                                                                  Integral dust extraction
    Dust extraction system
                                                                  (through the sanding plate with dust bag)
    Sanding plate brake                                           Yes
    Protection from electric shock                                by double insulation
    Cord length : m (ft)                                          2.5 (8.2)
    Net weight : Kg (lbs)                                         2.3 (5.1)
    *min-1 = per minute


 Standard equipment
    *Abrasive disc 150-#120 ............................. 1 pc.
    *Hex wrench 6 ............................................ 1 pc.
    *Dust bag .................................................... 1 pc.
 Optional          accessories
    *Sanding clothes (150mm) ; Grit 100, 240, 800             *Paper pack
    *Abrasive discs (150mm) ; #40, 60, 80, 120, 180, 240, 400 *Paper pack holder
    *Pads (150mm) ; soft, super soft
    *Sponge pad (150mm), Felt pad (150mm), Wool pad (150mm)
                                                                                                             P2/8
Features    and benefits

            Lower Vibration,                                                           Effective System of
          More Efficient Sanding                                                   Integrated Dust Extraction

 Compared with competitor A's model A-a in the same class,                   The large vacuum fan for more effective dust
 BO6030 sands more than model A-a                                            extraction.
 although its vibration is almost at the same level.                         Can be connected to the Makita vacuum cleaner.
 Sanding rate                                                                (The diameter of the opening for dust ejection is
 Numbers in chart below are relative values when setting                      the same as BO5020.)
 model A-a's capacity as 100.
                                                                       Dust extracting rate (%)
                                            125
 Makita BO6030                              120
                                                                       Makita BO6030                        75
                                                                                                            61
 Competitor                           100
                                      100                              Competitor                         72
    Model A-a                                                             Model A-a                       50
                       50        100       150
 (When sanding a workpiece of spruce fir                             (When sanding a workpiece of spruce fir
  with the following abrasive papers for two minutes.)                with the following abrasive papers for two minutes.)
                   Grit :60                                                            Grit :60
                   Grit :120                                                           Grit :120

                                                   Variable Speed Control Dial
                                                                                                   Soft Rubber Grip
   Ergonomic Housing Top;                         Simply turn the dial to preselect
        optimum design                            the optimum sanding speed to suit               Fits your hand perfectly
  for single-handed operation                     the material or the desired finish.             for controlled operation.
 Fits your palm ideally because of its
 low height and round design.

  Detachable Front Handle
                                                                                                   Large and Tough
 Convenient for corner sanding.                                                                      Cord Guard
 (the same handle as BO5020)
                                                                                                 Also, its excellent flexibility
                                                                                                 protects the cable from
                                                                                                 disconnection.


      Sanding Pad Brake                                "Hook and Loop"                         Dust Bag Convenient
Saves the workpiece from sanding
                                                     Pad Fastening System                      for Disposal of Dust
scratches when the running machine                           The dust extracting holes       Can be detached by merely
is pressed against the workpiece.                            are positioned so as to         pushing a button for quick
                                                             accept the accessories of       disposal of dust.
                                                             both FESTO and BOSCH.           (the same dust bag as BO5020)


                                                                                 Paper pack holder is supplyed
                                                                                 as an optional accessory.
                                                                                 Also FESTO's paper pack can be attached
 Assorted Optional Accessories                                                   to Mod.BO6030. See page 6/8
 for a Wide Range of Sanding Jobs
  Pads; soft, super-soft                                                   Paper pack
  Abrasive discs
  Sanding cloth (for extra fine finish)
  Sponge pad
  Wool pad (for buffing)
                                                                                                   Paper pack holder
                                                                                                         P3/8


Comparison         of products

                                           Makita           Competitor A       Competitor C         Competitor B
                         Model No.
                 Spec.                    BO6030              Model A-a           Model C             Model B
 Continuous rating input (W)                310                  310                340                  400
 Rated ampere under 120V (A)                2.7
 Orbits per minute (min-1)             4,000 - 10,000       4,000 - 10,000     4,500 - 12,000      4,000 - 10,000
 Stroke per minute (min-1)             8,000 - 20,000       8,000 - 19,000     9,000 - 24,000      8,000 - 20,000
 Orbit diameter : mm (")                      3                    3                  4            Changeable in
                                                                                                       3 and 6
 Vibration           No load                 0.9                  1.2               12.1                12.9
      : (m/s2)       Loaded                  2.7                  3.5                4.0                  3.5
 Change from eccentric mode
 to eccentric+rotation mode                  No                   No                 No                  No
 Pad fastening system                 Hook and Loop         Hook and Loop      Hook and Loop       Hook and Loop
Electronic control                           No                   Yes               No                   No
of constant sanding speed            (feed-back control)
Sanding pad brake                            Yes                  Yes                Yes                 Yes
Dust extracting system                 Integral dust         Integral dust     Integral dust         Integral dust
                                       extraction            extraction        extraction            extraction
                                         by double            by double          by double            by double
 Protection from electric shock                                                                       insulation
                                         insulation           insulation         insulation
                     Length              252 (9-7/8)         230 (9)             297 (11-3/4)       286 (11-1/4)
Dimensions
                     Width              150 (5-7/8)          150 (5-7/8)        150 (5-7/8)         150 (5-7/8)
    : mm ( " )
                     Height              181 (7-1/8)         183 (7-1/4 )        183 (7-1/4)        195 (7-5/8 )
                                             2.3                  2.1               2.1                  2.7
 Net weight : kg (lbs)
                                            (5.1)                (4.6)             (4.6)                (5.9)
                                      Front handle         Dust bag (paper)    Front handle         Front handle
 Standard equipment                  Dust bag (fabric)                        Dust bag (paper)   2 Dust bags (paper)
                                      Abrasive disc                            Abrasive disc      3 Abrasive papers
  Repair                                                                                                             P4/8
< 1 > Disassembling armature
    1. Lock fan 92 (for dust extraction) with screwdriver inserted into dust extracting hole of scirt. See Fig. 1.
    2. Turn armature anti-clockwise as illustrated in Fig. 1. Then, armature can be separated from skirt.

                                                          Turn anti-clockwise .


                                                                             Armature
                      Dust extracting hole


                                                                                      Skirt


                                                                 Fig. 1

< 2 > Disassembling ball bearing 6902DDW
    1. Separate fan 92 section from skirt, after disassembling armature as illustrated in Fig. 2.
    2. Disassemble bearing retainer from fan 92 by unscrewing pan head screw M3x12. See Fig. 2.


                                    Fan 92


                                  Retaining ring S-15

           Fan 92 section Ball bearing 6902DDW

                                    Spindle

                                   Bearing retainer

                                 Pan Hd. screw M3x12


    3. Screw hex socket head bolt M8x14 (for fastening pad 150) into spindle as illustrated in Fig. 3.
       This hex socket head bolt M8x14 functions as a stopper for No.1R234 "round bar for arbor" which is to be
       inserted into the hole of fan 92 in order to separate spindle.

     4. Insert No.1R234"round bar for arbor" into armature installing hole of fan 92. And press it by arbor press
        as illustrated in Fig. 3A. Then, spindle, 2 pcs.of ball bearing 6902DDW and retaining ring S-15 can be removed.


              View from pad installing side                               View from armature installing side

       Spindle                                  Hex socket head bolt M8x14
                                                (for fastening pad 150)                          No.1R234 Round bar for arbor

                                                        Fan 92


                                                                                              Retaining ring S-15
                                                      Ball bearing 6902DDW
                        Fig. 3                                                                    Fig. 3A
                                                                            Spindle
Repair                                                                                                          P5/8
  5. Ball bearing 6902DDW puts pressure on retaining ring S-15 which is engaged in the groove of spindle,
     because it has been slidden closely to the retaining ring S-15, when separating from fan 92. See Fig. 4.

                           Before disassembling

                                                          Retaining
                                                          ring S-15


                                                        Ball bearing
                                                        6902DDW
      Fan 92             After disassembling
                                                                                       Fig. 4

                                                          Retaining              Ball bearing 6902DDW has been
                                                          ring S-15              slidden closely to the retaining ring S-15,
                                                                                 and puts pressure on retaining ring S-15.


                                                        Ball bearing
                                                        6902DDW
  6. In order to take off pressure on retaining ring S-15, put the spindle on No.1R037 "bearing setting plate"
     as illustrated in Fig. 5, and press the spindle. So, ball bearing 6902DDW is returned to the original position.
     Consequently the pressure on retaining ring S-15 is taken off, and it can be easily disassembled from spindle
     as illustrated in Fig. 5A.

      Press with arbor press.
                                                                            Retaining ring S-15


                                                                       Ball bearing 6902DDW
       Spindle                              Spindle
                                                                                   Spindle
                                                                                                      Fig. 5A


                 No.1R037 "Bearing setting plate"
                                Fig. 5

  7. Put the spindle from which retaining ring S-15 has been taken off, on No.1R037 "bearing setting plate" as
     illustrated in Fig. 6. And disassemble ball gearings 6902DDW by pressing spindle.

                  Press with arbor press.


                                No.1R037 "Bearing setting plate"

                                               Fig. 6
 Repair                                                                                                            P 6/8

< 3 > Assembling rubber guard
      The lip portion of rubber guard has to fit in the groove of skirt as illustrated in Fig. 7.


                                                       Lip


                                                                                                    Rubber guard
                                   Groove


                                 Skirt


                                                                                 Fig. 7


< 4 > Attaching the other manufacturer's accessory
      FESTO's paper pack can be attached to Mod.BO6030, too. In this case, open the paper film with your finger.
     And attache the paper pack to paper pack holder. See Fig. 8.


      Open the film here with your finger.
                                                                                             Paper pack holder


                                                    Fig. 8
Circuit   diagram                                                                                                     P7/8

 With choke coil
                                                                                                                   to field

                                                                      Support
    Color index of lead wires                                         complete
   Black
   Orange
   Purple
   White
   Transparent
                                            Choke coil


                                                                                                        Choke coil
                     white or blue                                    Controller
                     The other lead wires are
                                                                      Switch
                     as per the color index listed
                     above.                                       4    3    2      1


                                                                                                  Noise suppressor
                                                Power supply cord

Wiring    diagram
                 Fix lead wires with            Controller lead
                                                wire (Black)               Support lead wire (Black)
                 lead holder.
                                                                                   Support lead wire (Orange)


     Support lead wire (Black)
                                                                                                Fix lead wires with
   Support lead wire (Purple)                                                                   lead holder.


   Fix support lead                                                                                 Do not make the lead wires
   wire (Purple) with                                                                               loose in this area.
   lead holder.


 Fix choke coil lead                                   Controller
 wire (Purple) and controller lead wire                                                    Fix lead wires with
 (white) to be connected to brush holder,                                                  lead holder.
 with lead holder.


  Put the loose portion of lead wires,                   Switch                    Put the loose portion of controller lead wire
  choke coil and insulated terminal                                                into the space between boss and controller.
  in this space.


              Inflect the terminal as per
              the illustration to reserve the
              space for noise suppressor.                                  Noise suppressor
Circuit   diagram                                                                                                         P8/8
                                                 Without choke coil


    Color index of lead wires
   Black
                                                                         Support
   Orange
                                                                         complete
   Purple
   White
   Transparent


                        white or blue                                    Controller
                        The other lead wires are
                                                                         Switch
                        as per the color index listed
                        above.                                       4    3      2      1


                                                                                                        Noise suppressor
Wiring     diagram                                 Power supply cord

                  Fix lead wires with            Controller lead
                                                 wire (Black)              Support lead wire (Black)
                  lead holder.
                                                                                   Support lead wire (Orange)


      Support lead wire (Black)
                                                                                                    Fix lead wires with
   Support lead wire (Purple)                                                                       lead holder.


   Fix support lead                                                                                    Do not make the lead wires
   wire (Purple) with                                                                                  loose in this area.
   lead holder.


  Fix controller lead wire                              Controller
  (white or blue ) to be connected                                                             Fix lead wires with
  to brush holder and support lead wire                                                        lead holder.
  (purple), with lead holder.

  Put the loose portion of lead wires
  in this space.                                          Switch
                                                                                     Put the loose portion of controller lead wire
    Put the loose portion of lead wires                                              into the space between boss and controller.
    and insulated terminal into this space.


               Inflect the terminal as per
               the illustration to reserve the
               space for noise suppressor.                                    Noise suppressor


◦ Jabse Service Manual Search 2024 ◦ Jabse PravopisonTap.bg ◦ Other service manual resources online : FixyaeServiceinfo