Service Manuals, User Guides, Schematic Diagrams or docs for : MAKITA UM401D-TE

<< Back | Home

Most service manuals and schematics are PDF files, so You will need Adobre Acrobat Reader to view : Acrobat Download Some of the files are DjVu format. Readers and resources available here : DjVu Resources
For the compressed files, most common are zip and rar. Please, extract files with Your favorite compression software ( WinZip, WinRAR ... ) before viewing. If a document has multiple parts, You should download all, before extracting.
Good luck. Repair on Your own risk. Make sure You know what You are doing.


Image preview - the first page of the document
UM401D-TE


>> Download UM401D-TE documenatation <<

Text preview - extract from the document
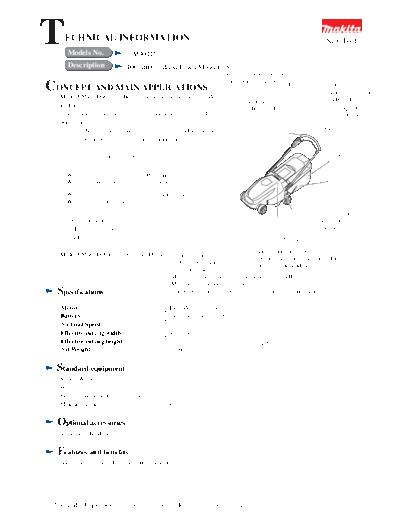
T     ECHNICAL INFORMATION
      Models No.                UM401D
                                                                                                                      New Tool


      Description              400mm Cordless Lawn Mower Switch lever is comfortable
                                                                             to grip for long operation.
                                                                             with lock-off button
CONCEPT AND MAIN APPLICATIONS                                                                          Rear bag (Cut lawn is collected.)
                                                                                                                     Cutting height can
   Model UM401DW is cordless lawn mower powered with 24V                                                             be adjusted
                                                                                    with lock-off button
   lead battery.                                                                                                     by the sigle lever.
                                                                                    Folding handle
   Its effective cutting width by rotary blade is 406mm(16"). Its                                                    6 different heights:
   brief benefits are;                                                                                               25mm(1")-
             *No pollution owing to no exhaust gas and less noise                                                    89mm(3-1/2")
             *Can mow approx.75 min.. continuously(approx.
   l200m )


                                                                                                                          1010mm(39.3/4")
               from a single charge.


      Without rear bag                  Mulching
      With mulching plate               (Scattering cut lawn to turf)

      With rear bag                     Collecting cut lawn
      Without mulching plate
                                                                                                                   Charge meter
      *Chaging time                                                                                                shows how much
                                                                   48


       3Hr :.75% charge                                                                                            charge is left
                                                                        2m
                                                                         m


       4Hr : Full charge                                                                  1316mm(51.3/4")
                                                                             (1
                                                                              9"
                                                                                  )


   Model UM4OlDW is with Charger DC240. Cutting capacity                  Interlocking key for safety switch
                                                                          Without key in position tool does
                                        1200m2 from a single charge
                                                                          not start unintendedly.
                                        Charging time
                                        4Hr Competitors' tools'charging time are 16-24Hr.
                                        Mulching(scattering cut lawn to turf)
  S pecifications                       can be performed without rear bag but with mulching plate

   Motor                                          DC 24V magnet motor
   Battery                                        24V lead battery (15Ah)
   No Load Speed                                  3800rpm
   Effective cutting width                        406mm(16")
   Effective cutting height                       25mm(1")-89mm(3-1/2") ------ 6 heights
   Net Weight                                     31.9kg (70.3 lbs)


  Standard equipment
   Socket Wrench 13 ------------------------- 1 pc.
   Wrench 32 ---------------------------------- 1 pc.
   Key(for interlocking safety switch) ----- l pc.
   Mulching Plate ------------------------------1 pc.


  Optional accessories
   Swing Saw Blade 406


  Features and benefits
   See the sheet attached for more information.


 The standard equipment for the tools shown may differ form country to country.
 Repair
*Cautions in repairing
  Caution (1) : Be sure to turn off the interlock switch and take away the key before repairing for safety.
  Caution (2) : This machine consists of the battery. If the curling has been removed, the battery and lead wire will be
           exposed. Use care not to get a short circuit. Especially take care that the metal ruler and driver etc. in
           the breast pocket may not drop on the machine when you have bent forward.
  Caution (3) Many strong impact proof resins(polypropylene) are used for this machine. Since fastening the tapping
           screws by the excessive torque may damage the female screws, be sure to apply the tool fastening
           torque as specified. Do not fasten manually or never use the tool that cannot set the torque as
           specified.

       Torque set for the tool when fastening the screws
           (1) Tapping screw flange PT 4x18                            =>            8-12 kgf-cm (0.6 - 0.9 ft-lbs)
               Note that the following is excluded.
                     i) For the cord lamp of deck and switch box       =>           10-12 kgf-cm (0.7- 0.9 ft-lbs)
                     ii) For the plate of front/rear shafts            =>           12-16 kgf-cm (0.9-1.2 ft-lbs)
           (2) Tapping screw flange PT 4x25                            =>            8-12 kgf-cm (0.6 -0.9 ft-lbs)
           (3) Tapping screw flange PT 5 x25                           =>           18-22 kgf-cm (1.3-1.6 ft-lbs)
               (For battery holder complete)
           (4) Tapping screw flange PT 5X25                            =>           10-14 kgf-cm (0.7-1.0 ft-lbs)
               (For control panel)

  1.Disassembling of blade
    To disassemble the motor assembly, remove the blade beforehand. See the instruction manuals for disassembling
    methods.

  2.How to remove the cowling
                                                                       Remove the rear bag, and then loosen the
     PT 4X25 Tapping screw flange PT4x25                               tapping screw PT4x25(2 pieces) and
                                                                       PT4x18(2 pieces) for mounting the curling
                                   PT 4X18 Tapping screw flange PT4x18 to disconnect the curling.


  3.Replacing of the battery
                                                                              Loosen the +Hexagon bolt M5x12(2
                                                                              pieces) to remove the lead wire from the
                          PT5X25 Tapping screw flange PT5x25
                                                                              battery.
                                              Temperature fuse complete       Loosen the tapping screw flange
    Lead wire                                                                 PT5x25(2 pieces).


                                                  M5 Hexagon nut M5

                                                  Battery holder complete


                                                    PT5X25 Tapping screw flange PT5x25

                                   +Hexagon bolt M5x12
                                    Sponge sheet B                          Slide the battery holder complete until
                                                                            the sponge sheet B touches with the
                                                                            temperature fuse complete.


                                              Slide away
                                                                                                  Remove.


  Slide the battery holder complete upward to take away it.
  Remove the battery from deck and then replace it.

  Be sure to place the temperature fuse complete between
  batteries.


4.How to remove the motor assembly
                                                                              Engage the box wrench 10 with both
                                                                              hexagon lock nut M6-10 and hexagon
                                                                              bolt M6x40, and then disassemble the
                                     Hexagon lock nut M6-10(4 pieces)         hexagon bolt M6x40 and the fix plate.
      Motor assembly
                                                                           
                                                                              Fasten the hexagon bolt M6x40 under
                                                                              the tool setting torque of 40-60 kgf-
                                                                              cm[2.9-4.3 ft-lbs] when assembling.


                                            Fix plate(2 pieces)
                                            Hexagon bolt M6x40(4 pieces)
5.Disassembling of motor assembly
                                                                          Loosen the hexagon holed stop screw M8 x 8
                                                                          (Adhesive attached) to remove the blade holder
  Small protrusion                                                        from the armature.
                                   End bell
                                                                          Loosen the hexagon bolt M5x115(2 pieces) to
                                   Ball bearing 6000LLB
                                                                          disassemble the motor assembly.
                                   Armature

                               Yolk unit
                                                            Flat washer 17
                                                            Ball bearing 6203LLB
   Small dent portion                 Square
                                      hole
                                                                 Bearing box


 Large dent portion
                                                                Hexagon bolt M5x115(2 pieces)
  Large protrusion                                              Blade holder(Dust cover mounted)

                                     Plate               Hexagon holed stop screw M8x8(adhesive adhered)
 Protrusions at 4 corners


      Fasten the hexagon bolt M5x115 under the tool setting torque of 20-30 kgf-cm[1.4-2.2 ft-lbs] when

      assembling. Make fit of each dent and protruded portions on the end bell, yolk unit, plate and bearing box,
      respectively.

6.How to remove the connecting rod, front shaft and rear shaft


                                                                          Flat washer 4(one piece)
                                                                          Tapping screw flange PT4x18(one piece)
                            Deck                                                  Boss
                                           Remove the
                                           tension spring 12.                        Circle clip(shaft)S-8
                                                                                       Rear shaft
                                                                                            8" wheel


                                                                                                Cap
                                                                          Deck
                                                                     Tension spring 12
                                                                 Connecting rod
                                                                 Circle clip(shaft)S-8    Bolt with step 3/8-16 UNC
    Plate(4 pieces)                                                 7" wheel
                                     Front shaft
     Tapping screw flange PT4x18(8 pieces)                                 Cap

                                                           Bolt with step 3/8-16 UNC


   Remove the wheel cap and then loosen the bolt with step 3/8-16 UNC to disconnect the 7" wheel and 8" wheel.
   Loosen the tapping screw flange PT4x12(1 piece) to remove the flat washer 4. Remove the tension spring 12
   from the boss on the deck. Remove the circle clip(shaft)S-8 from the front and rear shafts. Remove the
   connecting rod.
   Loosen the tapping screw flange PT4x18(8 pieces) on the back of the deck to remove the plates(4 pieces)
   Remove the front shaft and rear shaft from the deck.

   Assemble the shorter side of the                           Front shaft side
   connecting rod on the front shaft.

   For the tension spring 12, first assemble the connecting rod side                 Short
   and then insert the hook at back side into the root of boss on the deck.


                                                                      Boss
                                                                                 Insert into the root.
                                                                                                              Boss


                                                Connecting rod

7.Disassembling of the control panel

                                                             Control panel

                                          Cap                       Claw(6 pieces)


                             Hexagon nut M12


             Caulking(5 points)
                                                                                  Switch plate

             O.C.R.
                                                                  Inlet


                                                                          Control panel holder


                                                                 Tapping screw flange PT4x12(2 pieces)

                                                   Switch
                                   Indicator

   Loosen the tapping screw flange PT4x12(2 pieces) to remove the claws at 6 points, and then disassemble the
   control panel and control panel holder.
   To disassemble the inlet, cut off the lead wire.


   Assemble the switch while the switch lever is being turned off.
   Use care of directions for up/down when assembling the indicator.
   Assemble the O.C.R. while the face with 5 caulking faced up.
   How to assemble the inlet cover

                      Hole                                                        Set the torsion spring 4 on the inlet
                                                            Inlet cover
                                                                                  cover as shown on the figure and
                                                                                  then insert the longer arm of the
                                                                                  torsion spring 4 through the hole of
                                                                                  control panel.

           Control panel(main side)     Torsion spring 4
                                                                   Insert the spring pin 3-28 in the direction
                                                                   shown on the figure and then mount the inlet
                                                                   cover.


                                    Spring pin 3-28


8.Disassembling of the switch box


                                                                 Switch lever
                                    Switch lever arm


                       witch box


         Switch box cover                                   Remove
                                                            with bending.


                                          Tapping screw flange PT4x18
                                                                                     Handle


   Slightly bend the switch lever and then remove the switch lever from the handle.
   Loosen the tapping screw flange PT4x18(4 pieces), and remove the switch box and switch box cover from the
   handle.
    Caution : Use care not to miss the compression spring 16 as it may potentially jump out.
                                                                        Disconnect the E ring 12 to remove the

                                                                        15, lever and switch

                                                                        lever arm etc.


  Sinwasher        E ring 12         Lever
      

          Set the torsion spring 20 on the lever as shown on the figure.


                                                           Torsion spring 20


                                                           Lever


                          Switch box                                                        Insert the U-shaped hook of the
             Boss
                                                                                            tension spring 5 through the hole of
                                                                                            lever. Also set the circle-shaped hook
                                                                                            on the boss of the switch box.
                                                                                            Mount the lever on the switch lever
Tension spring 5                                                                            arm which has been pre-mounted on
                                                                                            the switch box.
                                                                                            Set the thin washer 15 and E ring
                                                                                            12 to fix.

     Switch lever arm
                              Lever


          Cross boss    Compression spring 16                                  Handle


                                             Lever
                                                                                        Switch button


                                        Cover the switch
                                        box cover.

                                                                                          Insert the boss through the hole on the handle.


         Switch box cover                                               Switch box


          Insert the boss(2 pieces) of the switch box equipped with the lever and switch button through the hole on the
          handle to assemble.
          Set the compression spring 16 on the cross boss of the switch box cover, and then mount the switch box cover on
          the switch box.
Circuit drawing

        Switch


White        Red Black
                                            Current relay
                                                            Indicator                   Switch
                                                                            Inlet

                                                                                                 Red
                  Cord unit

                                                                                                  Red
                                    Relay
                                                                                                      Temperature fuse complete

                     White                                                                       Red
                                                                                     Red
                 Receptacle sleeve                 White
                                                   White
    Red      Black            Red


                                                                                              Black

                             Red
                                                                        Battery
          Black                                                                     Battery


                                                                    Insulation cover


                                                                           Black


                                   Motor


                                   Black

                       Connector at closed end


◦ Jabse Service Manual Search 2025 ◦ Jabse PravopisonTap.bg ◦ Other service manual resources online : FixyaeServiceinfo