Service Manuals, User Guides, Schematic Diagrams or docs for : Asrock Motherboard Asrock K7NF2-RAID RAID Utility
<< Back | HomeMost service manuals and schematics are PDF files, so You will need Adobre Acrobat Reader to view : Acrobat Download Some of the files are DjVu format. Readers and resources available here : DjVu Resources
For the compressed files, most common are zip and rar. Please, extract files with Your favorite compression software ( WinZip, WinRAR ... ) before viewing. If a document has multiple parts, You should download all, before extracting.
Good luck. Repair on Your own risk. Make sure You know what You are doing.
Image preview - the first page of the document
>> Download Asrock K7NF2-RAID RAID Utility documenatation <<
Text preview - extract from the document
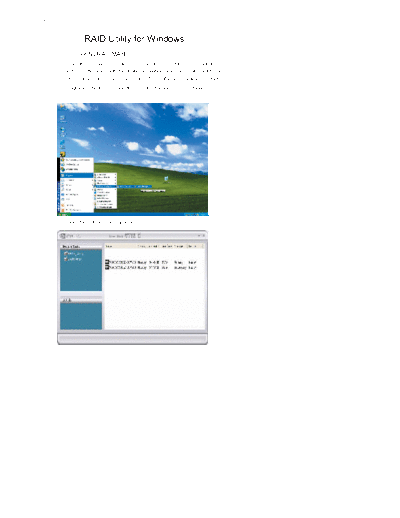
         RAID Utility for Windows
1. Enter NVRAIDMAN
RAID driver is built in nVidia ALL in one driver provided in ASRock sup
port CD. After you finish the driver installation, you can create, delete, or
rebuild any RAID array. Please enter NVRAIDMAN by clicking on Start
Programs NVIDIA Corporation           RAID Manager     RAID Manager.


Then, the below screen appears.


                                  1
2. Creating RAID Arrays


Creating RAID 0 (Striping)
NVRAIDMAN can be used to create a striped array from one disk up to
the maximum supported number of disks in the system. To create a two-
disk Striped Array do the following.
1. Go to the system BIOS and make sure that the drives that you want to
   use are RAID enabled.
2. Boot to Windows and launch the NVRAIDMAN application.
3. Create Array and the following screen will appear.


                                 2
4. Click Next and the following screen shot will appear.


5. Click the RAID Mode list arrow and select Striping, and leave the
 "Stripe Size" with its default value as shown in the following screen shot.


                                 3
6. Click Next, and the following screen shot will appear.


7. Select the two disks that you want to include in the stripe set.


To create a striped array with more disks, select additional disks from the
list.


                                  4
8. Click Next and the following screen shot will appear.


9. Click Finish and the following screen shot will appear.


The RAID 0 is created successfully.


                                 5
Creating RAID 1 (Mirroring)
The NVRAIDMAN application can be used to create a Mirror Array. By
definition, a mirrored array consists of two drives. Data is written to both
two drives, and if one drive fails then data can be recovered from the
other drive. To create a Mirrored Array, do the following.
1. Go to the system BIOS and make sure that the drives that you want to
   use are RAID enabled.
2. Boot to Windows and launch the NVRAIDMAN application, then click
   on Create Array and the following screen will appear.


                                  6
3. Click Next and the following screen shot will appear.


4. Click Next and the following screen shot will appear.


                                 7
5. Select the two drives that you want to use in the Mirrored array.


6. Click Next and the following screen shot will appear.


                                 8
7. If you want to start rebuilding the array right away (copy data from one
   disk to the other), select the disk that you wish to preserve. Do not
   select a disk if you do not want to rebuild the array at this time.
8. Click Next and the following screen shot appears.


9. Click Finish. If you selected a disk to preserve in step 7, the rebuilding
  process begins.


A mirrored array has been created, while the other two disks are set to
free disks.


                                  9
Creating JBOD (Spanning)
NVRAIDMAN can be used to create a Spanning Array which requires at
least one disk to start such an array. To create a Spanning Array do the
following:
1. Go to the system BIOS and make sure that the drives that you want to
    use are RAID enabled.
2. Boot to Windows and launch the NVRAIDMAN application, then click
  on Create Array and the following screen will appear.


3. Click Next and the following screen will appear.


                               10
4. Click the RAID Mode list arrow and select "Spanning" while leaving the
   Stripe Size set to its default value as shown in the following screen
   shot.


5. Click Next and the following screen shot will appear.


                                11
6. Select the two drives that you want to use in the Spanned array.


7. Click Next and the following screen shot will appear.


                                12
8. Click Finish and the following screen shot will appear.


A Spanned Array has been created.


                                13
3. Initializing NVRAID Array Disks
Now that the two-disk array has been created, it needs to be partitioned
and formatted.
1. Click on Start Settings Control Panel.
2. Double click on Administrative Tools.
3. Double click on Computer Management.
4. Click on Disk Management. The following screen is displayed.


                                14
5. The 153.38 GB is for the two disk striped array that was created earlier.
   To create a partition on it, right click on the Unallocated partition and
   select New Partition.


6. Follow the Wizard for setting up and formatting the partition. Once that
   is done, you can start using the newly created stripped array.


                                15
4. Deleting a RAID Array
NVRAIDMAN can be used to delete an Array. To delete an Array do the
following.
1. Launch the NVRAIDMAN application and right click on the RAID array
   that you want to delete (assuming that you have a RAID array already
  created) as shown in the following screen shot.


The above screen shot shows that there is a Mirrored array that will be
deleted. After the "Delete Array..." has been selected, the following screen
shot appear.


                                16
2. Click Next and the following screen shot will appear.


3. Click Finish and the array will be deleted and the following screen shot
  will appear showing all the free disks.


A similar process can be applied to delete any array created by NVIDIA
RAID.


                                17
5. Rebuilding a RAID 1 Array
Rebuilding is the process of recovering data from one hard drive to
another. All data is copied from one hard drive to another and then the
data is synchronized between the two hard drives. After creating a
mirrored array, you can rebuild the array using the following steps:
1. Go to Windows and run the NVIDIA RAID Management utility.


2. Right-click on Mirroring. Then the popup menu appears.


                                18
3. From the popup menu, click Rebuild Array. The NVIDIA Rebuild
  Array Wizard appears.


4. Click Next. The Disk Selection page appears.


                               19
5. Select the drive that you want to rebuild by clicking it from the list, then
  click Next. The Completing the NVIDIA Rebuild Array page appears.


6. Click Finish.


More About Rebuilding Arrays
◦ Jabse Service Manual Search 2026 ◦ Jabse Pravopis ◦ onTap.bg ◦ Other service manual resources online : Fixya ◦ eServiceinfo