Service Manuals, User Guides, Schematic Diagrams or docs for : CANON Copiers GP 405 ServBull ServBullGP405 acc-145

<< Back | Home

Most service manuals and schematics are PDF files, so You will need Adobre Acrobat Reader to view : Acrobat Download Some of the files are DjVu format. Readers and resources available here : DjVu Resources
For the compressed files, most common are zip and rar. Please, extract files with Your favorite compression software ( WinZip, WinRAR ... ) before viewing. If a document has multiple parts, You should download all, before extracting.
Good luck. Repair on Your own risk. Make sure You know what You are doing.


Image preview - the first page of the document
acc-145


>> Download acc-145 documenatation <<

Text preview - extract from the document
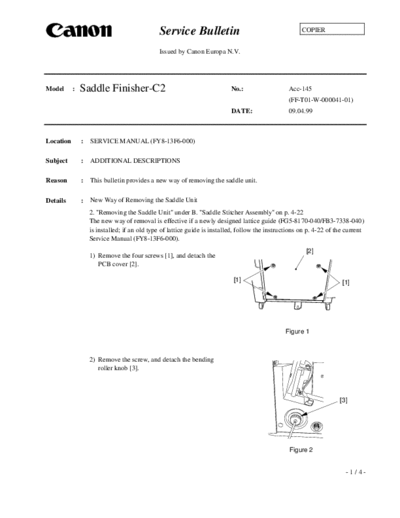
                                              Service Bulletin                                         COPIER


                                              Issued by Canon Europa N.V.


Model      :   Saddle Finisher-C2                                          No.:                   Acc-145
                                                                                                  (FF-T01-W-000041-01)
                                                                           DATE:                  09.04.99


Location       :   SERVICE MANUAL (FY8-13F6-000)

Subject        :   ADDITIONAL DESCRIPTIONS

Reason         :   This bulletin provides a new way of removing the saddle unit.

Details        :   New Way of Removing the Saddle Unit
                   2. "Removing the Saddle Unit" under B. "Saddle Stitcher Assembly" on p. 4-22
                   The new way of removal is effective if a newly designed lattice guide (FG5-8170-040/FB3-7338-040)
                   is installed; if an old type of lattice guide is installed, follow the instructions on p. 4-22 of the current
                   Service Manual (FY8-13F6-000).
                                                                                                         [2]
                   1) Remove the four screws [1], and detach the
                      PCB cover [2].

                                                                            [1]                                        [1]


                                                                                                Figure 1


                   2) Remove the screw, and detach the bending
                      roller knob [3].


                                                                                                                      [3]


                                                                                                  Figure 2


                                                                                                                        -1/4-
                                                                    Acc-145

                                                          [4]
3) Remove the four screws [5], and detach the
   rear lower cover [4].


                                                [5]
                                                                           [5]


                                                        Figure 3


4) Disconnect the two connectors [6] used to
   connect to the finisher assembly.


                                                                                 [6]


                                                         Figure 4


5) Remove the five screws [8], and detach the
   front inside cover [7].


                                                [8]                  [7]


                                                        Figure 5


                                                                       [8]


                                                  [7]


                                                        Figure 6

                                                                              -2/4-
                                                                             Acc-145


6) Remove the L-shaped pin [10], and
   disconnect the two connectors [11]; then,                                           [10]
   detach the delivery cover [9].


                                                       [9]


                                                                 Figure 7


                                                                                        [11]


                                                        [9]


                                                                  Figure 8


7) Remove the two screws each [14]; then, detach         [12]                          [13]
   the front side cover [12] and the rear side cover
   [13].

                                                                                        [14]
                                                         [14]


                                                                 Figure 9


8) Remove the foot cover [15] of the frame. This
   is to avoid interference between the foot            [15]
   cover and the clock disk [16] of the paper
   retaining plate motor while the saddle unit is
                                                                                       [16]
   being removed.

                                                                Figure 10


                                                                                       -3/4-
                                                                           Acc-145

                                                                 [17]

9) Remove the five screws [17] used to secure the
   saddle unit in place to the frame.
10)Remove the saddle unit [18] by shifting it in the
   direction of the copier.


                                                              Figure 11              [18]


                                                       [17]


                                                               Figure 12


                                                                               [17]

                                                       [18]


                                                              Figure 13


                                                                                     -4/4-


◦ Jabse Service Manual Search 2026 ◦ Jabse PravopisonTap.bg ◦ Other service manual resources online : FixyaeServiceinfo