Service Manuals, User Guides, Schematic Diagrams or docs for : CANON Copiers GP 405 ServBull ServBullGP405 gp405-07
<< Back | HomeMost service manuals and schematics are PDF files, so You will need Adobre Acrobat Reader to view : Acrobat Download Some of the files are DjVu format. Readers and resources available here : DjVu Resources
For the compressed files, most common are zip and rar. Please, extract files with Your favorite compression software ( WinZip, WinRAR ... ) before viewing. If a document has multiple parts, You should download all, before extracting.
Good luck. Repair on Your own risk. Make sure You know what You are doing.
Image preview - the first page of the document
>> Download gp405-07 documenatation <<
Text preview - extract from the document
Service Bulletin COPIER
Issued by Canon Europa N.V.
Model : MULTI OUTPUT TRAY-D1 No.: GP405-007
(FF-T01-W-000060-01)
DATE: 09.07.99
Location : INTERIOR OF MACHINE (GP MAIN UNIT), FEED UNIT (MULTI OUTPUT TRAY- D1)
Subject : JAMS WHEN MULTI OUTPUT TRAY-D1 IS CONNECTED TO MAIN GP UNIT AND FACE
DOWN DELIVERY MODE IS SELECTED
Reason : To communicate means to prevent jams in the face down delivery mode when the multi output tray-D1
is connected
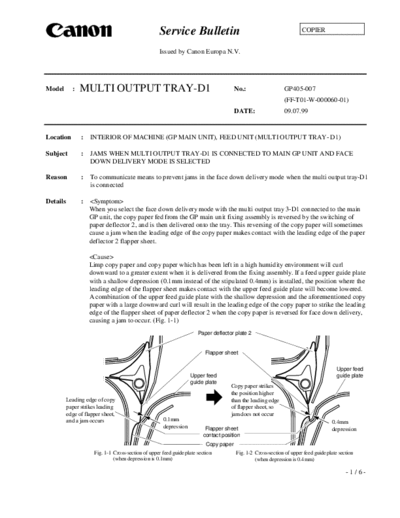
Details :
When you select the face down delivery mode with the multi output tray 3-D1 connected to the main
GP unit, the copy paper fed from the GP main unit fixing assembly is reversed by the switching of
paper deflector 2, and is then delivered onto the tray. This reversing of the copy paper will sometimes
cause a jam when the leading edge of the copy paper makes contact with the leading edge of the paper
deflector 2 flapper sheet.
Limp copy paper and copy paper which has been left in a high humidity environment will curl
downward to a greater extent when it is delivered from the fixing assembly. If a feed upper guide plate
with a shallow depression (0.1mm instead of the stipulated 0.4mm) is installed, the position where the
leading edge of the flapper sheet makes contact with the upper feed guide plate will become lowered.
A combination of the upper feed guide plate with the shallow depression and the aforementioned copy
paper with a large downward curl will result in the leading edge of the copy paper to strike the leading
edge of the flapper sheet of paper deflector 2 when the copy paper is reversed for face down delivery,
causing a jam to occur. (Fig. 1-1)
Paper deflector plate 2
Flapper sheet
Upper feed
Upper feed guide plate
guide plate
Copy paper strikes
the position higher
Leading edge of copy than the leading edge
paper strikes leading of flapper sheet, so
edge of flapper sheet, jam does not occur
and a jam occurs 0.1mm 0.4mm
depression Flapper sheet depression
contact position
Copy paper
Fig. 1-1 Cross-section of upper feed guide plate section Fig. 1-2 Cross-section of upper feed guide plate section
(when depression is 0.1mm) (when depression is 0.4mm)
-1/6-
GP405-007
There will be strict supervision over the adherence to 0.4mm deepness for the upper feed guide plate
depression. This is to avoid leading edge of the copy paper with a large downward curl to strike the
leading edge of the flapper sheet when the copy paper is reversed. (Fig. 1-2) Also in order to make
the tolerance less tight for the copy paper with large downward curl, the shape of the stay for the multi
output tray-D1 and the angle in sticking the flapper sheet of the paper deflector have been changed.
With these changes the position where the flapper sheet of the paper deflector plate 2 will make
contact with the upper feed guide plate 2 shifts further upward. This will allow the leading edge of
the paper with a large downward curl to avoid striking the leading edge of the flapper sheet by a more
comfortable margin. (Fig. 2-1, 2-2)
Change in shape of leading edge section
of upper feed guide (Tip cut off)
Upper stay
Upper stay
Paper deflector 2
Change in the angle in sticking
the sheet to shift the contact
position with the guide further
d
Flapper sheet
Deepness of
0.1mm here for the Deepness of 0.4mm
upper feed guide here for the upper feed
Flapper sheet
guide
contact position
Fig. 2-1 Cross-section of the former upper feed guide Fig 2-2 Cross-section of the new upper feed guide
Servicing : When a jam occurs with the aforementioned symptoms, replace the GP main unit's upper feed guide
by following the upper feed guide replacement procedures outlined below. However, the installation
of the upper feed guide with insufficient deepness for the depression may be confined to the machines
bearing the serial number in following ranges.
GP405 ITA PNY00001 PNY00200
UK QNY00001 QNY00702
FRA SNY00001 SNY00746
GER TNY00001 TNY00266
AMS UNY00130 UNY01879
GP355 ITA PNZ00001 PNZ00210
UK QNZ00001 QNZ00810
FRA SNZ00001 SNZ00750
GER TNZ00001 TNZ00370
AMS UNZ00001 UNZ01905
-2/6-
GP405-007
1) Unplug the power supply
2) Remove the three copy trays (Fig. 3).
Note: Take note of the location in which each
copy tray was attached.
Fig. 3 Copy trays
(multi output tray-D1)
3) After releasing the bottom external cover
hooks, release the top external cover hooks
and remove the external cover (Fig. 4).
Top hooks
External cover
Bottom hooks
Fig. 4 External Cover
(Multi output tray-D1
4) Remove the connector cover.
Hooks
i) Open the front cover of the main copier unit.
ii) Open the multi output tray-D1.
iii) Remove 1 screw and remove the connector
cover (Fig. 5).
Screw
Connector cover
Fig. 5 Connector cover (Interior of the main unit
fixing assembly)
Multi output tray-D1 connectors
5) Remove the connector (Fig. 6)
i) 3 fixing assembly connectors
ii) 2 multi output tray- D1 connectors
iii) Disengage the multi output tray- D1
cable from the wire clip.
Multi output tray-
D1 cable
Fixing assembly connectors
Fig. 6 Connector assembly (Left side of the
main unit fixing assembly)
-3/6-
GP405-007
Stop plate Screw
6) Remove 1 screw and remove the stop plate
(Fig. 7).
Fig. 7 Stop plate (Upper interior of the
multi output tray D1)
7) Holding the delivery assembly latch in the left hand
and the lower part of the multi output tray- D1 with
the right hand, remove the multi output tray-D1 from
the main unit (Fig. 8).
Note: When placing the multi output tray-D1 (which
was removed from the main unit) on the floor,
orient the tray to bring the delivery tray to the
bottom.
Fig. 8 Multi output tray-D1 delivery assembly
8) Remove 1 screw, and remove the sensor connector Screw
cover on the right side of the fixing assembly (Fig.
9).
Sensor connector cover
Fig. 9 Sensor connector cover (Right side of the
main unit fixing assembly)
9) Remove the connector on the right side of the
fixing assembly (Fig. 10).
Connector
Fig. 10 Connector (Right side of the main unit
fixing assembly
10) Remove the fixing assembly. Fixing assembly
i) Remove 1 screw, and remove the fixing assembly
handle.
ii) Remove 2 screws, and remove the fixing assembly
(Fig. 11).
Screws
Fig. 11 Fixing assembly (Main unit
delivery assembly)
-4/6-
GP405-007
Connector
11)Unplug the upper feed guide photointerrupter
connector (Fig. 12).
Fig. 12 Photointerrupter connector (nearer to
main unit delivery area)
12) Open the upper feed guide until it is vertical, and
hold in that position while removing it (Fig. 13).
Upper feed
guide
Fig. 13 Upper feed guide (Main unit delivery area)
Upper feed guide
13) Attach the photointerrupter connector which was
attached to the old upper feed guide to the new upper
feed guide.
14) Set the new upper feed guide to upright position (Fig.
14-1), stick the upper feed guide shaft hole onto the
feed inlet bushing, and close to the front (Fig. 14-2).
Note: After attaching the upper feed guide, check that
the upper feed guide shaft holes are properly
inserted onto the feed inlet bushing (Fig. 14-2). Fig. 14-1 Main unit delivery area
Feed inlet shaft bushing
Upper feed guide
Fig. 14-2 Upper feed guide (main unit delivery area)
-5/6-
GP405-007
15)Start assembly in reverse order from step 11) and take a precaution to route the red cable at the top of
two other cables in inserting the three cable connectors. (See a magnified view on Fig. 15.)
Red cable Fixing assembly connectors
Fig. 15 Connector cover (Left side of main unit fixing assembly)
Service Parts :Because feed guides with deepness of 0.1mm have not been shipped to the field as service parts, it is
possible to receive a feed guide with a deepness of 0.4mm for the depression by indicating part number
FF5-6955-000 as usual in requesting the parts for your requirement. The service parts kept in stock in
the field are good quality parts with the deepness of 0.4mm for the depression.
Multi output tray-D1
Inter- P.C.
change- -- -- -- -- -- -- -- -- -
No. Description Part number Q'ty
ability
1 Old DEFLECTOR, 1 FF5-7209-00
1 0 Q30A-18
01
No Yes
New DEFLECTOR, 1 FF5-7209-030
2 Old PLATE, UPPER FF5-7211-000 10 Q30A-22
01
No Yes
New PLATE, UPPER FF5-7211-040
The above two parts make the tolerance even less tight to handle copy paper with a large downward
curl. Replacing them at the same time the upper feed guide is replaced is not a requirement.
Affected machines:
GP405 ITA PNY00201 and later
UK QNY00703 and later
FRA SNY00747 and later
GER TNY00267 and later
AMS UNY01880 and later
GP355 ITA PNZ00211 and later
UK QNZ00811 and later
FRA SNZ00751 and later
GER TNZ00371 and later
AMS UNZ01906 and later
Multi output tray- D1: Will communicate as soon as the information is made available.
-6/6-
◦ Jabse Service Manual Search 2026 ◦ Jabse Pravopis ◦ onTap.bg ◦ Other service manual resources online : Fixya ◦ eServiceinfo