Service Manuals, User Guides, Schematic Diagrams or docs for : CANON Copiers GP 405 ServBull ServBullGP605 gp605-05

<< Back | Home

Most service manuals and schematics are PDF files, so You will need Adobre Acrobat Reader to view : Acrobat Download Some of the files are DjVu format. Readers and resources available here : DjVu Resources
For the compressed files, most common are zip and rar. Please, extract files with Your favorite compression software ( WinZip, WinRAR ... ) before viewing. If a document has multiple parts, You should download all, before extracting.
Good luck. Repair on Your own risk. Make sure You know what You are doing.


Image preview - the first page of the document
gp605-05


>> Download gp605-05 documenatation <<

Text preview - extract from the document
                                              Service Bulletin                                         COPIER


                                               Issued by Canon Europa N.V.


Model      :   GP605                                                        No.:                   GP605-005 Rev. 1
                                                                                                   (FF-T01-K1-000009-02)
                                                                            DATE:                  04.06.99


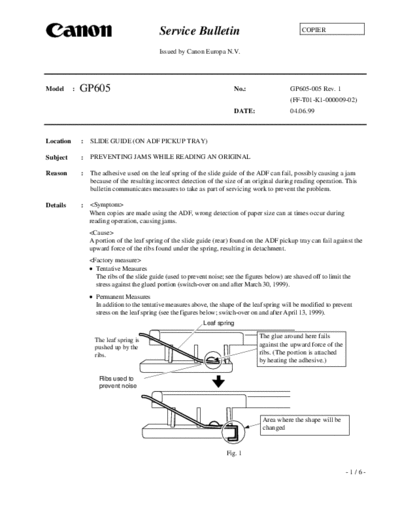
Location       :   SLIDE GUIDE (ON ADF PICKUP TRAY)

Subject        :   PREVENTING JAMS WHILE READING AN ORIGINAL

Reason         :   The adhesive used on the leaf spring of the slide guide of the ADF can fail, possibly causing a jam
                   because of the resulting incorrect detection of the size of an original during reading operation. This
                   bulletin communicates measures to take as part of servicing work to prevent the problem.

Details        :   
                   When copies are made using the ADF, wrong detection of paper size can at times occur during
                   reading operation, causing jams.
                   
                   A portion of the leaf spring of the slide guide (rear) found on the ADF pickup tray can fail against the
                   upward force of the ribs found under the spring, resulting in detachment.
                   
                    Tentative Measures
                     The ribs of the slide guide (used to prevent noise; see the figures below) are shaved off to limit the
                     stress against the glued portion (switch-over on and after March 30, 1999).
                    Permanent Measures
                     In addition to the tentative measures above, the shape of the leaf spring will be modified to prevent
                     stress on the leaf spring (see the figures below; switch-over on and after April 13, 1999).
                                                                Leaf spring

                     The leaf spring is
                                                                                      The glue around here fails
                     pushed up by the                                                 against the upward force of the
                     ribs.                                                            ribs. (The portion is attached
                                                                                      by heating the adhesive.)

                      Ribs used to
                      prevent noise


                                                                                        Area where the shape will be
                                                                                        changed


                                                                         Fig. 1

                                                                                                                         -1/6-
                                                                                           GP605-005 Rev. 1

Servicing   : < Implementing the Measures >
              1) Remove the screw, and detach the cover
                  at the back of the ADF.                                                         Screw


                                                                               Fig. 2

             2)     Free the harness of the pickup tray.                Wire saddle
             i)     Remove the wire saddle.                                                    Tie-wrap
             ii)    Remove the tie-wrap.
             iii)   Disconnect the connector.                                                      Screw
             iv)    Remove the screw, and detach the
                    grounding wire.


                                                            Connector


                                                                                 Fig. 3


            3) Remove the two screws from the pickup                                           Screws
               tray, and detach the pickup tray.
                   Note:
               When detaching the pickup tray, pay
               attention to its harness.


                                                                                  Fig. 4


                                                                          Grounding wire (1 screw)
             4) Turn over the pickup tray, and disconnect the
                three connectors.
             5) Remove the screw, and detach the grounding
                wire.


                                                                                 Connectors

                                                                                 Fig. 5
                                                                                                     -2/6-
                                                                                   GP605-005 Rev. 1


6) Remove the four screws, and open the
   slide switch cover.


                                                          Screws
                                                                          Fig. 6


7) Remove the grip ring, and detach the gear.
                                                         Gear

                                                 Grip ring


                                                                          Fig. 7


8) Remove the screw, and detach the guide              Screw
   retainer.
                                                Guide retainer


                                                                          Fig. 8


9) Remove the two screws, and detach the
   indicator LED PCB holder; then, mount it
   to the slide guide which has been provided
   with the measures.


                                                                                      Slide guide


                                                                           Indicator LED
                                                                           PCB holder
                                                                 Screws


                                                                          Fig. 9

                                                                                            -3/6-
                                                                                           GP605-005 Rev. 1


10) Shift both slide guides inward, and match the teeth as shown (indicated by arrows).


                                   Shift so that the arrow is
                                   between the third and fourth
                                   teeth counting from the right.

  Slide guide


                                   Shift so that the arrow is
                                   between the fifth and sixth
                                   teeth counting from the left.


                                                   Fig. 10


11) While keeping the teeth matched, set the
    gear and mount the grip ring.                            Gear
    Note: Put one transparency between the
           gear and the grip ring to allow a gap     Grip ring
           (of about 0.3 mm).


                                                                                Fig. 11


12) While paying attention to the routing of
                                                                                                 Screw
    the harness and the positioning block             Pay attention to the
    (used to match the phase), mount the              spatial relationship
    guide retainer with a screw.                      (phase).
    Note: Take care to avoid trapping the
           wire.


                                                                      Lead the harness out from here.


                                                                                 Fig. 12


                                                                                                    -4/6-
                                                                                     GP605-005 Rev. 1
                                                                               Screws
13) Close the slide switch cover, and tighten
    the four screws.
    Note: At this time, connect one connector
           in advance to facilitate the work.


                                                            Connector
                                                                          Fig. 13


14) Connect all connectors.


                                                            Connector
                                                                           Fig. 14

15) While arranging the harness as needed,                                                 Screws
    set the pickup tray and tighten the two
    screws.


                                                                           Fig. 15


                                                                 Wire saddle
                                                                                        Tie-wrap
16) Free the harness of the pickup tray.
i) Mount the grounding wire with a screw.
ii) Connect the connector.                                                                   Screw
iii) Fit the tie-wrap.
iv) Fit the harness to the wire saddle, and
     lock it in position.

                                                Connector


                                                                         Fig. 16

                                                                                              -5/6-
                                                                                               GP605-005 Rev. 1


              17) Secure the cover at the rear of the ADF
                  in place with a screw.


                                                                                                        Screw

                                                                                     Fig. 17

Affected machines:
              Main body:
                 PLE00102 and later        NLE01743 and later         PLP00049 and later
                 QLE00246 and later        RLE00040 and later         SLE00374 and later
                 TLE00140 and later        ULE00537 and later
              Classification by level of the ADF
                 Classification label attached to the ratings plate
                    Tentative measures: 9-mm dia. Brown label
                    Permanent measures: 9-mm dia. Pink label
              ADF Units Affected
                YC01647 and later
                YD01384 and later
                YE00068 and later


                                                                                                        -6/6-


◦ Jabse Service Manual Search 2026 ◦ Jabse PravopisonTap.bg ◦ Other service manual resources online : FixyaeServiceinfo