Service Manuals, User Guides, Schematic Diagrams or docs for : CANON Copiers GP 605 ServBull ServBullGP605 gp605-09
<< Back | HomeMost service manuals and schematics are PDF files, so You will need Adobre Acrobat Reader to view : Acrobat Download Some of the files are DjVu format. Readers and resources available here : DjVu Resources
For the compressed files, most common are zip and rar. Please, extract files with Your favorite compression software ( WinZip, WinRAR ... ) before viewing. If a document has multiple parts, You should download all, before extracting.
Good luck. Repair on Your own risk. Make sure You know what You are doing.
Image preview - the first page of the document
>> Download gp605-09 documenatation <<
Text preview - extract from the document
Service Bulletin COPIER
Issued by Canon Europa N.V.
Model : GP605 No.: GP605-009 Rev. 1
(FF-T01-K1-000020-02)
DATE: 09.07.99
Location : ADF PICK-UP ASSEMBLY
Subject : FOLDING OF DOCUMENT'S LEADING EDGE IN ADF
Reason : To communicate countermeasures for the possibility of the document's leading edge becoming folded
when the accuracy as to the position the ADF reversing flapper stops is deficient or when the reversing
guide is not completely pushed in and properly seated after attending to the problem of this flapper
remaining folded up through mishandling.
Details :
When using the ADF to copy, there are cases where the document's leading edge becomes folded.
In case the accumulated tolerances of the parts get too close to the limits, the document may strike
the copyboard glass and the document's leading edge may become folded.
The reversing flapper is replaced as the measure to deal with the situation of breakage consequent
to the user getting his fingers caught to the reversing flapper in clearing a jam. But failing to
notice during the replacement that the reversing guide has not been completely pushed in and
properly seated could result in the document's leading edge to become folded.
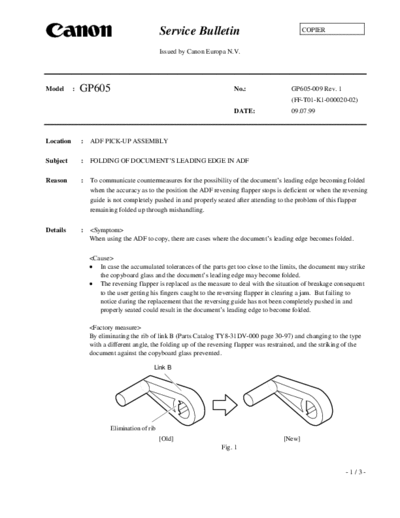
By eliminating the rib of link B (Parts Catalog TY8-31DV-000 page 30-97) and changing to the type
with a different angle, the folding up of the reversing flapper was restrained, and the striking of the
document against the copyboard glass prevented.
Link B
Elimination of rib
[Old] [New]
Fig. 1
-1/3-
GP605-009 Rev. 1
Servicing : < Work procedure >
1) Remove the 2 binding screws underneath
the ADF. (Fig. 2)
Screws
Fig. 2
2) Remove the 1 screw from the right side of the
ADF. (Fig. 3)
Screw
Fig. 3
3) Open the upper cover assembly and remove 1
screw, then remove the front cover
(upper/lower) (Fig. 4). Screw
Front cover
(Upper/Lower)
Fig. 4
-2/3-
GP605-009 Rev. 1
4) Remove the E ring, and replace link B
(Fig. 5).
E ring
Link B
Fig. 5
Arrow added
5) Open the registration guide, loosen the 2
screws and push in the reversing guide B
in the direction of the arrow until properly
Screws
seated, and then re-tighten the screws
(Fig. 6).
Reversing
guide B
Fig. 6
6) Place the front cover by following the procedure in reverse, then tighten the 4 screws.
-3/3-
◦ Jabse Service Manual Search 2026 ◦ Jabse Pravopis ◦ onTap.bg ◦ Other service manual resources online : Fixya ◦ eServiceinfo