Service Manuals, User Guides, Schematic Diagrams or docs for : CANON Fax B100 B100_009
<< Back | HomeMost service manuals and schematics are PDF files, so You will need Adobre Acrobat Reader to view : Acrobat Download Some of the files are DjVu format. Readers and resources available here : DjVu Resources
For the compressed files, most common are zip and rar. Please, extract files with Your favorite compression software ( WinZip, WinRAR ... ) before viewing. If a document has multiple parts, You should download all, before extracting.
Good luck. Repair on Your own risk. Make sure You know what You are doing.
Image preview - the first page of the document
>> Download B100_009 documenatation <<
Text preview - extract from the document
SERVICE BULLETIN FAX
Issued by Canon Europa N.V.
MODEL: FAX-B100, MultiPASS 10 No.: B100-009 Rev. 1
(HS-B0E-0037-01)
Date: 02.08.96
LOCATION: SCNT BOARD ASSY
MODEL NO.: H12-0273 (EC) H12-0303 (EC)
SUBJECT: PATTERN CUT / PARTS ADDED / PARTS CHANGED
OUTLINE
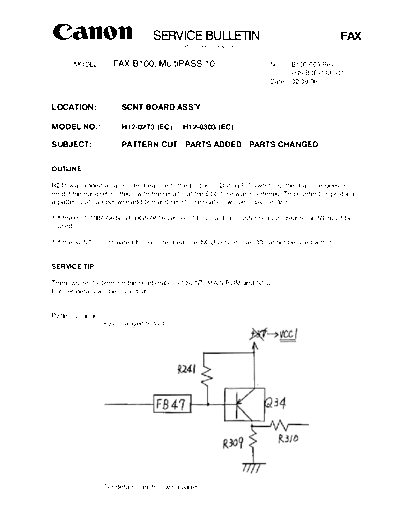
R241 was added as a countermeasure to the problem During F/T switching, the machine goes on
hold if the handset is lifted, with the result that the ESS time was shortened. To counter this problem,
a pattern cut, jumper wire addition and resistor relocation will be implemented.
* If the HH1-1984-06 NCU (HG5-0616 version 03) is used, a countermeasure treated SCNT must be
used.
* If the SCNT is not treated this countermeasure, NCU version over 03 cannot be used with it.
SERVICE TIP
There are restrictions on the combination of SCNT, MAIN ROM and NCU.
Further details will be issued later.
Pattern change
+5V changed to VCC1
For details, see following pages.
FAX -2- B100-009 Rev. 1
Items of caution
1. Check with a tester after the pattern cut has been made.
2. Do not cut other patterns nearby.
3. Be sure not to short other parts, circuits.
Affected machines
With HG5-0619/HG5-0622 SCNT BOARD ASSEMBLY are to be used with PCB HH1-1983-03 and
HH1-1983-05, and the HG5-0616 NCU BOARD ASSEMBLY is to be used with PCB HH1-1984-06.
Circuit check with tester
1. Check that the circuit is cut between A and A.
2. Check that the circuit is connected between B and B.
* Check that the pattern has not been cut wrongly.
Component side
FAX -3- B100-009 Rev. 1
Procedure when PCB HH1-1983-03 has an 820 resistor attached. (See Service Bulletin B100-015.)
1. If the 820 resistor is attached to the component side, cut it off with a pair of wire cutters. If it is
on the soldered side, leave it as it is.
2. Cut the 5V pattern line.
3. After cutting away the solder from the through hole, thread the jumper wire through, and solder
it.
4. Add the 820 resistor to the solder side. (Details are the same as Service Bulletin B100-015.)
Component side Jumper wire Pattern cut
Solder side
Add 820 resistor
(lower side of Q34E-FB47)
Be careful of the solder bridge
FAX -4- B100-009 Rev. 1
Procedure when PCB HH1-1983-03 has no 820 resistor attached.
1. Cut the 5V line pattern. (Check the circuit with a tester.)
2. Feed the jumper wire and the 820 resistor into the through hole, and solder them.
3. Solder one end of the jumper wire to the lead of the resistor.
4. Cut the jumper lead in order to prevent shorting. (It should not be more than 1mm on the
soldered side.)
Component side
Be careful not to short out the neighbouring patterns.
FAX -5- B100-009 Rev. 1
Procedure for PCB HH1-1983-05
1. Cut the 5V line pattern. (Check the circuit with a tester.)
2. Feed the jumper wire through the through hole, and solder it.
3. Cut the jumper lead in order to prevent shorting. (It should not be more than 1mm on the
soldered side.)
Solder
Jumper wire
PCB
Resist
Component side
The section where the 820 resistor is to be attached has been made into a pattern.
FAX -6- B100-009 Rev. 1
PARTS
MODEL NO. PARTS NAME PARTS NO. VER. IC LOCATION NO.
H12-0273 OLD SCNT BOARD ASSY HG5-0619-070 04 -- ---
NEW SCNT BOARD ASSY HG5-0619-070 05
H12-0303 OLD SCNT BOARD ASSY HG5-0622-060 03 -- ---
NEW SCNT BOARD ASSY HG5-0622-060 04
MACHINE ◦ Jabse Service Manual Search 2026 ◦ Jabse Pravopis ◦ onTap.bg ◦ Other service manual resources online : Fixya ◦ eServiceinfo