Service Manuals, User Guides, Schematic Diagrams or docs for : CANON Printer s200 Service manual Canon S200
<< Back | HomeMost service manuals and schematics are PDF files, so You will need Adobre Acrobat Reader to view : Acrobat Download Some of the files are DjVu format. Readers and resources available here : DjVu Resources
For the compressed files, most common are zip and rar. Please, extract files with Your favorite compression software ( WinZip, WinRAR ... ) before viewing. If a document has multiple parts, You should download all, before extracting.
Good luck. Repair on Your own risk. Make sure You know what You are doing.
Image preview - the first page of the document
>> Download Service manual Canon S200 documenatation <<
Text preview - extract from the document
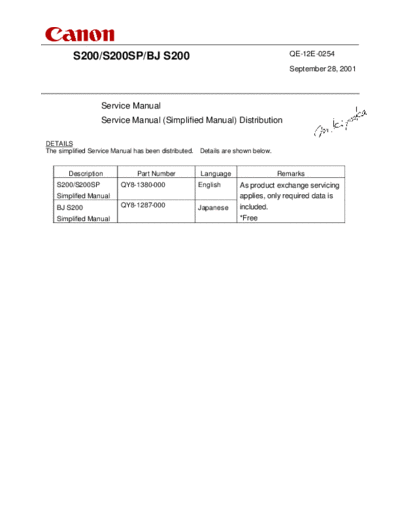
S200/S200SP/BJ S200 QE-12E-0254
September 28, 2001
Service Manual
Service Manual (Simplified Manual) Distribution
DETAILS
The simplified Service Manual has been distributed. Details are shown below.
Description Part Number Language Remarks
S200/S200SP QY8-1380-000 English As product exchange servicing
Simplified Manual applies, only required data is
BJ S200 QY8-1287-000 Japanese included.
Simplified Manual *Free
S200 / S200SP
Simplified Manual
QY8-1380-000
1 Product / Option / Consumable list
2 Specifications
3 Error code list
4 Service mode
(Test print, EEPROM reset, destination setting)
5 External view / Parts list
6 H/W troubleshooting flowchart
7 Special Service Information
Attach Service Test Print
BPQA-21
Rev 01 2001.9/28
1. Product / Option / Comsumable lists
1.1 Products
Product Name Product Code Sales Territory Remarks
Canon Bubble Jet Printer 6862A001AA USA W/O CD
S200 6862A001AB USA
6862A002AA CAN W/O CD
6862A002AB CAN W/O CD
6862A003AA LAM LVT
6862A004AA LAM HVT
6862A005AA AR
6862A006AA EUR
6862A007AA DEU
6862A008AA FRN
6862A009AA GB
Canon Bubble Jet Printer 6862A010AA JAPAN
BJ S200
Canon Bubble Jet Printer 6862A011AA ASIA HVT
S200SP 6862A012AA AUST
6862A013AA CHN
6862A014AA TWN
6862A015AA HK
6862A016AA KRN
1.2 Options
None
1.3 Consunables
Product Name Product Code Sales Territory Remarks
Canon Ink Tank 6881A001AA JPN
BCI-24 Black 6881A002AA EUR
6881A003AA USA/CAN
6881A004AA ASIA/AUST
Canon Color BJ Cartridge 6882A001AA JPN
BCI-24 Color 6882A002AA EUR
6882A003AA USA/CAN
6882A004AA ASIA/AUST
Canon Ink Cartridge 6881A008AA JPN
BCI-24 Black Twin Pack 6881A009AA EUR
6881A010AA USA/CAN
6881A011AA ASIA/AUST
Canon Ink Cartridge 6882A008AA JPN
BCI-24 Color Twin Pack 6882A009AA EUR
6882A010AA USA/CAN
6882A011AA ASIA/AUST
2. Specifications
2.1 Specifications (Note) Differences from the base model BJC-2100/2100SP are in RED
DeskTop serial color bubble jet printer
Paper feeding method Auto Sheed Feeding
Resolution Max. 2880 dpi equiv. X 720 dpi *JPN only: 1440 dpi X 720 dpi
Print Speed
HQ Color 1.6ppm (Color throughput pattern)
Mono. 3.8ppm (Monochrome throughput pattern)
HS Color 3ppm (Color throughput pattern)
Mono. 5ppm (Monochrome throughput pattern)
Print Direction Bidirectional / Unidirectional
( Print direction changes automatically according to
the print data/ print mode/ installed cartridged type. )
Print width 203.2mm (8inch)
Interface USB (USB1.1) only
Print head Exclusive color cartridge only (Service Part No. : QY6-0038-000)
Max. no. of printable sheets CL CL: Approx. 130 sheets / BK: Approx. 520 sheets
(SCID NO.5 pattern, default print mode)
BK BK: Approx. 340 sheets (1500 character pattern, default print mode)
(JEIDA std. J1 pattern, default print mode)
Stacking Capacity of sheet feeder
Plain paper Max. 5mm stack (Approx. 50 sheets with 75g/m2)
LGL size Max. 10 sheets
Postcard (except pro-photo postcard) Max. 20 sheets
Envelopes Max. 5 sheets
Transparencies Max. 20 sheets
Back Print Film -
Glossy photo paper Max. 1 sheet
Glossy film (HG-201) Max. 1 sheet
Pro-photo paper Max. 1 sheet
Pro-photo postcard Max. 10 sheets
Fabric -
T-shirt transfer Max. 1 sheet
Banner paper Max. 1 sheet
Detection functions
Paper out Available
Paper width None
Waste ink amount Available
Presence of BJ cartridge Available
Cartridge recognition Available (Supported cartridge or non-supported cartridge)
Remaining ink level Available (Default: OFF, detection by dot counting)
Print head alignment function Available
Significant misalignment under bi-directional printing can be adjusted.
Noise Fine Approx. 43 dB (Sound pressure level ISO9296)
HQ Approx. 45 dB
HS Approx. 46 dB
Environmental requirements
During operation Temp. 5 to 35 deg. C (41 to 95 deg. F)
Humidity 10% to 90%RH (no condensation)
Non operation Temp. 0 to 40 deg. C (32 to 104 deg. F)
Humidity 5% to 90%RH (no condensation)
Power supply
Input voltage/Frequency AC100V/120V 50/60Hz (LV)
AC220/240V 50Hz (HV)
Power consumption 18W
Stand-by status 2W
External dimension
W/O paper tray/support 390(W) X 189(D) X 162(H)
W paper tray/support 390(W) X 479(D) X 248(H)
Weight 2.4kg (W/O BJ cartridge and option)
Applicable safety standards
Printer FCC,IC,CE Mark,TWN-EMC,C-Tick,VCCI, Korean EMS, Gost-R,
Safety UL,CUL,CB Report,GS,CE Mark,FIMKO,DENTORI,AS,PSB,CCIB,KRN-DENTORI, CCEE, SASO, IRAM
2.2 Product life
Whichever of the following comes first
- 3 years
- Color printing 3000 pages
- Black printing 4500 pages
2.3 Print head spec.
Details
Type 4 color ink cartridge integrated type BJ cartridge (same type as the C-21e)
(electrically incompatible with the BC-21e)
Print head Bk/Col. 136 nozzles in a vertical line (same as the BC-21e)
Bk (64 nozzles ) + Y,M,C (24 nozzles each)
Droplet: Bk 30ng / Col. 10ng (Nozzles are smaller than those of the BC-21e)
Ink color Bk (new pigment) / Col.: Y,M,C (high brilliance ink)
Ink tank BCI-24 Bk, BCI-24 Color
(Same as the S300, BCI-24 Bk is structurally incompatible with the BC-21e)
Weight Approx. 75g
3. Error Code List
Errors will be displayed on the connected computer monitor.
To display error codes, the BJ Status Monitor of the Windows host computer should be active.
Error Code Error indication Error condition
1000 Printer is out of paper. Push RESET button to feed paper.
1200 Front cover is open. Close front cover.
1300 Paper JAM occurrs. Remove jammed paper.
1400 BJ cartridge is not installed.*1 Install BJ cartridge and close front cover.
1501 *2 Bk ink low warning2 (low remaining ink) Only status is indicated.
1510 *2 Col. ink low warning2 (low remaining ink ) Only status is indicated.
1541 *2 Bk ink low warning3 (ink level unclear) Only status is indicated.
*2
1542 Col. ink low warning3 (ink level unclear) Only status is indicated.
*2
1561 Bk ink low warning1 (approx. half level) Only status is indicated.
*2
1562 Col. ink low warning1 (approx. half level) Only status is indicated.
1700 Waste ink full warning (95% capacity) Possible to recover error with RESET button.
*3
1900 Head temperature warning Possible to recover error by closing the front cover.
5000 Home position error H/W fail Replace printer.
5100 Carriage control error H/W fail Replace printer.
5200 Head temperature error H/W fail Replace printer.
5400 Printer temperature error H/W fail Replace printer.
5600 No cartridge while printing H/W fail Replace printer.
5B00 Waste ink full H/W fail Replace printer.
5C00 Purging operation error H/W fail Replace printer.
6100 ROM error H/W fail Replace printer.
6300 RAM error H/W fail Replace printer.
6800 EEPROM error H/W fail Replace printer.
*1: Also applies when an unsupported cartridge is installed.
*2: Only when the detection function is active.
(Status is not indicated when the detection function is OFF.)
*3: When this error occurs the carriage does not move to the head replacement position when the
front cover is opened.
4. Service Mode
Function Procedure Remarks
Cleaning the BJ cartridge Press and hold the RESET button for 2 seconds or more Cleaning time
( while the AC cord is plugged in) :Approx.40seconds.
#Can be performed from the printer driver utility.
Deep Cleaning Select "Deep Cleaning" from the printer driver utility. Cleaning time
(It is necessary to connect the printer to the PC.) :Approx.60seconds.
Paper feeding without printing Click the RESET button three times. Perform paper feeding from the ASF
(For feeding cleaning sheet through the ASF.) without printing.
Test print
1) Nozzle pattern Double click the RESET button. Print nozzle check pattern
(while the AC cord is plugged in) (Line misalignment check
pattern)
[1]
Print Head Alignment Select "Print Head Alignment" from the printer driver utility.
[2] Significant misalignment
Select the optimal value using the printed head position can be adjusted.
adjustment pattern. (It is necessary to connect the printer
to the PC.)
2) Service test print
Control ROM Version See *1 service test print
Pages Per Cartridge Print sample : See *3
Waste ink Amount
Destination setting
EEPROM Reset See *2 EEPROM reset / Destination setting
(Reset waste ink amount)
Destination setting See *2 EEPROM reset / Destination setting
(Japan/SP/Others)
*1 Service test print
-1 Without the cartridge installed and with the front cover closed, connect the AC cord
while holding down the RESET button.
-2 Release the RESET button, press it down again within 5 seconds and release it once more.
-3 Open the front cover and install the print head (QY6-0038-000) and set A4-sized paper.
-4 Press the RESET button 3 times in a row.
-5 Close the front cover.
-6 The printer starts service test printing.
*2 EEPROM reset / Destination setting
-1 Without the cartridge installed and with the front cover closed, connect the AC cord
while holding down the RESET button.
-2 Release the RESET button, press it down again within 5 seconds and release it.
-3 Hold down the RESET button for 2 seconds or more and release it once more.
-4 < EEPROM Reset > < Destination setting >
Hold down the RESET button for 2 secs or more -Japan Press the RESET button once.
and release it. -Others Press the RESET button twice
-SP Press the RESET button 3 times
After the button is pressed, the carriage will move
the same number of times as the RESET button was pressed.
*3 Print sample of 'Service test print'
You can check the EEPROM settings with a 'Service test print'. (See the first part of the 'Service test print.')
Control ROM Version
Waste ink Amount
Fed sheet count
S200 Destination XX ROMVer X.XX Lost XX.X% CL XXXXX PaperCnt -> Nol XXXX Cad XXXX Res XXXX Gls XXXX Sel XXXX Otr XXXX
PurgeCnt -> Tim yyyyy Dot yyyyy Mnu yyyyy Crg yyyyy Wip yyyyyyk PurgeFlag: yyy Door: close USBSerialNo yyyyyy Fch: yy
Paper type
Destination setting Other
Other 01 Self print
Japan 02 Glossy paper
SP 03 High resolution paper
Postcard
Plain paper
5. External View / Parts List
Parts List
Key Part Number Rank Q'ty Description Remarks
A 0000U019 N 1 WHOLE UNIT, W/O POWER SUPPLY UNIT
B QH3-3443-000 1 AC Adapter 100/120V 50/60HZ LV(USA,CANADA,JAPAN)
QH3-3446-000 1 AC Adapter 220/240V 50/60HZ HV(Europe)
QH3-3449-000 1 AC Adapter 220/240V, CHN/ASIA/AUS HV(CHN,ASIA,AUS)
QH3-3451-000 1 AC Adapter 100/120V,TWN LV(TWN)
QH3-3452-000 1 AC Adapter 220/240V, KRN HV(KRN)
QY6-0038-000 K 1 PRINT HEAD, WITH INK TANKS
Note: BJC-2000/2000SP parts can be used for the S200/S200SP power supply cable. See below for screws.
Part Number Q'ty Description Remarks
XB1-2300-607 3 SCREW, BH3X6 (S) For LOGIC BOARD ASS'Y
XB6-7300-607 2 SCREW, TP, M3X6 For ASF UNIT
XB4-7300-807 1 SCREW, TAP TIGHT, BINDING HEAD For PRINT UNIT/BOTTOM COVER
XB4-7301-007 1 SCREW, TAP TIGHT BH3X10 For POWER SUPPLY/BOTTOM COVER
6. H/W Troubleshooting Flowchart
6.1 Printer main unit troubleshooting flowchart
(Confirmation of the printer when refurbishing)
Insert the AC adapter
No
Can CR/LF motor
move opration be heard?
Yes
Open the front cover
No
Does the CRG move to the head
replacement position?
Yes
Install the print head
Close the front cover
Does the head return to No
home position? (Auditorily)
Yes
Print the "Service Test Print" * Refer to "4.Service Mode" (Refer to the attached sample)
regarding printing method. 1) Non ejection of ink
Yes ----------------------------> NG
No 2) Top margin:
Correct? Outside of paper -------------> NG
3) Line
Yes Replace the print-head and Not connected ----------------> NG
re-print the "service test print". 4) Gray part
If there are black/white lines ---> NG
No
Correct ?
Yes
Yes
Is the waste ink capacity
10% or higher ?
No
Connect the computer
via the USB I/F
No
Possible to print ?
Yes
Normal Defective
At the final step of refurbishment, be sure to initialize EEPROM in accordance with
4. Service Mode . The purge reminder mark is set by initializing the EEPROM.
Unplug the power cord immediately, and do not print afterwards.
6.2 Print head troublshooting flowchart
Connect the computer
via the USB I/F
Nozzle check pattern printing * Refer to "4.Service Mode"
regarding printing method.
Yes
Correct?
No
* Refer to "4.Service Mode"
Cleaning regarding printing method.
Nozzle check pattern printing
Yes
Correct?
No
Deep cleaning * Refer to "4.Service Mode"
regarding printing method.
Nozzle check pattern printing
Yes
Correct?
No
Replace ink tank
Nozzle check pattern printing
Yes
Correct?
No
Yes
Significant
alignment?
No
Print Head Alignment
* Refer to "4.Service Mode"
regarding printing method.
Nozzle check pattern printing
Significant
alignment?
Yes No
Defective Normal
7. Service Information
7.1 Whole unit replacement
When the unit is exchanged as a Whole Unit (WHOLE UNIT, W/O POWER SUPPLY UNIT : 0000U019),
in accordance with the following procedures:
1 Remove the AC adapter from the printer returned by the user.
2 Install the removed AC adapter in the whole unit.
3 Affix the product name label. (The label has been packaged with whole unit)
4 Perform destination setting. (See "4. Service Mode" for details)
5 Align the print head position if the print head is installed. (See following "7.2 Print head replacement.")
< Composition of WHOLE UNIT, W/O POWER SUPPLY UNIT>
Enclosed items
Printer unit (No product name label / No AC adapter)
Paper pick-up tray
Paper output tray
Product name labels
Packing material
7.2 Print head replacement
When replacing the print head (PRINT HEAD, WITH INK TANKS: QY6-0038-000), conduct the following steps:
Align the head position after the print head is replaced. (See "4. Service Mode" for print head alignment
procedures.)
As misalignment is sometimes significant due to previous print head alignment after print head
replacement, advise users to align print head, if necessary. (Possible to check alignment by nozzle check
pattern. See "4. Service Mode" for procedures.)
7.3 Product technical information
(1) Problems when evaluating
Function Paper type Result Conditions Countermeasure Cause Estimated call and claim
1 Paper feeding Paper pick-up KH-201 (Glossy Last two sheets fed Low temperature / low Set only one sheet of paper at a As the friction between stacked paper is *Paper out error
performance problem side) overlapped humidity time for printing great, last two sheets fed overlapped. *Two sheets of paper (postcards) are fed at
*Friction rates differ by media lot once ejection of ink
*Non
*Cannot print
2 PH-101 (address Overlapped paper When printing address 1) Dry the glossy side of paper As the friction between stacked paper is *Paper out error
side) feeding side after printing whole adequately after printing great, last two sheets fed overlapped. *Two sheets of paper (postcards) are fed at
glossy side with high duty *Friction rates differ by media lot once ejection of ink
2) Flatten the curled paper *Non
pattern at low temperature
and low humidity *Cannot print
3 Last sheet is not If the last sheet is not picked up, As the friction between the stacked paper *Paper (postcard) is not picked up
picked up set the enclosed thick paper and ASF becomes significant, the paper *Paper out error
underneath when printing only feed roller cannot pick up stacked paper.
*Cannot print
one sheet of paper
4 Failure to feed/print When stacking multiple 1) Flatten the curled paper The last paper is picked up and fed too far, *Paper out error
last sheet sheets of paper at low then ejected without being printed
2) Set one sheet of paper at a *Non ejection of ink (Paper is ejected without
temperature and low
time for printing being printed)
humidity
*Cannot print
5 Paper delivery All Japanese Postcard ejection When printing max. Remove a postcard from the As the postcard being fed contacts those *Cannot print the lower part of paper
problem postcards failure printable area and more Paper Output Tray after printing, on the Paper Output Tray, the final section *Lines/uneven print density at the rear edge of
than 3 sheets are left on or perform printing without Paper of the postcard cannot be fed and printed paper
the Paper Output Tray at Output Tray. completely. This unfed paper may cause
low temperature and low print failure at the top of the next sheet. *Print data at the top of paper is missing
humidity *Poor print quality
6 Image quality Uneven print All paper types Uneven horizontal When printing max. Recommend printing within The final section of the sheet is not held by *Cannot print the lower part of paper
density at the image on final section printable area "print-assured area" the Pinch Roller, and printing in this area of *Lines/uneven print density at the final section
final section of paper loose paper can result in uneven density. of paper
The occurrence rate is the same as the
current competitive printer (Z33). *Poor print quality
7 Uneven print HR-101/GP-301/ Uneven horizontal When printing max. Recommend printing within When the top of the paper contacts the *Lines/uneven print density at the top of paper
density at KH-201/PR-101/ image at the top of printable area at low "print-assured area" spurs, a loop of paper can occur. When
insertion point to PH-101 paper temperature and low ink is ejected, misalignment due to this
spurs humidity causes uneven density. Insignificant *Poor print quality
except for specific pattern (high duty half
tone).
8 Uneven print HR-101 Uneven horizontal When printing max. Recommend printing within As the paper surface is not flat at excessive *Line/uneven print density at the top of paper
density due to image at the top of printable area at low "print-assured area" ink ejection, uneven density occurs.
paper cockling paper temperature and low Insignificant except for specific pattern
humidity (high duty half tone). *Poor print quality
9 Print head Plain paper Smeared paper Remarkable only when Adjust paper thickness lever to As the paper surface is not flat at excessive *The printed side of paper is smeared.
contacts paper surface printing high duty solid thick paper position ink ejection, uneven density occurs.
*Poor print quality
pattern (Bk solid, Insignificant except for specific pattern
secondary Cl solid, Bk and (high duty half tone).
process Bk solid)
Note: Due to very specific occurrence conditions, the phenomenon above occur only rarely. The above 8 items (1 to 8) occur at the same level
as the current BJC-2100/S100.
(2) New Functions
1. Remaining ink level detection function
This printer has a function to detect the remaining ink level. (Default setting: OFF)
Detection method: Dot counting (counted for each Bk/Cl ink tank)
Cl tank: The remaining ink level is detected by total counted dot values of 3 color ink tanks
Display method: Displayed on the Status Monitor (displayed at 3 levels shown below for each Bk/Cl ink tank)
Level 1: Half level of remaining ink level (approx. 40%)
Level 2: "!" mark is indicated. (Approx. 20% of remaining ink level)
Level 3: "?" mark is indicated. (Remaining ink level is unclear)
* Remaining ink detection function displays the status only, and does not cause errors.
Accuracy: The margin of error of detection accuracy is plus or minus 10% in normal printing
*The margin of error is likely to be large in the following specific print patterns:
When printing continuously using an only single-color ink tank
As the remaining ink level is calculated by total counted dot values of 3 color ink
tanks, if either C/M/Y ink is heavily consumed, the margin of error increases.
When performing continuous Bk solid printing, the margin of error for remaining
ink is large.
With continuous printing ink flow from the tank to the ink chamber can be
interrupted, after which ink remains unused in the tank and will not flow again.
Procedures for display:
Perform the following operations from the printer driver utility:
1) Set the indication of the remaining ink level in "Low Ink Warning Setting."
2) Reset the ink counter in "Ink Counter Reset."
* Be sure to reset the ink counter from the printer driver utility after replacing ink tanks.
1) Due to user error, the actual remaining ink level does not accord with the indicated remaining
ink level, resulting in "ink out," etc.
User error: Forgetting to reset ink counter / ink counter reset apart from when replacing ink tanks
2) Due to the specific print pattern, the actual remaining ink level does not accord with the indicated remaining ink
level, resulting in "ink out."
Specific print pattern: Continuous printing using single-color ink tank only / continuous Bk solid printing, etc.
2. Print control change according to temperature/paper type
As this printer performs the most suitable printing for the temperature environment and print mode (print paper), the
control of pre-printing ink ejection varies.
"Low temperature below 15 degrees" or "other":
To obtain steady print quality, the pre-printing ink ejection is controled at every line.
Print mode Under approx. 15oC Over approx. 15oC
Plain paper Every line Dot count
Other Every line Every line
1) When selecting plain paper print mode:
Print speed is reduced to approx. one-third of normal in a low temperature environment (under approx. 15 degrees)
2) When selecting plain paper print mode:
The max. number of sheets printable decreases (the amount of ink consumed increases a little) in a low
temperature environment (under approx. 15 degrees).
3. Deep cleaning
This printer has a deep cleaning function.
Deep cleaning: This is a deep cleaning function in order to resolve print failure due to ink clogging the print head
(The black ink is pigment-based, and clogs easier than the current dye-based ink.)
*Perform from the printer driver utility. The amount of purged ink is approx. three times that of normal cleaning.
1) Excessive ink consumption when comductiong deep cleaning repeatedly.
4. Elimination of recovery function at paper pick-up
(All types of pro-photo paper: PR-101/PC-101/PH-101)
The recovery function at paper pick-up is eliminated when the pro-photo paper print mode is selected.
Recovery function at paper pick-up:
The function to correct print position when paper is fed to far at paper pick-up
*As Pro-photo paper is slippery and the print position misaligns easily, the recovery function was eliminated.
If the paper is fed to far, the paper will be ejected without being printed.
5. Bidirectional registration adjustment function
This printer has a bidirectional registration adjustment function (print head alignment).
Bidirectional registration adjustment function:
The function to correct horizontal misalignment in bidirectional printing
Print head alignment pattern: Patterns "A" to "D" for bidirectional correction
(A: HS mode Bk, B: HS mode Cl, C: HQ mode Bk, D: HQ mode Cl)
See "4. Service mode" for adjustment procedures/horizontal misalignment confirmation method.
1) Horizontal misalignment may be significant if setting prior to print head alignment remain
after print head replacement without re-adjustment.
Unidirectional/bidirectional print mode (driver default: bold italic)
Print mode (paper) Print data Speedy Standard Fine
Plain paper Bk*1 Bidirectional (HS) Bidirectional (HQ) Unidirectional
Cl Bidirectional (HS) Bidirectional (HQ)*2 Unidirectional
High resolution paper Bk*1 - Bidirectional (HQ) Unidirectional
(HR-101) Cl - Unidirectional Unidirectional
*1
Postcard/ Bk - Bidirectional (HQ) Unidirectional
Inkjet postcard Cl - Unidirectional Unidirectional
Transparent film Bk/Cl - Unidirectional Unidirectional
(CF-102)
T-shirt ransfer Bk/Cl - - Unidirectional
(TR-201)
Special paper apart from Bk/Cl - Unidirectional Unidirectional
the above
*1
: when gray scale is selected
*2
: when Bk/Cl data is mixed
Bk unidirectional / Cl bidirectional
: Bk data only
Bk bidirectional
Attached Sample (Service Test Print)
Check item 1 (Non ejection of ink): Total area of the sample below
Check item 2 (Top margin)
Print EEPROM Information
-->See "4. Service Mode" for details.
Check item 3
(Line)
Check item 4 Check item 4
(Gray part) (Gray part)
Head check pattern
EEPROM Information
(HEX Indication)
Paper size :
Paper size: A4
◦ Jabse Service Manual Search 2026 ◦ Jabse Pravopis ◦ onTap.bg ◦ Other service manual resources online : Fixya ◦ eServiceinfo