Service Manuals, User Guides, Schematic Diagrams or docs for : DENON AV Surround Receiver AV Surround Receiver Denon - AVR-1910 & 1620 & 1610 & 790 & 590 Update Instruction AVR-1910
<< Back | HomeMost service manuals and schematics are PDF files, so You will need Adobre Acrobat Reader to view : Acrobat Download Some of the files are DjVu format. Readers and resources available here : DjVu Resources
For the compressed files, most common are zip and rar. Please, extract files with Your favorite compression software ( WinZip, WinRAR ... ) before viewing. If a document has multiple parts, You should download all, before extracting.
Good luck. Repair on Your own risk. Make sure You know what You are doing.
Image preview - the first page of the document
>> Download Update Instruction AVR-1910 documenatation <<
Text preview - extract from the document
2009/7/28 V01
AVR-1910/1610/1620/790/590 Firmware Update Instruction (Common for AVC-1620)
Nr. Contents Tools Remarks
Follow this instruction and the operating instructions for service(1) PC with RS-232C terminal Commercially avaiable
parts kit = "00DSPK-581 WRITING UNIT" which to be used with(2) RS-232C cable 9P, D-sub, StraighCommercially avaiable
1 Writer Starter = "m3a0806v020046exe.zip"
File size : 345,864 bytes (0.32 Mbytes)
"FlashSta.exe"
Please download the Writer Starter software "Flash Available in SDI or web.
Programmer M16C Flash Starter M3A-0806 Software
Ver.2.0.0.46 Upgrade" from SDI or below URL.
2 Program File = "AVR1910_1610_Main Ver00.85.mot" Available in SDI.
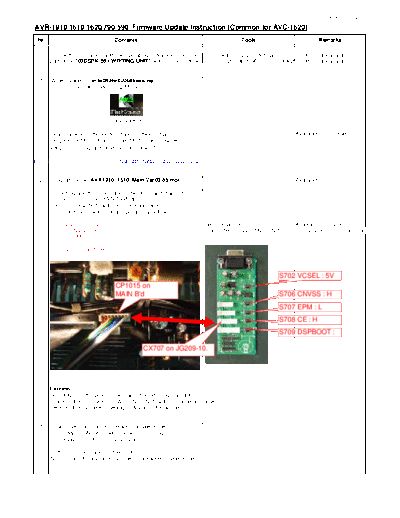
3 Jig setting and the connection between jig and main unit.
Connect CP1015 on MAIN PWB and
CX707 on JG209-10 with 8P connector cable.
Set all the slide switch into the position as follows.
S702 VCSEL : 5V Service parts kit: Avaiable for service
S706 CNVSS : H 00DSPK-581 WRITING UNIT 8P connection cable included
S707 EPM : L
S708 CE : H
S709 DSPBOOT : H
S702 VCSEL : 5V
CP1015 on
MAIN B'd S706 CNVSS : H
S707 EPM : L
S708 CE : H
S709 DSPBOOT :
CX707 on JG209-10.
Caution!
Do not turn on the power of A/V amplifier, when A/V amplifier
connects the "00DSPK-581 WRITING UNIT" with 8p connector cable.
Because the customer's setting of A/V amplifier will be lost.
4 How to set main unit into firmware update mode.
Put POWER ON/OFF switch on while pressing
"Surround <" + "MENU" (for all models)
buttons on front panel of main unit.
No LED and FL display should be lit (firmware update mode.)
5 Operation with writer software.
Procedure of writing software.
1) Start up "Flash Starter M3A-0806 Ver2.0.0.46" on PC.
2) Window of "FlashSta.exe"
3) Double click the file name of the "FlashSta.exe".
3) Click the "OK" button.
4) If A/V amplifer does not connect to "00DSPK-581 WRITING UNIT"
(or PC) properly or Setting of the "00DSPK-581 WRITING UNIT"
is not correct, the following indication is displayed.
Please click the "Cancel" button, and confirm all connection and
setting, and goes to item-3.
Cancel
5) Click the "Refer..." button.
6) Select file "AVR1910_1610_Main Ver00.85.mot" file in PC.
Click the "Open" button.
AVR1910_1610_Main
AVR1910 1610 Main Open(O)
Cancel(C)
7) Click the "OK" button.
8) Please input the "FF" to 7 spaces by keyboard.
and click the "OK" button.
9) Click the " Setting..." button.
10) Select the "57600" in Baud rate (bps)
and click the "OK" button.
11) Click the "E. P. R" button.
12) Click the "OK" button.
13) Updating is starting.
14) Click the "OK" button.
6 While holding the "<" and ">" buttons (SURROUND MODE)
down simultaneously, turn the "Power switch" on.
The FL Display indicates all digits at interval a second.
7 Finished.
* How to confirm the firmware version.
Put POWER ON/OFF switch on while pressing
"DIMMER" and "STATUS" buttons
on the front panel of main unit.
Press "DIMMER" to catch the product model name,
Main (CPU) and DSP firmware version.
◦ Jabse Service Manual Search 2026 ◦ Jabse Pravopis ◦ onTap.bg ◦ Other service manual resources online : Fixya ◦ eServiceinfo