Service Manuals, User Guides, Schematic Diagrams or docs for : DE`LONGHI disassembly-BM350
<< Back | HomeMost service manuals and schematics are PDF files, so You will need Adobre Acrobat Reader to view : Acrobat Download Some of the files are DjVu format. Readers and resources available here : DjVu Resources
For the compressed files, most common are zip and rar. Please, extract files with Your favorite compression software ( WinZip, WinRAR ... ) before viewing. If a document has multiple parts, You should download all, before extracting.
Good luck. Repair on Your own risk. Make sure You know what You are doing.
Image preview - the first page of the document
>> Download disassembly-BM350 documenatation <<
Text preview - extract from the document
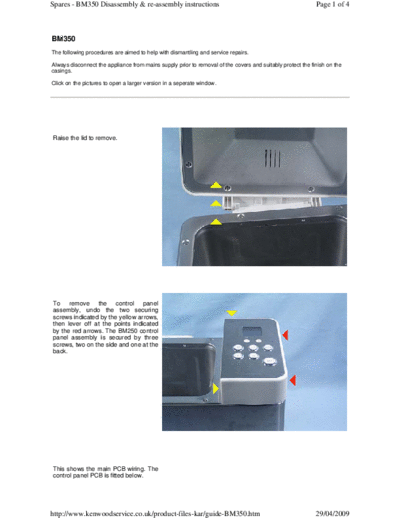
Spares - BM350 Disassembly & re-assembly instructions                                                       Page 1 of 4


BM350
The following procedures are aimed to help with dismantling and service repairs.

Always disconnect the appliance from mains supply prior to removal of the covers and suitably protect the finish on the
casings.

Click on the pictures to open a larger version in a seperate window.


Raise the lid to remove.


To remove the control panel
assembly, undo the two securing
screws indicated by the yellow arrows,
then lever off at the points indicated
by the red arrows. The BM250 control
panel assembly is secured by three
screws, two on the side and one at the
back.


This shows the main PCB wiring. The
control panel PCB is fitted below.


http://www.kenwoodservice.co.uk/product-files-kar/guide-BM350.htm                                           29/04/2009
Spares - BM350 Disassembly & re-assembly instructions               Page 2 of 4


View with the control panel removed.


The convector     fan   &   thermistor
position.


http://www.kenwoodservice.co.uk/product-files-kar/guide-BM350.htm   29/04/2009
Spares - BM350 Disassembly & re-assembly instructions               Page 3 of 4


To gain access to the internal parts,
first remove the top surround which is
secured by six screws.


With the appliance upside down,
remove all the base screws including
the feet, then ease off the outer body.
The chassis assembly is removed
through the top.


http://www.kenwoodservice.co.uk/product-files-kar/guide-BM350.htm   29/04/2009
Spares - BM350 Disassembly & re-assembly instructions               Page 4 of 4


 View with the outer casing removed.

 Please note:      it is necessary to
 remove the outer casing when
 replacing the thermistor on the
 BM350, whereas on the BM250 the
 thermistor is accessible with only the
 control panel assembly removed.
 Twin thermal fuses 172
◦ Jabse Service Manual Search 2024 ◦ Jabse Pravopis ◦ onTap.bg ◦ Other service manual resources online : Fixya ◦ eServiceinfo