Service Manuals, User Guides, Schematic Diagrams or docs for : Keithley 601 601A(Model601)
<< Back | HomeMost service manuals and schematics are PDF files, so You will need Adobre Acrobat Reader to view : Acrobat Download Some of the files are DjVu format. Readers and resources available here : DjVu Resources
For the compressed files, most common are zip and rar. Please, extract files with Your favorite compression software ( WinZip, WinRAR ... ) before viewing. If a document has multiple parts, You should download all, before extracting.
Good luck. Repair on Your own risk. Make sure You know what You are doing.
Image preview - the first page of the document
>> Download 601A(Model601) documenatation <<
Text preview - extract from the document
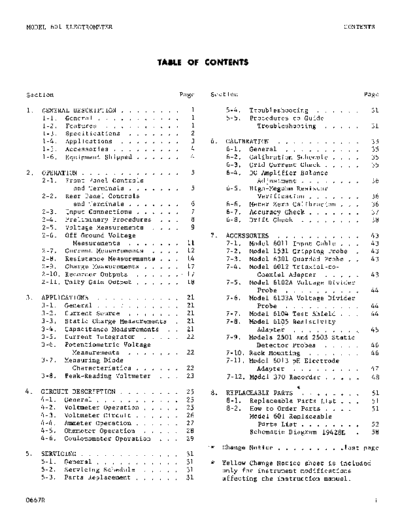
MODEL 601 ELECTROMETER CONTENTS
TABLE OF CONTENTS
Section Page Section Page
1. GENERALDESCRIPTION . 1 5-4. Troubleshooting . . . . 31
l-l. General . . . 1 5-5. Procedures to Guide
1-2. Features . 1 Troubleshooting . . . . 31
1-3. Specifications , 2
l-4. Applications . . 6. CALIBRATION . . . . . . . 35
1-5. Accessories . . 2 6-l. General . . , . . . . . . . 35
1-6. Equipment Shipped 4 6-2. Calibration Schedule . . . 35
6-3. Grid Current Check . . . . . 35
2. OPERATION . . . . . . . . 5 6-4. DC Amplifier Balance
2-l. Front Panel Controls Adjustment . . . . . . . . 36
and Terminals . . . . . . 5 6-5. High-Megohm Resistor
2-2. Rear Panel Controls Verification . . . . . . . 36
and Terminals . . . . . 6 6-6. Meter Zero Calibration . . 36
2-3. Input Connections . . . . . 7 6-J. Accuracy Check . . . , , . . 37
2-4. Preliminary Procedures . . 8 6-8. Drift Check . . . . . . . . 38
2-5. Voltage Measurements . . . 9
2-6. Off Ground Voltage 7. ACCESSORIES . . . . . . . . 43
Measurements . . . . . . 11 J-l. Model 6011 Input Cable . . 43
2-7. Current Measurements . . . 12 J-2. Model 1531 Gripping Probe . 43
2-8. Resistance Measurements . * 14 J-3. Model 6301 Guarded Probe . . 43
2-9. Charge Measurements . . . . 17 7-4. Model 6012 Triaxial-to-
2-10. Recorder Outputs . . . . . . 17 Coaxial Adapter . . . 43
2-11. Unity Gain Output . . . . . 18 7-5. Model 6102A Voltage Divider
Probe , , . . , . , . . . 44
3. APPLICATIONS . . . . . . . . . . * 21 7-6. Model 6103A Voltage Divider
3-l. General . . . : . . . . , . . 21 Probe , . . . . . , . . 44
3-2. current source , . . . . . . 21 J-7. Model 6104 Test Shield . . 44
3-3. Static Charge Measurements . 21 7-8. Model 6105 Resistivity
3-4. Capacitance Measurements . . 21 Adapter . . . . . . . . .~ 45
3-5. current Integrator . . . . . 22 7-9. Models 2501 and 2503 Static
3-6. Potentiometric Voltage Detector Probes , . . . . 46
Measurements . . . . , . . 22 J-10. Rack Mounting . . . , . . . 46
3-7. Measuring Diode J-11. Model 6013 pH Electrode
Characteristics . . . . , . 22 Adapter . . . . . . . . 47
3-8. Peak-Reading Voltmeter . . . 23 J-12. MQdel 370 Recorder . . . . . 4,8
\
4. CIRCUIT DESCRIPTION . . . , . 25 8. REPLACEABLEPARTS . . . . . . . 51
4-l. General . . . . . . . 25 8-1. Replaceable Parts List . . . 51
4-2. Voltmeter Opiration , . 25 8-2. How to Order Parts . . . . 51
4-3. Voltmeter Circuit . . . 26 Model 601 Replaceable
4-4. Ammeter Operation . . . 27 parts List . . . . . . . , 52
4-5. Ohmmeter Operation . . 28 Schematic Diagram 194283 . 58
4-6. Coulombmeter Operation 29
,* Change Notice . . . . . . . . .last page
5. SERVICING . . . . . . . . . 31
5-l. General . . . . . . . . 31 * Yellow Change Notice sheet is included
5-2. Servicing Schedule . 31 only for instrument modifications
5-3. Parts Replacement , . , 31 affecting the instruction manual.
0667R i
GENERALDESCRIPTION MODEL 601 ELECTROMETER
-
XGURE 1. Keithley Instruments Model 601 Electrometer.
ii 9666
MODEL 601 ELECTROMETER GENERALDESCRIPTION
SBCTION 1. GENERAL DESCRIPTION
l-l. GENEXAL.
a. The Keithley Model 601 Electrometer is a versatile battery operated instrument which
measures wide ranges of dc voltages, currents, resistances and charges. It is a highly
refined dc vacuum tube voltmeter that uses an electrometer tube input to provide greater
than 1014 ohm input resistance. The Model 601 has all the capabilities of conventional
VTVMs, but Lt can also make many more measurements without loading circuits.
b. The Electrometer has nine volta e ranges from 0.001 volt full scale to 10 volts,
twenty-eight current ranges from 10' l$ ampere full scale to 0.3 ampere, twenty-three linear
resistance ranges from 100 ohms full scale to 1013 ohms, and thirteen charge ranges from
10-12 coulomb full scare to 10-6 coulomb.
The Model 601 offers complete line isolation and excellent off-ground measuring capa-
bi;ity. Up to 1500 volts may be applied between the input low terminal and the case, and
safe operation is assured with the case grounded. A three-terminal input allows complete
guarding of the high terminal.
d. The Model 601 employs matched electrometer input tubes followed by three differen-
tial transistor amplifier stages and a transistor output stage. A large amount of nega-
tive feedback is used for stability and accuracy.
l-2. FEATURES.
a. Voltmeter accuracy is *l% of full scale, exclusive of noise and drift.
b. Zero drift of the Model 601 is 200 microvolts per hour maximum averaged over any 24-
hour period after warm-up. During the 2-hour warm-up, zero drift is no more than 2 milli-
volts after the first hour.
c. Two amplifier outputs are available. A switch on the rear panel allows either
+l volt or fl milliampere for full-scale meter deflection. The-current output is variable
25% with 1.4-kilohm recorders. The unity-gain amplifier output is equal to the input
voltage within 50 ppm or 100 inicrovolts, exclusive of zero drift.
d. Current measurements can be made by one of two methods: the normal method in which
&he current is determined by measuring the voltage drop across a resistor shunting the
oxput, or the fast method in which negative feedback is applied through the shunt resis-
tor. The former method minimizes noise. The latter method reduces the input drop and
greatly increases the response speed on the low-current ranges.
e. The lOOO-hour life of the batteries enables "sage in Long-term experiments without
interruptions for-recharging. Battery life is maintained even when the l-milliampere re-
corder output is used. For further convenience, battery condition is readily checked on
the panel meter,
056JR 1
GENERALDESCRIPTION MODEL 601 ELECTROMETER
1-3. SPECIFICATIONS.
AS A VOLTMETER:
RANGE: .OOl volt full scale to 10 volts in nine lx and 3x ranges.
ACCURACY: ~1% of full scale on all ranges exclusive of noise and drift.
ZERO DRIFT: After l-hour warm-up no more than 2 millivolts in the second hour, and in
any subsequent 24-hour period, the average drift will not exceed 200 microvolts per hour.
METER NOISE: Cl0 microvolts maximum with input shorted on most sensitive range.
INPUT IMPEDANCE: Greater than 1014 ohms shunted by 20 picofarads. Input resistance may
also be selected in decade steps from 10 to 1011 ohms.
AS AN AMMETER:
RANGE: LO-14 ampere full scale to 0.3 ampere in twenty-eight lx and 3x ranges.
ACCURACY: *z% of full scale on 0.3 to lo-11 ampere ranges using the smallest available
Multiplier Switch setting; 24% of full scale on 3 x lo-12 to lo-14 ampere ranges.
METER NOISE: Less than i3 x 10'15 ampere.
GRID CURRENT: Less than 2 x LO-l4 ampere.
AS AN OHMMETER:
RANGE: 100 ohms full scale to 1013 ohms in twenty-three linear lx and 3x ranges.
ACCUR4CY: 23% of full scale on 100 to 108 ohm ran es using the largest available Multi-
plier Switch setting: ;t5% of full scale on 3 x 10⁸ to 1013 ohm ranges.
AS A COULOMBMETER:
RANGE: LO-12 coulomb full scale to lo-6 coulomb in thirteen lx and 3x ranges.
ACCURACY: i5% of full scale on all ranges. Drift due to grid current does not exceed
2 x lo-14 coulomb per second.
AS AN AMPLIFIER:
INPUT IMPEDANCE: Greater than 1014 ohms shunted by 20 picofarads. Input resistance may
also be selected in decade steps from 10 to 1011 ohms.
OUTPUTS: Unity-gain output and either voltage or current recorder output.
UNITY-GAIN OUTPUT: At dc, output is equal to input within 50 ppm or 100 microvolts, ex-
clusive of zero drift. Up to 0.1 milliampere may be drawn. Output polarity is same as
input polarity
0366R
MODEL 601 ELECTROMETER GENERALDESCRIPTION
VOLTAGE RECORDER. OUTPUT: +l volt for full-scale input. Internal resistance is 910 ohms.
Output polarity is opposite input polarity.
Gain: 0.1, 0.33, etc. to 1000.
Frequency Response (Within 3 db): dc to 100 cps at a gain of 1000, rising to 50 kc st
a gain of 3.3, decreasing to 1 kc at a gain of 0.1.
Noise: Less than 2% rms of full scale at a gain of 1000, decreasing to less than 0.5%
at gains below 10.
CURRENTRECORDEROUTPUT: il milliampere for full-scale input, variable +5% with 1400-ohm
recorders.
GENERAL:
ISOLATION: Input low to case: greater than 1010 ohms shunted by 0.0015 microfarad. I*-
put low may be floated up to k1500 volts with respect to case.
POLARITY: Meter switch selects left-zero (positive or negative) or center-zero scales.
Meter switch does not reverse polarity of outputs.
CONNECTORS: Input: Teflon-insulated triaxial Dage 33050-l. Lo: binding post. Voltage
or current output: Amphenol 80-PC2F. Unity gain output, case ground: binding posts.
BATTERY CHECK: Condition of all batteries may be checked with front panel controls.
BATTERIES: Four 2N6 (or 246, VS305 or NEDA 1602); three TR286 (or E286); two RM42R (or
E42N or HG42R). 1000 hours battery life.
DIMENSIONS, WEIGHT: 10-l/2 inches high x 6-5/b inches wide x 10 inches deep; net weight,
14 pounds.
ACCESSORIESSUPPLIED: Model 6011 Input Cable; mating output connector.
l-4. APPLICATIONS.
a. Voltmeter applications include directly measuring potentials across pH electrodes,
piezoelectric crystals, capacitors, electro-chemical cells and biological membranes.
The Model 601 is also useful as a null detector with potentiometers or bridges in high im-
pedance applications.
b. As a picoammeter the Model 601 can br used with photomultiplier tubes, flame and
beta ray ionization detectors, lithium ion drift detectors and gas chromatographs. It is
also useful in nuclear studies , plasma physics and vacuum research.
c. As an ohmmeter the Electrometer is ideal for measuring insulation resistance and
resistor voltage coefficients. It is useful for measuring "in circuit" resistances,
since the Model 601 low terminal can be isolated from case ground. Volume and surface re-
sistivities can be measured with the Model 601 and the Model 6105 Resistivity Adapter.
d. In addition to measuring charge directly other coulombmeter uses are measuring
0366R 3
GENERALDESCRIPTION MODEL 601 ELECTROMETER
charge current over a period and obtaining integral curves of time varying currents. The
Electrometer can also be used as a charge amplifier to measure piezoelectric crystal out-
puts.
l-5. ACCESSORIES. (Also see Section 7).
a. Model 6011 Input Cable has 30 inches of low noise triaxFa1 cable with mating triax-
ial input connector and three alligator clips.
Model 6013 pH Electrode Adapter has a Z-foot cable and triaxial
b. connector and accepts
Leed & Northrop and Beckman pH electrode connectors. The Adapter allows accurate and con-
venient pH potential measurements with the Model 601.
c. Model 6301 is a high impedance guarded probe with a 3-foot connecting triaxial
cable that allows measurements to be made more conveniently. The Model 6301 has an insu-
lation resistance of over 1014 ohms. Using the Probe does not effect any Model 601
specifications.
d. Model 1531 is a gripping probe with a 3-foot connecting triaxial cable. The Model
1531 has an insulation resistance of over lOlo ohms.
e. Model 4005 Rack Mounting Kit adapts the Model 601 to rack mounting 10-l/2 inches
high x 19 inches wide. The Kit can accommodate two Model 601's side-by-side by using an
additional cover.
f. Model 6012 Triaxial-to-Coaxial Adapter permits using the Model 601 with all Keithley
electrometer accessories having uhf type coaxial connectors. These include the Models
6102A, 6103A, 6104, 6105, 2501 and 2503: Since circuit low and case ground are connected
using the Adapter, the Model 601 should not be floated.
g. Models 6102A and 6103A voltage divider probes, described in Section 7, facilitate
measurements and extend the voltage range to 10 kilovolts.
h. Model 6104 Test Shield is suitable for resistance measurements with either 2 or
3-terminal guarded connections, as well as voltage and current tests.
i. Model 6105 Resistivity Adapter is a guarded test fixture for measuring volume and
surface resistivities of materials when used with the Model 601 and the Keithley Model
240A High Voltage Supply.
j. Models 2501 and 2503 Static Detector Probes are capacitive voltage dividers with a
10,OOO:l ratio, when used with the Probe 3/8 inch from the charged surface.
k. Model 370 Recorder is uniquely compatible with the Model 601 as well as other
Keithley microvoltmeters, electrometers and picoammeters. The recorder is a high quality
economical instrument that maximizes the performance of the Model 601, and many other
Keithley instruments, even in the most critical applications.
l-6. EQUIPMENTSHIPPED. The Model 601 Electrometer is factory calibrated and shipped
with all components in place. The shipping carton also contains the Instruction Manual,
'Model 6011 Input Cable and mating output plug.
4 0667R
MODEL 601 ELECTROMETER OPERATION
SECTION 2. OPERATION
2-l. FRONT PANEL CONTROLSAND TERMINALS (See Figure 2)
a. Range Switch. The Range Switch selects the measuring mode and the range. It is
divided into a VOLTS position, 11 AMPERESranges, eight OHMSranges and four COULOMBS
ranges. A line above the dial skirt indicates the range used. Full-scale sensitivity
for all ranges is the Range Switch setting times the Multiplier Switch setting. The 10 or
3 of the top meter scale corresponds to the full-scale deflection for the range selected;
for example, on the l-volt range, the needle is at 10 for a l-volt input.
b. Multiplier Switch. The Multiplier Switch determines the voltage sensitivity of the
dc amplifier and sets the full-scale voltage range when the Range Switch is set to VOLTS.
The Multiplier Switch may also be used to multiply the AMPERES(3x maximum setting above
10a3), OHMSand COULOMBS ranges on the Range Switch. A line above the dial skirt indicates
the range used.
c. METER Switch. The Switch has six positions: the spring-returned BATTERY CHECK
position allows checking of the battery condition with the Multiplier Switch. POWER OFF
shuts off the instrument. OFF disconnects only the meter during recorder operation. The
+ and - positions determine the polarity of the meter. CENTER ZERO sets the instrument
for center zero operation (lower meter scale).
d. ZERO Controls. Two ZERO Controls are
on the front panel: a MEDIUM Switch (outer
knob) and a lo-turn FINE potentiometer
(center knob). These allow precise meter
zeroing.
e. ZERO CHECK Button. Depressing the
Button effectively removes all input signal
from the instrument by shunting the input
and amplifier through 10 megohms. This
allows meter zeroing on any range. The
Button is locked in the zero check position
when the line is horizontal.
f. FEEDBACKSwitch, The FAST and NORMAL
positions of the Switch determine the feed-
back connections within the instrument.
With the Switch at FAST, current measure-
ments are made with the range resistors in
the feedback network; this results in lower
input voltage drops and faster response
speeds. The FAST position is also used for
coulomb measurements, and~to increase re-
sponse speed. When the Switch is in NORMAL,
the range resistors shunt the input.
FIGURE 2. Model 601 Front Panel Controls
g. INPUT Receptacle. The INPUT Recepta- and Terminals. Circuit designations refer
cle is a Teflon-insulated triaxial type to Replaceable Parts List and the Schematic
connector. Its center terminal is the cir- Diagram.
0666R 5
OPERATION MODEL 601 ELECTROMETER
cuit high; the inner shield is circuit low
(circuit ground); the outer shield is case
ground. (See Figure 4.) A shield cap is
provided. The LO Terminal, below the
Receptacle, is connected to circuit low;
it is connected to case ground only if the
shorting link on the rear panel is connect-
ed.
2-2. REAR PANEL CONTROLSAND TERMINALS
(See Figure 3).
a. COARSEZERO SWITCH. The COARSEZERO
Switch has 11 positions to extend the zero-
ing capability of the front panel ZERO Con-
trols.
d. OUTPUT Switch. The Switch is a two-
position slide switch for the output. In
the 1 MA position, the instrument will
drive l-milliampere recorders. In the 1 V
position, the output is 1 volt for full-
scale meter deflection. Source resistance
is approximately 1090 ohms.
C. 1 MA CAL Control. The Control varies `LtiUKli 3. Model bUL Kear hnel COntrols
the output from 0.95 to 1.05 milliampere and Terminals.
for 1400-ohm recorders, so the recorder
scale will correspond with the Electrometer
meter.
d. OUTPUTReceptacle. A 2-terminal microphone-type receptacle provides 1 volt or 1 mil-
liampere for full-scale meter deflection. Pin No. 2 is at circuit low when the FEEDBACK
Switch is at NORMAL. Neither terminal is at ground when the FEEDBACKSwitch is at FAST.
Both terminals.are isolated from case ground.
e. Xl OUTPUTand OHMSGUARDTerminals. The potential between the Xl OUTPUTTerminal
and the OHMSGUARDTerminal (circuit low when the FEEDBACKSwitch is in NORMAL) is equal
to the input voltage with 0.005% linearity or 100 microvolts. When the FEEDBACKSwitch
is at FAST, the Xl OUTPUTTerminal is at circuit low and the OHMSGUARDTerminal is float-
ing.
f. LO Terminal. A black terminal allows connection to the input low connection. Con-
necting the LO and CASE GROUND Terminals puts both at case ground.
g. CASE GROUND Terminal. A blue termitial is connected directly to the outside cabinet
of the Model 601 and the outside shell of the input connector. It is connected to nothing
else within the instrument.
NOTE
If the Model 601 will be stored for a long period, remove batteries. Also, make
sure the METER Switch is at POWER OFF when the instrument is not being used.
6 0666R
MODEL 601 ELECTROMETER OPERATION
7
Lead Circuit JlOl Terminal
heavy wire with red clip cover Input (circuit) high center
thin wire with black clip cover Input (circuit) low Inner shield
thin wire with blue clip cover Case Ground Outer shield
TABLE 1. Color Coding of Alligator Clips for Model 6011 Input Cable.
2-3. INPUT CONNECTIONS.
a. The accessories described in Section 7 are designed to increase the accuracy and
convenience of input connections. Use them to gain the maximum capability of the Model
601.
b. The Mo4el 6011 Input Cable, supplied with the instrument, facilitates input connec-
tions. Table 1 contains the color coding of the alligator clips. The high terminal is
shielded by the inner braid of the triaxial cable up to the miniature alligator clip. If
the unshielded clip causes pick up from near-by electric fields, remove it and connect
the shielded lead directly to the source.
NOTE
Techniques and applications are thoroughly discussed in the brochure, Electro-
meter Measurements, by Joseph F. Keithley. It is available from Keithley Instru-
ments, Inc., or its representatives.
C. Carefully shield the input connection and the source being measured, since power
line frequencies are well within the pass band of the Electrometer. Unless the shiefding
is thorough, any alteration in the electrostatic field near the input circuitry will cause
definite meter disturbances.
d. Use high resistance, low-loss materials - such as Teflon (recommended), polyethy-
lene or polystyrene - for insulation. The insulation leakage resistance of test fixtures
and leads should be several orders magnitude higher than the internal resistance of the
SOlL?ZCe. Excessive leakage reduces the accuracy of readings from high impedance sources.
Triaxial or coaxial cables used should be a low-noise type which employ a graphite or
other conductive coating between the dielectric and the surrounding shield braid. Amphen-
ol-Borg Electronics Corporation, Microdot, Inc., and Simplex Wire and Cable Company make
satisfactory types. Using the supplied Model 6011 Input Cable is j simple way to insure
good input connections,
NOTE
Clean, dry connections and cables are very important to maintain the value of all
insulation materials. Even the best insulation can be compromised by dust, dirt,
solder flux, films of oil or water vapor. A good cleaning agent is methyl alcohol,
which dissolves most common dirt without chemically attacking the insulation. Wash
salt solutions with distilled water before using the cleaning agent.
e. Any change in the capacitance of the measuring circuit to low will cause extraneous
disturbances. Make the measuring setup as rigid as possible, and tie down connecting
cables to prevent their movement. A continuous vibration may appear at the output as a
sinusoidal signal, and other precautions may be necessary to isolate the instrument and
0666R 7
OPERATION MODEL 601 ELECTROMETER
the connecting cable from the vibration.
f. For low impedance measurements -
below 108 ohms or above 10m8 ampere - un-
shielded leads may be used. However, keep
the leads short.
g. When measuring currents LO-l4 ampere
or less with the FEEDBACKSwitch at FAST,
sOme insulators - such as Teflon - may
produce random signals which show up as
erratic meter deflections. Insulation
used in the Model 601 is carefully selected
to minimize these signals. L
FIGURE 4. Model 601 Triaxial Incut Receo
h. It is usual,ly better to connect the tac1e. The center terminal is circuit 0;
Model 601 to the circuit only when a reading input high; the inner shield is circuit
is being made. In some cases, the grid cur- or input low; the outer shield is case
rent can charge the external test circuitry. ground.
One example of this occurs when measuring a
capacitor's leakage resistance by observing
the decay of the terminal voltage. If the leakage current is less than the grid current,
there may be no decay.of the terminal voltage when the Electrometer is left connected
across the capacitor's terminals.
NOTE
Keep the shielded cap on the INPUT Receptacle when the Electrometer is not in
a circuit.
i. The Model 6012 Triaxial to Coaxial Adapter enables using coaxial cables and acces-
sories with the Model 601 by adapting the triaxial INPUT connector to the uhf coaxial type.
NOTE
The Adapter connects circuit low to case ground. Do not float the Model 601
when using the Adapter. The instrument chassis will be at the same potential
as the input low.
2-4. PRELIMINARY PROCEDURES.
a. Check battery condition by setting
the METER Switch to the BATTERY CHECK po-
I Multiplier position Battery Checked I
sition. Rotate the Multiplier Switch .OOl B201 & B202
through the .OOl to 0.1 positions, and ob- .003 B203
serve the meter readings. The meter should .Ol B204 & B205
read one-half of full scale or mwre for each .03 B206 & B207
Multiplier Switch position. Table 2 shows 0.1 R208 h 732n9
the batteries checked by position. If the
reading for any battery is below half TABLE 2. Multiplier Switch Positions for
scale, replace all batt'eries. Note new bat- Checking Condition of Batteries
teries may cause the Model 601 to drift more
than normal for at least 72 hours due to
change in battery terminal voltage.
8 0766R
MODEL 601 ELECTROMETER OPERATION
b. Set the controls as follows:
METER Switch POWER OFF
Range Switch VOLTS
Multiplier Switch 1
FEEDBACK Switch NORMAL
ZERO CHECK Button LOCK
c. Turn the METER Switch to CENTER ZERO. Within ten seconds, the meter needle should
come to the center zero position. If not, adjust to meter zero with the MEDIUM and FINE
ZERO Controls. Normally, there is no need to use the COARSEZERO Switch.
d. After a few moments increase the voltage sensitivity by advancing the Multiplier
Switch to .3, .l, etc. Continue zeroing with the FINE ZERO Control.
e. After long periods of storage or after a" overload, the Model 601 may drift exces-
sively. The electrometer tubes are shock mounted; however, a severe jolt to the Electro-
meter may cause a zero offset. This is corrected with the Zero Controls. Drifting,
though, can occur for several hours.
NUTE
If the Model 601 has been stored for some time, the grid current will exceed the
specification when first
---I used then decrease to below the specified amount after
one or two hours of use. This is a" inherent characteristic of the electrometer
tube; the instrument is not faulty.
f. Although the grid current of the Electrometer is much below that found in conven-
tional voltmeters, it can be observed on the meter. A small voltage results from the
grid current charging the input capacitance, and the Electrometer appears to drift when
the input is open. Use the ZERO CHECK Button to discharge the build-up.
g. Follow the particular procedures in paragraph 2-5 to 2-9 for measuring voltage, cur-
rent, resistance and charge. When using Multiplier Switch settings -- 3 and 1 in the
of 10, -----
voltage, current, resistance and charge measuring modes, make sure the Output Switch is
---
----- to IV if the output --- notconnected
set is to a load. Otherwise, the meter shows a loading
effect. When the output is connected to a load, this effect is not present.
NOTE
Using the center zero scales decreases accuracy 0.5% because Lhe scale spa" is
shorter.
2-5. VOLTAGEMEASUREMENTS.
a. The Model 601 can be used to measure voltages several ways.
1. In the normal method - FEEDBACK Switch at NORMAL - the unknown voltage is co"-
netted to the INPUT Receptacle. Input impedance is iO-l4 ohms, 20 pf.
2. To reduce the slowing effects of input capacity, use the fast method to measure
the voltage. A guarded circuit is possible this way.
3. To measure Low impedance sources, the Model 601 input resistance can be decreased
if desired.
0667R 9
OPERATION MODEL 601 ELECTROMETER
4,. Accessory probes extend the Model 601's range to 10 kilovolts.
NOTE
Locking the ZERO CHECK Switch places 10 megohms acro.ss input high and low, which
may temporarily cause instability in some types of high impedance sources.
b. Normal Method Voltage Measurements.
1. Follow the instructions of paragraph Z-4.. Set the controls as follows:
METER Switch CENTER ZERO
Range Switch VOLTS
Multiplier Switch 10
FEEDBACK Switch NORMAL
ZERO CHECK Button LOCK
2. Connect the unknown voltage to the INPUT Receptacle; unlock the ZERO CHECK Button.
Set the METER Switch to + or -, as necessary. Increase sensitivity with the Multiplier
Switch. Recheck zero setting after increasing sensitivity.
3. For off-ground measurements, see paragraph 2-6.
C. Fast Method Voltage Measurements. This method reduces the slowing effects of input
capacity and allows guarded voltage measurements.
1. Follow the instructions of paragraph Z-4,. Set the controls as follows:
METER Switch CENTER ZERO
Range Switch VOLTS
Multiplier Switch 10
FEEDBACK Switch FAST
ZERO CHECK LOCK
2. Connect CASE GROUNDTerminal to OHMSGUARDTerminal, using the shorting link.
3. Connect the unknown voltage t.o the high (center) terminal of the INPUT Receptacle
and to the CASE GROUND Terminal on the rear panel. Use the LO Terminal as a guard be-
tween circuit high and low. Unlock the ZERO CHECK Button. Set the METER Switch to +
or -, as necessary. Increase sensitivity with the Multiplier Switch. Recheck zero set-
ting after increasing sensitivity.
4.. To make off ground voltage measurements, see paragraph 2-6.
d. Low Impedance Measurements. To decrease input resistance, set the Range Switch to
one of the AMPERESranges. The input resistance is now the reciprocal of the current
range. For instance, to obtain a" input resistance of 107 ohms, set the Range Switch to
the 10s7 AMPERESrange. Set the full-scale voltage range with the Multiplier Switch.
Operating procedures are the same as subparagraph b. At lower input resistances, the
Model 601 will not run off scale as easily in the presence of excessive ac fields. This
occurs only when the input is left open.
10 0567R
MODEL 601 ELECTROMETER OPERATION
e. To measure sources more than 10 volts, use one of two divider probes. The Model
6102A 1O:l Divider Probe extends the Model 601's range to 100 volts; overall accuracy is
?3% and input resistance is lOLo ohms. The Model 6103A 1OOO:l Divider Probe extends the
Model 601's range to 10 kilovolts; overall accuracy is f5% and input resistance is 1012
ohms. Follow the same operating procedures with the dividers as in subparagraph b. The
Model 6012 Triaxial-to-Coaxial Adapter must be used with the Models 6102A and 6103A
Divider Probes. Note, however, using the Adapter connects circuit low to case ground; do
not float the Electrometer. The full-scale voltage range is the divider ratio times the
Multiplier Switch setting.
Operating the Model 601 nwre than 1500 volts off ground may permanently damage
the instrument. Isolation between circuit low and ground may break down some-
where Fn the circuit, putting the case at an off-ground potential. Since these
breakdowns are very difficult to locate, it might not be possible to float the
instrument safely again.
2-6. OFF GROUNDVOLTAGEMEASUREMENTS.
a. The Model 601 can measure an unknown voltage whose low is up to 1500 volts off
ground while its own case is at ground. This allows safe operation of the Electrometer.
Its operation is the same as given in paragraph 2-5, except for input connections and
some added cautions. These differ, depending upon the FEEDBACKSwitch setting.
1. FEEDBACKSwitch set to NORMAL. Disconnect the shorting link between the LO and
CASE GROUND Terminals on the rear panel. Make sure the Model 601 case is securely con-
nected to an earth ground, and that the low of the unknown voltage is less than 1500
volts dff ground. Connect the unknown voltage directly to the INPUT Receptacle. Opel-~
ate the Model 601 as described for normal method voltage measurements.
2. FEEDBACKSwitch set to FAST. Do not use the shorting link. Make sure the Model
601 case is securely connected to an earth ground, and that the low of the unknown vol-
tage is less than 1500 volts off ground. Ground the outer shield of the INPUT Receptacle.
Connect the high of the unknown voltage to the canter terminal of the INPUT Receptacle.
Connect the low to the GUARDTerminal. Use the inner shield of the INPUT Receptacle as
a guard. Operate the Model 601 as described for fast method voltage measurements.
NOTE
When the Model 601 is off ground, make sure the shell of a mating plug to the
OUTPUT Receptacle is not connected to either pin in the Receptacle.
b. If the Model 6012 Adapter is used, do not float the Model 601. The Adapter connects
the input low to the case ground, so that the Model 601 chassis and controls are at the
same potential as the Low of the unknown source.
NOTE
Use only an insulated blade screwdriver to adjust the COARSEZERO Switch and 1 MA
CAL Cdntrol when floating the Model 601. An ordinary screwdriver could short the
circuit low to case ground, creating a shock hazard and damaging the external cir-
cuitry.
06668 II
OPERATION MODEL 601 ELECTROMETER
r ------------- 1
r----------`--
R
I I I
Rin
I EE I I
I Imeter
I
I
I
I
FIGURE 5. Annneter Circuit Loading. Current sources may be considered a voltage (E) in
sarias with a resistance (R). The current with no annneter attached is I=E/R. When an
ammeter is attached to measure the current, the effective input resistance of the ammeter
Rin is in series with the source resistance (R). The current in the complete circuit is
less and Imeter = E/(R + Rtn). If the effective ammeter input resistance is small com-
pared to R, Imeter+ - I and the error introduced by circuit loading is negligible.
2-7. CURRENTMEASUREMENTS.
a. The Model 601 can measure currants three ways.
1. In the normal method - used on any range - the currant is determined by measur-
ing the voltage drop across a resistor shunting the amplifier input. This method is
useful when lower noise is more important than faster response speeds or if some damp-
ing is needed.
2. In the fast method - for use only below the 10V5 ampere range - the shunt resis-
tor is between the amplifier output and input in the feedback loop. This circuit
largely neutralizes the effect of input capacity and greatly increases the response
speed. Also, the input voltage drop is reduced to a maximum of one millivolt on any
range.
3. For galvanometric current measurements, the Model 601 acts as a null indicator
between a very accurate current source and the unknown current source. Its off ground
operating capability makes it ideal for this application since the reference source and
unknown may both have a common grounded terminal.
b. Rise tima varies primarily with the current range, the input capacity and the method
used. On most ranges, the rise time in the fast mode is less than one second with 50
picofarads across the input. Even with much larger shunt capacities, the negative feed-
back maintains a short rise time. Given a choice, it is better to placg the Electrometer
nearer to the current source than to the data reading instrument. Transmitting the input
signal through long cables greatly decreases the response speed and increases noise due
to the cable capacitance.
C. To measure from a source with both terminals off ground in either method, remove
the link between the LO and CASE GROUND Terminals on the rear panel. Connect the unknown
current to the INPUT .Receptacle. The source must be less than *1500 volts off ground
(see paragraph 2-6).
12 0766R
MODEL 601 ELECTROMETER OPERATION
d. Normal Method (0.3 to lo-l4 ampere ranges).
1. Follow the instructions of paragraph 2-4. Set the controls as follows:
METER Switch CENTER ZERO
Range Switch 10-l AMPERES
Multiplier Switch 1
FEEDBACK Switch NORMAL
ZERO CHECK Button LOCK
Connect the unknown current to the INPUT Receptacle and unlock the ZERO CHECK Button.
Set the METER Switch to + or -, as necessary. Increase the sensitivity with the Range
Switch and the Multiplier Switch. Do not set the Multiplier Switch higher than 3 for
Range Switch settings 10m3 and above. Check zero with the ZERO CHECK Button.
2. Full-scale current range is the settings of the Range Switch times the Multiplier
Switch. Use the smallest Multiplier Switch setting possible to minimize input voltage
drop and obtain the best accuracy. The input Fesistor varies with the Range Switch set-
ting, from 10 ohms at 10-l AMPERES to loll ohms for lo-11 AMPERES. Input voltage drop
is the percentage of full scale that the meter reads times the Multiplier Switch setting.
NOTE
On the low current ranges, balance cut the grid current with the Zero Controls
or subtract the value from the reading. To find the aawunt of grid current,
cap the INPUT Receptacle and read the meter.
e. Fast Method (ranges below lOa ampere).
1. Follow the instructions of paragraph 2-4. Set the controls as follows:
METER Switch CENTER ZERO
Range Switch 10-6 AMPERES
Multiplier Switch 1
FEEDBACK Switch FAST
ZERO CHECK Button LOCK
Connect the unknown source to the INPUT Receptacle and unlock the ZERO CHECK Button.
Set the METER Switch to + or -, as necessary. Increase the sensitivity with the
Range Switch and the Multiplier Switch. Do not set the Range Switch to 10e5 AMPERESor
higher. Check zero with the ZERO CHECK Button.
NOTE
Use only the ZERO CHECK Button to check zero for the fast method. Do not short
the input, because this will remove the feedback from the circuit.
2. The full-scale current range is the Range Switch setting times the Multiplier
Switch setting. When selecting the Multiplier Switch setting, remember small settings
permit lower current source resistance, and larger settings improve instrument zero
stability. Check the caution in subparagraph 3a below.
066711 13
OPERATION MODEL 601 ELECTROMETER
3. With the fast method, the input drop is reduced and the response speed is in-
creased at least 100 times. However, follow these precautions:
4 The internal impedance of the unknown current scnxce should not be less than
0.1 of the value of the feedback resistor being used. otherwise, adequate feedback
voltage cannot be developed at the input, and zero instability results. The feedback
resistor value is the reciprocal of the AMPERESrange of the Range Switch. Also, the
voltage drop across the current source should be at least 100 times the voltage drop
acrOsS the Model 601.
b) The low side (Pin No. 2) of the OUTPUT Receptacle is no longer connected to the
low side of the INPUT Receptacle. Therefore, do not allow the low side of a recorder
to be electrically connected, such as through the ground lead of a power cord, to the
low side of the current source. Another alternative is "sing the unity-gain output.
(See paragraph Z-11.)
c) Do not use the fast method to measure capacitance unless "sing a very stable vol-
tage supply. Connecting a capacitor to the input changes the circuit to a differentia-
. to;, resulting in extreme sensitivity to very small voltage transients.
I
f. Galvanometric Method.
1. Operate the Model 601 as a pico-
ammeter in the fast method of operation.
Use an accurate reference current source
to buck out the unknown current source.
Connect as shown in Figure 6.
2. Set the METER Switch to CENTER
ZERO and "se the higher current ranges. FIGURE 6. Measuring Current by the Galvan-
Adjust the buckout current to indicate ometric Method. Use an accurate reference
null on the Model 601. Increase the current source to buck Out the unknown cur-
Electrometer's sensitivity as needed. rent source, I,. The Model 601, on its
When the Model 601 is as close to null current ranges, serves as a null detector.
as possible, the known reference cur- Use a uhf-tee fitting and Model 6012 Adapter
rent source equals the unknown source at the Model 601 input. Connect the Elec-
* the Model 601 current readings. trometer to the two sources with coaxial
cable. Select cable carefully for very low
2-S. RESISTANCE MEASUREMENTS. currents (see paragraph Z-3). For off
ground measurements, "se triaxial cable and
a. The Model 601 can measure resistan- connectors, grounding the outer shield.
ces by three methods.
1. In the normal or two-terminal method (ammeter-voltmeter), the Electrometer measures
the voltage drop across the unknown sample as a known, constant current flows through
it. The voltage drop is proportional to the resistance of the sample. This method is
the simplest for the 100 to loLL ohm ranges.
2. Above 10L1 ohms or to prevent leakage, the guarded method is better. It results
in faster response speeds and also nullifies leakage errors acress the Electrometer in-
Put I since the potential acress the input terminal is small.
3. In the preceding methods, the voltage across the sample cannot be arbitrarily
set. In some cases, as in measuring capacitor leakage, these methods involve much more
,a
14 06678
MODEL 601 ELECTROMETER OPERATION
time than if a larger voltage could be applied. In the external voltage method the
Model 601 is used as a fast picoammeter. The unknown resistance sample is connected to
an external known voltage source and the current through the sample is measured. Either
the normal or fast method may be used. The resistance is calculated from the readings.
NOTE
Discharge any capacitor before removing it from the circuit. Depressing the
ZERO CHECK Button shorts the input through a lo-megohm resistor, providing a
discharge path.
b. Normal Method (100 to 10" ohm ranges).
1. Follow the instructions of paragraph 2-4. Set the controls as follows:
METER Switch +
Range Switch 105 OHMS
Multiplier Switch 1
FEEDBACK Switch NORMAL
ZERO CHECK Button LOCK
Connect the resistance sample to the INPUT Receptacle. Unlock the ZERO CHECK Button.
Check zero with only the ZERO CHECK Button.
NOTE
Do not open circuit the Electrometer on the OHMS ranges; the input will develop
up to 10 volts due to its constant current characteristic. Keep the input
shorted or the ZERO CHECK Button locked.
2. The full-scale ohms range is the Range Switch setting times the Multiplier Switch
setting. Use the largest Multiplier Switch setting possible to obtain the best accuracy.
3. Before making a final reading, manipulate the Multiplier and Range Switches, so
the sample is tested at a number of test potentials. The applied test voltage is the
percentage of full scale that the meter reads times the Multiplier Switch setting.
4. When the test current is applied, high termipal of the INPUT Receptacle is negative.
NOTE
Shield the input if the resistance sample exceeds LO8 ohms.
c. Guarded Method (to 1014 ohm ranges).
1. Follow the instructions of paragraph 2-4. Set the controls as follows:
METER Switch
Range Switch loll OHMS
Multiplier Switch 1
FEEDBACK Switch FAST
ZERO CHECK Button LOCK
0667R 15
OPERATION MODEL 601 ELECTROMETER
Connect the low impedance side of the resistance sample to the Model 601 GUARDTerminal,
and the high impedance side to the center terminal of the INPUT Receptacle. Unlock the
ZERO CHECK Button.
2. Read the resistance as outlined for the normal method, subparagraph b.
3. The low terminal of the INPUT Receptacle is now a driven guard. It may be used
to minimize the slowing effects of capacity between high and low and errors due to leak-
age resistance between high and low.
4. The Model 6011 Input Cable, supplied with the Model 601, provides a convenient
means of making guarded resistance measurements. Connect the shorting link between the
CASE GROUNDand GUARDTerminals on the rear panel. This allows the CASE GROUNDor blue
test lead terminal to be connected to the low impedance side `of the unknown resistance.
The inner shield or the black test clip is the GUARDTerminal.
d. External Voltage Method (to 1017 ohms).
1. Turn the ZERO CHECK Switch to LOCK. Connect the sample between the High Terminal
of the INPUT Receptacle and the power supply. (See Figure 7,.) Put a switch in the
high voltage line to ground the low impedance end of the sample when it is disconneCtad
from the potential. Before disconnecting, make sure to lock the ZERO CHECK Button. If
the Power Supply must be floating, remove the link between the CASE GROUNDand LO Ter-
minals and connect the CASE GROUND Terminal to an earth ground.
2. Set the FEEDBACKSwitch to NORMAL. Usually this method is best, since instabilit-
ies can arise for resistance samples less than 0.1 the value of the feedback resistor.
3. Apply a potential to the sample before releasing the ZERO CHECK Button. Set the
Range Switch to .3 AMPERESand increase sensitivity until a reading is obtained.
4. If the potential applied is at I I
least 100 times the full-scale input
drop (Multiplier Switch setting), the
,I r-
resistance is equal to the applied poten-
tial divided by the current reading. The
high voltage sensitivity of the Model 601,
therefore, permits external.voltages of I - 601 1
0.1 volt or more to be used.
5. If the potential applied is less
&han 100 times the input drop, the resis-
tance is equal to the difference between
the applied potential and the input drop,
all divided by the current reading.
FIGURE 7. Measuring Resistance by the Ex-
6. If.the current is read by the fast ternal Voltage Method. A potential from a
method, the input drop is so slight that known source, V, is applied to the unknown
it need not be included in the calcula- resistance sample, R,. The Model 601 mea-
tion. If the capacity shunted across the sures the current through s, from which
sample is large, such as encountered in the resistance is calculated. Switch S
capacitor leakage measurements, the fast grounds R when no potential is applied.
method increases response speed and this Note in ai2eve figure the power supply is
connection is recommended. floating.
16
MODEL 601 ELECTROMETER OPERATION
2-9. CHARGEMEASUREMENTS.
a. Follow the instructions of paragraph 2-4,. Set the controls as follows:
METER Switch CENTER ZERO
Range Switch 10-7 COULOMBS
Multiplier Switch .Ol
FEEDBACK Switch FAST
ZERO CHECK Button LOCK
Unlock the ZERO CHECK Button and then connect the unknown source to the INPUT Receptacle.
If the Electrometer reads off scale, increase the Multiplier Switch setting. If the sen-
sitivity is not enough, decrease the Multiplier Switch setting until the reading is on
scale. Changing the Multiplier Switch setting does not affect the transfer of charge
from the unknown source to the instrument. If increasing sensitivity with the Multiplier
Switch does not bring the reading on scale, increase sensitivity with the Range Switch
and repeat the above steps.
b. The full-scale charge range is the Range Switch setting times the Multiplier Switch
setting. Grid current contributes 2 x 10-14. coulomb per second maximum.
NOTE
Because of the instrument's RC time constant, wait 20 seconds after discharginlg
internal capacitance on the LOS7 coulomb range before making another measurement.
On the 10-S coulomb range, wait at least two seconds.
2-10. RECORDEROUTPUTS.
a. For recording with the Model 601, "se the Keithley Model 370 Recorder for ease, econ-
omy, versatility and performance. The Model 370 is a pen recorder with 10 chart speeds and
1% linearity. It can float up to l 500 volts off ground. The Model 370's input cable has a
connector which mates directly with the OUTPUT Connector on the Model 601; this avoids
interface problems often encountered between a measuring instrument and a recorder. The
Model 601 OUTPUT, when set to IMA Position, will drive the 370; no preamplifier is needed.
b. Other recorders, oscilloscopes and similar instruments can be used with the Model
601. The Model 601 has two variable outputs, fl volt and *l milliampere, to amplify sig-
nals within l/2% for recorders, oscilloscopes and similar instruments. These can be used
on all ranges of the Model 601.
NOTE .
The Model 601 may be used with the FEEDBACK Switch in FAST position with other
instruments. However, make sure there is no common ground between low terminals
of the Electrometer and the other instrument.
c. l-Volt output. Connect oscilloscopes and pen recorder amplifiers to the OUTPUT
Receptacle. Pin no. 1 is the negative terminal and pin no. 2 is grounded when the FEED-
BACK Switch is set to NORMAL. Set the OUTPUT Switch to 1 V. The Model 601 output is now
*l volt for full-scale meter deflection on any range. Internal resistance is 910 ohms.
The frequency response (*3 db) is dc to 200 cps at a gain of 1000, rising to 50 kc at a
gain of 3.3, and decreasing to 1 kc at a gain of 0.1. Noise is less than 2% rms of full
scale at a gain of 1000, decreasing to 0.5% at gains below 10. The METER Switch does not
reverse the output polarity.
0667R 17
OPERATION MODEL 601 ELECTROMETER
NOTE
Neither terminal of the OUTPUT
Receptacle should be at case
ground potential if the instru-
ment is used off ground. Make
L 1 kR
sure the shell of any mating M^rl.c.l
Lx"UrL
plug is not connected to either 601
terminal in the Receptacle. The >
output t
shorting link should not be con- (Tlcl?I z
nected between LO and CASE GROUND. Recorder
Use a recorder with an input iso-
lated from ground when making off
ground measurements.
d. l-Milliampere Output. Connect 1-mil- b .
liampere instruments to the OUTPUTRecept- FIGURE 8. Divider Circuits Across Model
acle. Pin no. 1 Fs the negative terminal. 601 Output for Driving 50 and lOO-Millivolt
Set the OUTPUT Switch to 1 MA. The output Recorders. Use 1% resistors in the divid-
is approximately 1 milliampere for full- ers for 50-millivolt recorders, resistor R
scale meter deflection on any range. For is 5Ofi; for 100-millivolt, R is 1OOQ.
exact output, adjust the meter on the .003-
volt range with the FINE ZERO Control for
full-scale deflection. Then adjust the 1 MA CAL Control until the recorder reads full
scale. Check the recorder and meter zero and repeat◦ Jabse Service Manual Search 2026 ◦ Jabse Pravopis ◦ onTap.bg ◦ Other service manual resources online : Fixya ◦ eServiceinfo