Service Manuals, User Guides, Schematic Diagrams or docs for : LG Air Conditioner lwb762cl AR3757~1
<< Back | HomeMost service manuals and schematics are PDF files, so You will need Adobre Acrobat Reader to view : Acrobat Download Some of the files are DjVu format. Readers and resources available here : DjVu Resources
For the compressed files, most common are zip and rar. Please, extract files with Your favorite compression software ( WinZip, WinRAR ... ) before viewing. If a document has multiple parts, You should download all, before extracting.
Good luck. Repair on Your own risk. Make sure You know what You are doing.
Image preview - the first page of the document
>> Download AR3757~1 documenatation <<
Text preview - extract from the document
3. INSTALLATION
3.1 SELECT THE BEST LOCATION
1.To prevent vibration and noise, make sure the unit in installed securely and firmly.
2.Install the unit where the sunlight does not shine directly on the unit.
3.The outside of the cabinet must extend outward for at least 10" and there should be no obstacles, such as a
fence or wall, within 20" from the back of the cabinet because it will prevent heat radiation of the condenser.
Restriction of outside air will greatly reduce the cooling efficiency of the air condditioner.
CAUTION
All side louvers of the cabinet must remain FENCE
exposed to the outside of the structure. AWNING
COOLED AIR
4.Install the unit a little slanted so the back is slightly lower HEAT
than the front (avout 1/2 "). This will force condensed water RADIATION
to the outside.
5.Install the unit with the bottom about 30"~60" above the
floor level.
30"-60"
ABOUT 1/2 "
Over 20"
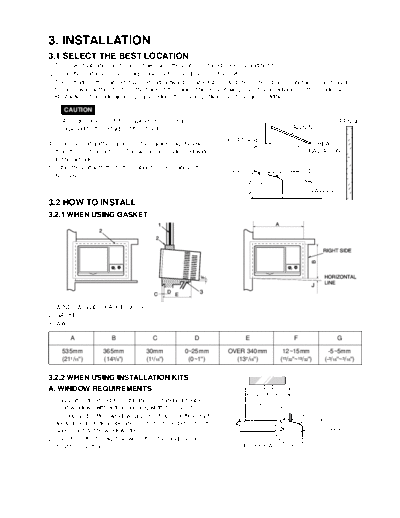
3.2 HOW TO INSTALL
3.2.1 WHEN USING GASKET
1. WINDOW (WIDTH-A, HEIGHT-B)
2. GASKET
3. WALL
A B C D E F G
535mm 365mm 30mm 0~25mm OVER 340mm 12~15mm -5~5mm
(211/15") (143/8") (11/16") (0~1") (137/18") (15/32"~19/32") (-3/16"~3/16")
3.2.2 WHEN USING INSTALLATION KITS
A. WINDOW REQUIREMENTS
25" to 36"
1. This unit is designed for installation in standard double
15" min
hung windows with actual opening width from 25" to 36". STOOL
OFFSET
The top and bottom window sash must open sufficiently to
SILL
allow a clear vertical opening of 15" from the bottom of the
upper sash to the window stool. EXTERIOR
2. The stool offset (height between the stool and the sill)
must be less than 11/4". INTERIOR WALL
--16--
B. INSTALLATION KITS CONTENTS
1 2 3 4
NO. NAME OF PARTS Q'TY
1 GUIDE PANEL 2
2 SILL SUPPORT 2
3 BOLT 2
4 NUT 2 5 6 7 8
5 SCREW(TYPE A) 16
6 SCREW(TYPE B) 3
7 SCREW(TYPE C) 4
8 FOAM-STRIP 1
9 UPPER GUIDE 1 10 9
10 FRAME GUIDE 2
C. SUGGESTED TOOL REQUIREMENTS
SCREWDRIVER(+), RULER, KNIFE, HAMMER, PENCIL, LEVEL
D. PREPARATION OF CHASSIS
1. Remove the front grille.
2. Remove the screw which fastens the cabinet at
both sides and at the back. 8
7
9
6
1
4
2
3 LOW
MED F A N 0 CO
O
L
HIGH
R
5
LE
THE CO
O LOW
RMO
STA
3. Slide the unit out of the cabinet by gripping the
T
OPE
RAT
ION
base pan handle and pull forward while bracing
the cabinet.
4. Screw the upper guide ◦ Jabse Service Manual Search 2026 ◦ Jabse Pravopis ◦ onTap.bg ◦ Other service manual resources online : Fixya ◦ eServiceinfo