Service Manuals, User Guides, Schematic Diagrams or docs for : LG Refrigerator GR-572TVF Disassembly(GR-572)
<< Back | HomeMost service manuals and schematics are PDF files, so You will need Adobre Acrobat Reader to view : Acrobat Download Some of the files are DjVu format. Readers and resources available here : DjVu Resources
For the compressed files, most common are zip and rar. Please, extract files with Your favorite compression software ( WinZip, WinRAR ... ) before viewing. If a document has multiple parts, You should download all, before extracting.
Good luck. Repair on Your own risk. Make sure You know what You are doing.
Image preview - the first page of the document
>> Download Disassembly(GR-572) documenatation <<
Text preview - extract from the document
3. DISASSEMBLY
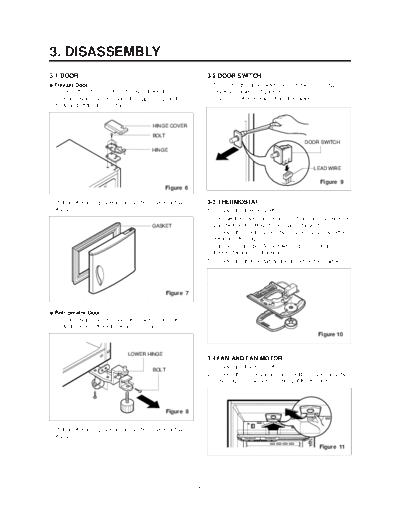
3-1 DOOR 3-2 DOOR SWITCH
q Freezer Door 1. To remove the door switch, pull out it with a '--' type
1. Remove the hinge cover by pulling it upwards. driver as shown in (figure 9).
2. Loosen hexagonal bolts fixing the upper hinge to the 2. Disconnect the lead wire from the switch.
body and lift the freezer door.
HINGE COVER
BOLT
DOOR SWITCH
HINGE
LEAD WIRE
Figure 9
Figure 6
3. Pull out the door gasket to remove from the door foam 3-3 THERMOSTAT
Ass'y. 1. Remove the freezer shelf.
2. Remove the Cover Lamp-F and Control Box-F by loosening
GASKET 2 screw fixed to ceiling of Inner Case (Figure 10)
3. Remove the Control Box-F by loosening 2 screws after
detaching the cap.
4. Pull the Control Box Assy down and, separate the
thermostat and Control Box-F.
5. Remove the thermostat by disconnecting the lead wire.
Figure 7
q Refrigerator Door
1. Loosen hexagonal bolts fixing the lower hinge to the
body to remove the refrigerator door only.
Figure 10
LOWER HINGE
3.4 FAN AND FAN MOTOR
1. Remove the freezer shelf.
BOLT
2. Remove the Cover Lamp-F and Holder Cover Lamp by
loosening 2 screw fixed to ceiling of Inner Case.
Figure 8
2. Pull out the door gasket to remove from the door foam
Ass'y.
Figure 11
-6-
3. Remove the Grille by pulling it out. 3-6 LAMP
4. Pull out the Shroud and remove the Fan Motor Assy by
loosening 2 screws.
5. Pull out the fan and, separate the Fan Motor, Brackets FREEZER ROOM LAMP REFRIGERATOR ROOM LAMP
and the Guide Fan.
FAN MOTOR
SHROUD
Figure 16 Figure 17
BRACKET
FAN
GRILLE 3-6-1 Freezer room lamp
Figure 12 1. Unplug the power cord from the outlet.
2. Remove the room lamp lid by taking down while pulling
it forward with your hand after inserting finger into the
3-5 DEF' CONTROL ASSY inside hole as shown in (figure 16).
Def control Assy consists of Defrost Thermostat and FUSE◦ Jabse Service Manual Search 2026 ◦ Jabse Pravopis ◦ onTap.bg ◦ Other service manual resources online : Fixya ◦ eServiceinfo