Service Manuals, User Guides, Schematic Diagrams or docs for : LG TV LP-XG22-24 NP00EDADJ
<< Back | HomeMost service manuals and schematics are PDF files, so You will need Adobre Acrobat Reader to view : Acrobat Download Some of the files are DjVu format. Readers and resources available here : DjVu Resources
For the compressed files, most common are zip and rar. Please, extract files with Your favorite compression software ( WinZip, WinRAR ... ) before viewing. If a document has multiple parts, You should download all, before extracting.
Good luck. Repair on Your own risk. Make sure You know what You are doing.
Image preview - the first page of the document
>> Download NP00EDADJ documenatation <<
Text preview - extract from the document
ADJUSTMENT INSTRUCTION
1. Application Object II. Output Signal Parts Adjustment
This instruction is for the application to the LCD Projector.
1. VCOM Adjustment
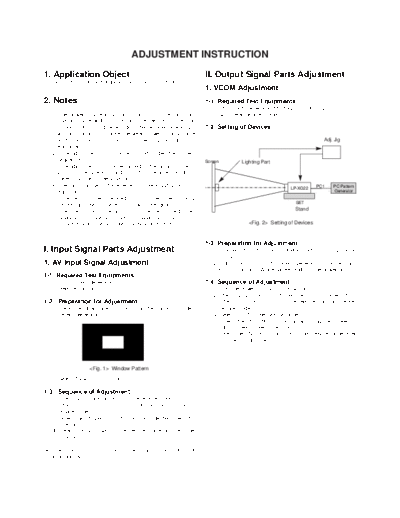
2. Notes 1-1. Required Test Equipments
(1) PC Pattern Generator (MSPG 2165A-MASTER)
(1) The power source insulation of this LCD Projector is not (2) 40" screen and set stand
charging type and you may not use the transformer for
insulation. But you'd better adjust the set after operating it 1-2. Setting of Devices
with insulation transformer between power supply cable
and input part of the set for protecting the adjusting Adj. Jig
equipments.
(2) The adjustment must be performed under the correct
sequence. Screen Lighting Part
(3) The adjustment must be performed in the circumstance of
25!5cC of temperature and 65!10% of relative humidity if
there is no specific designation.
(4) The input voltage of the receiver must keep 220V, 60Hz in LP-XG22 PC1 PC Pattern
adjusting. Generator
(5) The set must be operated for 5 minutes preliminarily
SET
before adjustment if there is no specific designation.
The preliminary operation must be performed after Stand
receiving 100% White Pattern. But reception of the moving
picture may also be possible in unavoidable case. Setting of Devices
1-3. Preparation for Adjustment
I. Input Signal Parts Adjustment (1) Connect the PC pattern generator with LP-XG22 set as
.
1. AV Input Signal Adjustment (2) Adjust the output of PC pattern generator to source XGA-
60 to output 30% WHite pattern and turn the power on.
1-1. Required Test Equipments
(1) A PC pattern generator : 1EA 1-4. Sequence of Adjustment
(2) Remote control :1EA (1) Turn the power supply of LP-XG22 on.
(2) Press SELECT button of the remote control to select PC.
1-2. Preparation for Adjustment (3) Press SERVICE button of the remote control to enter
(1) Select window pattern of Fig. 1 as the pattern of video service mode.
pattern generator. (4) Select VCOM in the service mode.
(5) Press the VOLUME +/- button watching the screen to
adjust screen flicker to be minimum.
(6) Press the ENTER button to exit from service mode after
completing adjustment.
Window Pattern
(2) Select AV with SELECT button.
1-3. Sequence of Adjustment
(1) Press Auto Trackung button of the remote control.
(2) Press SERVICE button of the remote control to enter
service mode.
(3) Select Factory Default in the service mode,then press the
Enter button.
(4) Select the Auto Gain in the service mode,thn press the
Enter buttons.
Real adjustment is performed by system MICOM
automatically.
- 12 -
2. Color Temperature (White Balance) 3503 Offset
Adjustment Roffset XXX
Goffset XXX
2-1. Required Test Equipment
(1) Illuminometer:1EA (model name : CL-100) -> For Boffset XXX
measuring chromaticity at the center of projected screen.
(2) Pattern generators : 1EA -> For input of white signal to the Offset Page of 3503
full screen.
(3) A measuring instrument for color uniformity
(6) Adjust the value of Roffset, Goffset and Boffset to make
(4) A set stand
the brightness ratio between white and black more than
(5) A remote control
200 : 1.(maintain the coordinate of white)
You may use measuring instruments for lighting part instead
2. White Adjustment
of an illuminometer and pattern generators.
(1) Set the adjustment pattern to the RED window pattern
Refer to the equipment manual for the measuring method
when adjusting RED.
with these equipments.
2-2. Setting of Devices
Adjust in the same state as
2-3. Preparation for Adjustment
Compose devices as above and put the test set on the stand.
At this time the upper cover of the set must be separated.
Window Pattern
(1) Set the screen to PC mode.
(2) Press SERVICE button of the remote control and
(2) Connect the connector 1 for adjustment with the set.
search the "2467" menu as below.
(3) After 2 seconds,connect the connector 2 for adjustmet
with the set. 2467
RGain XXX
2-4. Sequence of Adjustment
1. Black Adjustment GGain XXX
(1) Set the screen to PC mode. BGain XXX
(2) Set the adjustment pattern to the window pattern as
below. Gain Page of 2467
(3) Adjust the value of RGain until the brightness of RED
window changes at the maximum value.
(4) Adjust GREEN in the same way as adjusting RED.
(5) Adjust BLUE in the same way as adjusting RED.
(6) Switch the adjustment pattern to white window pattern.
(7) Fix the value of BGain and adjust the value of RGain
Window Pattern
and BGain to set the coordinates of color.
(3) Press SERVICE button of the remote control and
3. GAMMA Adjustment
search the "2467" menu as below.
2467
3-1. Required Test Equipment
(1) Illuminometer:1EA (model name : CL-100) -> For
RGain XXX measuring chromaticity at the center of projected screen.
GGain XXX (2) Pattern generators :1EA -> For input of white signal to the
full screen.
BGain XXX
- PC pattern generator 1EA ; Gray pattern of 16 tones
(3) A set stand
Gain Page of 2467 (4) A remote control
(4) Adjust Rgain, Ggain and Bgain to maximum value with
3-2. Setting of Devices
+/- button of the remote control.
Adjust in the same state as .
(5) Search 3503 Offset Menu with pressing the MENU
button.
3-3. Preparation for Adjustment
Compose devices as above and put the test set on the stand.
At this time the upper cover of the set must be separated.
- 13 -
3-4. Sequence of Adjustment 4. Color Uniformity Adjustment
(1) Adjust the adjustment pattern with using 16 step pattern as
below. 4-1. Required Test Equipment
16 (1) Measuring instrument for uniformity:1EA (model name :
15
CL-100) -> For measuring chromaticity at the center of
projected screen.
14
(2) Pattern generators : 2EA -> For input of white signal to the
full screen.
3 One PC pattern generator ; Gray pattern of 16 tones
2
(3) A set stand
(4) A remote control
1
4-2. Setting of Devices
16Step Pattern Adjust in the same state as .
(2) Press SERVICE button of the remote control and search
the "2467 Gamma" page as below. Lighting Part
Screen
2467
RGamma yy XXX
GGamma yy XXX PC1 PC Pattern
NP00EA/ED Generator
BGamma yy XXX
SET
2467 Gamma Menu Stand
(3) Select 01 for yy in adjustment menu (2) and adjust Setting of Devices
RGamma, GGamma and BGamma to adjust the brightness
of pattern (2) to 1/15 of the maximum brightness.
(4) Adjust Gamma of each step by repeating steps above. 4-3. Preparation for Adjustment
(5) Perform step (3) up to data and the rest can be replaced Compose devices as above and put the test set on the stand.
by the certain data. At this time the upper cover of the set must be separated.
(6) In automatic adjustment,begin the adjustment from
Gamma data of low luminance in sequence with using 4-4. Sequence of Adjustment
Window pattern. (1) Adjust the adjustment pattern with using 50% white
pattern. Devide the screen virtually as below and perform
3-5. Automatic Adjustment adjustment. (X : 16Step, Y : 13Step)
(1) Pattern: Window Pattern of luminance 100%
(2) Gamma table:Every RGB adress 00~1023 -> 0 0 1 2 3 .........xx.......... 14 15
(3) When adjusting Gamma,Gamma table data adjust adress 1
896~1023 to find desired data in every section.Refresh the
Gamma table by calculating the every section data with .
adjustment data of each point. .
(4) Green Gamma Adjustment yy
Pattern: 100% Green Window
GREEN Gamma Adjustment Adress: .
0~895: 00h,896~1023:Present adjustment data .
(5) Adjustment by changing the R,B Gamma 11
Pattern: 100% White Window
RED Gamma Adjustment Adress: 12
0~895: 00h,896~1023: Adjust the data to find X data of
Y(x,y).
BLUE Gamma Adjustment Adress:
0~895: 00h,896~1023: Adjust the data to find Y data of (2) Press SERVICE button of the remote control and search
Y(x,y) the "3503" page as below.
(6) Memorize the adjustment data in PC.
(7) Operate the next level adjustment like 3)~5). 3503
(8) When finishing the adjustment of every level,calculate the R xx yy XXX
data of every section with adjusted data of memorized
GREEN(n),RED(n),BLUE(n) in PC. G xx yy XXX
(9) Refresh the Gamma table of R,G,B with calculated data of B xx yy XXX
7).
Uniformity Adjustment Menu
- 14 -
(3) The above measuring instrument reads the coordinates of
white color through the optical instrument installed as
below. Adjust data of the place which correspondes with
the screen position by adjusting xx and yy in adjustment
menu above to adjust white uniformity.
5. DDC Data Input
5-1. Required Test Equipment
(1) A jig for adjusting PC, DDC.
(PC serial to D-sub. Connection equipment)
(2) S/W for writing DDC (EDID data write & read)
(3) D-sub terminal
5-2. Setting of Devices
PC
JIG
5-3. Preparation for Adjustment
(1) Set devices as above and turn the PC, jig on.
(2) Put the S/W for writing DDC (EDID data write & read) into
operation. (operated in DOS mode.)
5-4. Sequence of Adjustment
(1) Put the set on the table and turn the power on.
(2) Input the product code, production week / year, serial
number ( if it is not input, write "01") to the S/W for writing
DDC.
(3) Put the EDID write instruction into operation.
- 15 -
◦ Jabse Service Manual Search 2026 ◦ Jabse Pravopis ◦ onTap.bg ◦ Other service manual resources online : Fixya ◦ eServiceinfo