Service Manuals, User Guides, Schematic Diagrams or docs for : LG TV WP-32A30D Chassis MC75A TV+WP32A30D
<< Back | HomeMost service manuals and schematics are PDF files, so You will need Adobre Acrobat Reader to view : Acrobat Download Some of the files are DjVu format. Readers and resources available here : DjVu Resources
For the compressed files, most common are zip and rar. Please, extract files with Your favorite compression software ( WinZip, WinRAR ... ) before viewing. If a document has multiple parts, You should download all, before extracting.
Good luck. Repair on Your own risk. Make sure You know what You are doing.
Image preview - the first page of the document
>> Download TV+WP32A30D documenatation <<
Text preview - extract from the document
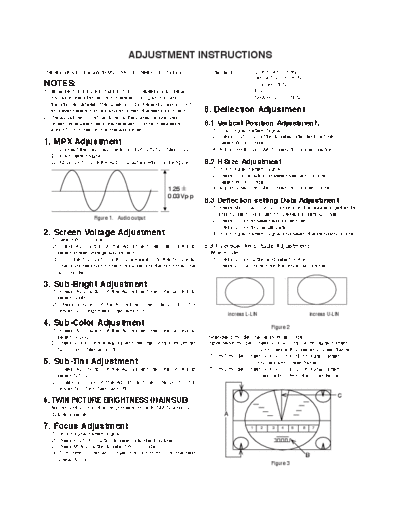
ADJUSTMENT INSTRUCTIONS
These instructions apply to MC-75A color television chassis. Standard CONTRAST : 85%
BRIGHTNESS : 50%
NOTES: COLOR : 50%
1. Because this is a cold chassis, it is not necessary to use an TINT : 0
insulation transformer. But, operate it using an insulation SHARPNESS : 50%
transformer between the power supply line and chassis input
to prevent electric shock and to protect the test instrument. 8. Deflection Adjustment
2. The adjustment must be done by the correct appliances.
3. Unless otherwise noted, the receiver must be operated for 8.1 Vertical Position Adjustment.
about 10 minutes prior to the adjustment. (1) Input Digital Pattern Signal
(2) Press PICTURE button to select standard picture.
1. MPX Adjustment (3) Select WIDE mode.
(1) Connect the Oscilloscope to pin 3 of IC101 on Main PCB. (4) Adjust VR301 on SMPS board for proper position.
(2) Input Stereo signal.
(3) Adjust VR101 until the Audio Output waveform is like figure 1. 8.2 H Size Adjustment
(1) Input Digital Pattern Signal.
(2) Press Picture button to select standard picture.
(3) Select WIDE mode.
1.25 (4) Adjust VR401 on SMPS board for proper H size.
0.03Vp-p
8.3 Deflection setting Data Adjustment
(1) Press MENU and CH up buttons on the drawer together for
about 2 seconds to get into Deflection setting mode.
Figure 1. Audio output
(2) Press CH +/- to select adjustment item.
(3) Press CH +/- to change Data.
2. Screen Voltage Adjustment (4) Input Digital Pattern Signal and select the standard picture.
(1) Select WIDE mode.
(2) Press ADJ button on the Adjustment Remote Control to 8.3.1 Vertical Amplitude Adjustment
select screen voltage adjustment. : Wide mode
(3) Turn the SCREEN control clockwise until the horizontal (1) Press CH +/- button and select V-ASP.
Line is visible and counter clockwise until the horizontal line (2) Press VOL +/- button for the proper amplitude.
is unvisible.
1 2
3. Sub-Bright Adjustment
(1) Press ADJ button of the Adjustment Remote Control to
select S-BRI.
(2) Press VOL +/- of the Adjustment Remote Control for
proper Sub-Brightness (Standard :50)
increas L-LIN increas U-LIN
4. Sub-Color Adjustment Figure 2
(1) Press ADJ button of the Adjustment Remote Control to
select S-COL. : Standard mode : Same as Wide mode.
(2) Press VOL+/- of the Adjustment Remote Control for proper : Spectacle mode : Press VOL +/- until (A) of Digital Pattern
Sub-Color. (Standard : 10) coincides with upper and Lower frame.
: Zoom1 mode : Press VOL +/- until (B) of Digital Pattern
5. Sub-Tint Adjustment coincides with Lower frame.
(1) Press ADJ button of the Adjustment Remote Control to : Zoom2 mode : Press VOL +/- until (C) of Digital Pattern
select S-TIN. comes 7!3mm from the upper frame.
(2) Press VOL +/- of the Adjustment Remote Control for
proper Sub-Tint (Standard : 6)
C
6. TWIN PICTURE BRIGHTNESS (MAIN/SUB)
Adjust VR02 until the Brightness of both MAIN and SUB
picture is same. A
7. Focus Adjustment 1 2 3 4 5 6 7
(1). Input digital Pattern signal.
(2) Press PICTURE button to select standard picture.
(3) Press MODE button to select WIDE mode.
(4) Turn both Upper and Lower Focus control until the best B
overall focus.
Figure 3
- 1 -
8.3.2 H Position Adjustment (2) Select G-DRI and B-DRI and adjust to get the Highlight
(1) Press CH +/- button and select H-POS. data (X=282!8, Y=288!8).
(2) Press VOL +/- button until left and right of screen is equal. (3) Adjust Contrast and Brightness until the highlight area of
signal is 4.5!0.5F.L.
9. WHITE BALANCE Adjustment (4) Select G-CUT and B-CUT and adjust to get the Low light
(1) Input Digital Pattern signal data (X=282!8, Y=288!8).
(2) Select Wide mode (5) Repeat adjustment (1)~(4) above to get both Low and High
(3) Press MENU and CH+ buttons on the drawer together for light data.
about 2 seconds to get into Deflection setting mode. (6) Check the result of adjustment using White Balance Meter
(4) Press CH+/- to select adjustment item. HIGH LIGHT : X=282!8, Y=288!8
(5) Press VOL +/- to change Data. LOW LIGHT : X=282!8, Y=288!8
(6) Adjustment [ OSD COLOR : Green$Adjust at all modes
(1) Adjust Contrast and Brightness until the highlight area of Cyan$Adjust only WIDE mode
signal is 30!3.5F.L. Yellow$Adjust only WIDE mode, correction
[ Setting Data of Deflect and White Balance at other modes.
No. OSD ADJUSTMENT RANGE STD PANO WIDE ZOOM1 ZOOM2 D/W1 D/W2 OSD COLOR
0 V-POS Vertical Position 0~63 32 32 32 32 32 32 32 Yellow
1 V-ASP Vertical Aspect 0~63 12 15 14 28 40 14 17 Green
2 U-LIN Upper LINEARITY 0~15 3 3 3 3 3 2 2 Green
3 L-LIN Lower LINEARITY 0~15 4 4 4 4 4 2 3 Green
4 H-POS H-Position 0~15 7 6 6 6 6 7 7 Green
5 H-SIZ H-SIZ 0~63 11 57 43 43 43 46 46 Green
6 P-AMP Pin cushion correction 0~63 19 22 22 22 22 18 22 Green
7 P-PHA PHASE correct 0~15 6 6 6 6 6 6 6 Green
8 A-BOW Bow 0~15 10 10 10 10 10 10 10 Cyan
9 A-ANG Angle 0~15 12 12 12 12 12 12 12 Cyan
10 U-PIN Upper pin cushion 0~15 8 8 8 8 8 10 8 Green
11 L-PIN Low pin cushion 0~15 7 7 7 7 7 5 7 Green
12 L-BLK Left H-BLANKING 0~15 10 12 12 12 12 12 12 Green
13 R-BLK Right H-BLANKING 0~15 6 8 8 8 8 8 8 Green
14 S-BRI SUB Brightness 0~63 50 50 50 50 50 50 50 Cyan
15 S-COL SUB COLOR 0~15 10 10 10 10 10 10 10 Cyan
16 S-TIN SUB TINT 0~15 6 6 6 6 6 6 6 Cyan
17 G-DRI G-DRIVE 0~63 38 38 38 38 38 38 38 Cyan
18 B-DRI B-DRIVE 0~63 34 34 34 34 34 34 34 Cyan
19 G-CUT G-CUT OFF 0~15 7 7 7 7 7 7 7 Cyan
20 B-CUT B-CUT OFF 0~15 7 7 7 7 7 7 7 Cyan
21 V-SIZ Vertical SIZE 0~63 5 20 5 20 20 5 5 Green
22 V-LIN Vertical LINEARITY 0~15 5 5 5 5 5 5 5 Green
23 S-CON SUB CONTRAST 0~15 6 6 6 6 6 6 6 Cyan
24 GAMMA GAMMA correct 0~3 2 2 2 2 2 2 2 Cyan
25 D-PIC DYNAMIC-PICTURE 0~1 1 1 1 1 1 1 1 Cyan
26 DC-TR DC-TRANSMISSION 0~1 1 1 1 1 1 1 1 Cyan
27 PR-OV PRE-OVER SHOOT 0~3 0 0 0 0 0 0 0 Cyan
28 SHA-F SHARPNESS f0 (SH) 0~1 1 1 1 1 1 1 1 Cyan
29 V-MOV Vertical SCROLL 0~63 28 28 28 28 28 32 32 Green
30 S-COR Vertical S correction 0~15 5 5 5 5 5 5 5 Green
31 A-MOD AFC-MODE (A-M) 0~3 1 1 1 1 1 1 1 Cyan
32 ABL ABL-MODE (ABL-M) 0~1 0 0 0 0 0 0 0 Cyan
33 C-TRA C-TRAP ON/OFF 0~1 0 0 0 0 0 0 0 Red
34 TOT TOT FILTER 0~1 0 0 0 0 0 0 0 Red
35 CD-M CD-MODE (CD-M) 0~1 0 0 0 0 0 0 0 Red
36 D-COL DYNAMIC COLOR 0~1 1 1 1 1 1 1 1 Red
37 REP-P REP-POSITION 0~3 3 3 3 3 3 3 3 Red
38 LIMIT WHITE LIMIT 0~1 0 0 0 0 0 0 0 Red
39 C-ADJ C-TRAP 0~15 5 5 5 5 5 5 5 Red
40 RGB OFF-RGB 0~7 7 7 7 7 7 7 7 Red
41 AGING AGING 1,2 0~3 0 0 0 0 0 0 0 Red
42 V-BLK V-BLK Width 0~3 3 3 3 3 3 3 3 Red
43 Z-SW ZOOM SW 0~1 0 0 0 1 1 0 0 Red
44 H-BLK H-BLK Width 0~1 1 1 1 1 1 1 1 Red
45 J-SW JUMP SW 0~1 0 0 0 0 0 1 0 Red
46 VM VM 0~1 1 1 1 1 1 1 1 Red
47 PICON PICON 0~1 1 1 1 1 1 1 1 Red
48 V-OFF V.Drive 0~1 0 0 0 0 0 0 0 Red
49 FHHI H. Frequency 0~1 0 0 0 0 0 0 0 Red
50 A-OFF AKB OFF 0~1 0 0 0 0 0 0 0 Red
51 DELAY Y DELAY 0~7 3 3 3 3 3 3 3 Red
52 VSOFF RGB ON/OFF 0~1 0 0 0 0 0 0 0 Red
- 2 -
PURITY & CONVERGENCE ADJUSTMENT
Caution:
Convergence and Purity have been factory aligned. Do not 5. Reconnect the internal degaussing coil.
attempt to tamper with these alignments.
However, the effects of adjacent receiver components, or 6. Position the beam bender locking rings at the 9 o'clock
replacement of picture tube or deflection yoke may require the position and the other three pairs of tabs (2,4 and 6 pole
need to readjust purity any convergence. magnets) at the 12 o'clock position.
DEFLECTION YOKE 6-POLE
PURITY &CONVERGENCE 6-POLE
MAGNETS
MAGNES PURITY MAGNET(2-POLE)
MAGNET ASSEMBLY
6-POLE
,,,,
,,,, ,
,,,, ,
,,,, , ,
,,,,
,,,,
,,,, 4-POLE
X-AXIS YOKE MAGNET
,
,,,, , ,,,,
,,,, , ,, ,
,, ,,
,,,, , ,, ,,
,,,, , ,
,,,,
,, , POSITIONING
(L/R PURITY)
RUBBER
WEDGES PURITY MAGNET
4-POLE
GLASS CLOTH TAPE CONVERGENCE MAGNET ASSEMBLY
CONVERGENCE MAGNET ASSEMBLY
: Purity Adjustment
This procedure DOES NOT apply to bonded yoke and picture 7. Perform the following steps, in the order given, to prepare the
tube assemblies. receiver for the purity adjustment procedure.
The instrument should be at room temperature (60 degrees F or
above) for six (6) hours and be operating at low beam current a. Face the receiver in the "magnetic north" direction.
(dark background) for approximately 20 to 30 minutes before
performing purity adjustments. b. Externally degauss the receiver screen with the television
power turned off.
CAUTION: Do not remove any trim magnets that may be
attached to the bell of the picture tube. c. Turn the television on for approximately 10 seconds to
perform internal degaussing and then turn the TV off.
1. Remove the AC power and disconnect the internal
degaussing coil. d. Unplug the internal degaussing coil. This allows the
thermistor to cool down while you are performing the purity
2. Remove the yoke from the neck of the picture tube. adjustment. DO NOT MOVE THE RECEIVER FROM ITS
"MAGNETIC NORTH" POSITION.
3. If the yoke has the tape version beam bender, remove it and
replace it with a adjustable type beam bender (follow the e. Turn the receiver on and obtain a red raster by increasing
instructions provided with the new beam bender) the red bias control (CW) and decreasing the bias controls
for the remaining two colors (CCW).
4. Replace the yoke on the picture tube neck, temporarily
remove the three (3) rubber wedges from the bell of the f. Attach two round magnets on the picture tube screen at 3
picture tube and then slide the yoke completely forward. o'clock and 9 o'clock positions, approximately one (1) inch
from the edge of the mask (use double-sided tape).
- 3 -
1.ADJUST YOKE Z-AXIS FIRST 2 .ADJUST BEAM BENDER 2 POLE
TO GET EQUAL BLUE MAGNET TO GET FOUR EQUAL
COLOR CIRCLES COLOR CIRCLES
MAGNETS
RED RED
8. Referring to above, perform the following two steps: 6. Reconnect the internal degaussing coil and apply AC power.
a. Adjust the yoke Z-axis to obtain equal blue circles.
b. Adjust the appropriate beam bender tabs to obtain correct 7. Turn the receiver on for 10 seconds to perform internal
purity (four equal circles). degaussing and then turn the receiver off again.
9. After correct purity is set, tighten the yoke clamp screw and 8. Unplug the internal degaussing-coil.
remove the two screen magnets.
9. Turn on the receiver, connect a signal generator to the VHF
10. Remove the AC power and rotate the receiver 180 degrees antenna terminal and apply a crosshatch signal.
(facing "magnetic south").
Caution: During the convergence adjustment procedure, be
11. Reconnect the internal degaussing coil. very careful not to disturb the purity adjustment tabs
are accidentally move, purity should be confirmed
12. Turn the receiver on for 10 seconds (make sure the receiver before proceeding with the convergence adjustments.
came on) to perform internal degaussing, and then turn the
receiver off. Note: Make sure the focus is set correctly on this instrument
before proceeding with the following adjustment.
13. Unplug the internal degaussing coil.
10. Converge the red and blue vertical lines to the green vertical
14. Turn on the receiver and check the purity by holding one (1) line at the center of the screen by performing the following
round magnet at the 3 o'clock and a second round magnet at steps (below TABLE).
9 o'clock position. If purity is not satisfactory, repeat steps 8 a. Carefully rotate both tabs of the 4-pole ring magnet
through 14. simultaneously in opposite directions from the 12 o'clock
position to converge the red and blue vertical lines.
15. Turn off the receiver and reconnect the internal degaussing b. Carefully rotate both tabs of the 6-pole ring magnet
coil. simultaneously in opposite directions form the 12 o'clock
position to converge the red and blue (now purple)
vertical lines with the green vertical line.
: Convergence Adjustment
11. Converge the red and blue horizontal with the green line at
Caution: This procedure DOES NOT apply to bonded yoke and the center of the screen by performing the following steps.
picture tube assemblies. (below TABLE)
Do not use screen magnets during this adjustment a. Carefully rotate both tabs of the 4-pole ring magnet
procedure. Use of screen magnets will cause an simultaneously in the same direction (keep the spacing
incorrect display. between the two tabs the same) to converge the red and
blue horizontal lines.
1. Remove AC power and disconnect the internal degaussing b. Carefully rotate both tabs of the 6-pole ring magnet
coil. simultaneously in same direction (keep the spacing
between the two tabs the same) to converge the red and
2. Apply AC Power and set the brightness to the Picture Reset blue (now purple) horizontal lines with the green
condition. Set the Color control to minimum. horizontal line.
c. Secure the tabs previsouly adjusted by locking them in
3. Apply 8V to the pin42 of IC501. place with the locking tabs on the beam bender.
4. Adjust the Red, Green and Blue Bias controls to get a dim
white line.
5. Remove the AC power and 8V from the pin42 of IC501.
- 4 -
RING ROTATION DIRECTION MOVEMENT OF RED
PAIRS OF BOTH TABS AND BLUE BEAMS
B B
OPPOSITE OR
R R
4
POLE
SAME B R OR B R
B B
OPPOSITE OR
R R
6
POLE
SAME B R OR B R
UP/DOWN ROCKING OF THE YOKE LEFT/RIGHT ROCKING OF THE YOKE
UP/DOWN ROCKING OF THE YOKE
CAUSES OPPOSITE ROTATION OF RED CAUSES OPPOSITE SIZE CHANGE YOKE
LEET/RIGHT ROCKING OF THE OF THE
AND BLUEOPPOSITE ROTATION OF RED
CAUSES RASTERS RED AND BLUE RASTERS CHANGE OF
CAUSES OPPOSITE SIZE
AND BLUE RASTERS THE RED AND BLUE RASTERS
GREEN
GREEN
ADJUSTMENT
VIEWING ADJUSTMENT RED
AREA BLUE RED VIEWING
AREA
RED
GREEN RED BLUE
BLUE RED
GREEN
RED BLUE
TV
SCREEN
GREEN
12. While watching the 6 o'clock positions on the screen, rock the 17. Temporarily place a rubber wedge at the 5 o'clock and 7
front of the yoke in a vertical (up/down) direction to converge o'clock positions to hold the horizontal position of the yoke.
the red and blue vertical lines. (Fig upper left) 18. Check the 3 o'clock and 9 o'clock areas to confirm that the
13. Temporarily place a rubber wedge at the 12 o'clock position red and blue vertical lines are converged. If the lines are not
to hold the vertical position or the yoke. converged, slightly offset the horizontal tilt of the yoke (move
14. Check the 3 o'clock and 9 o'clock areas to confirm that the red the temporary rubber wedges if necessary) to equally
and blue horizontal lines are converged. balance the convergence error of the horizontal lines at 6
If the lines are not converged, slightly offset the vertical tilt of the o'clock and 12 o'clock and the vertical lines at 3 o'clock and 9
yoke (move the rubber wedge if necessary) to equally balance the o'clock.
convergence error of the horizontal lines at 3 o'clock and 9 o'clock 19. Using a round magnet confirm purity at the center, right and
and the vertical lines at 6 o'clock and 12 o'clock. left sides and corners. See Purity Adjustment Procedure.
15. Place a 1.5 inch piece of glass tape over the rubber foot at 20. Reconfirm convergence and apply a 1.5 inch piece of glass
the rear of the 12 o'clock wedge. tape over the rubber foot at the rear of the 5 o'clock and the 7
16. While watching the 6 o'clock and 12 o'clock areas of the o'clock wedges.
screen, rock the front of the yoke in the horizontal (left to
right) motion to converge the red and blue horizontal lines.
(Fig. upper right)
- 5 -
◦ Jabse Service Manual Search 2026 ◦ Jabse Pravopis ◦ onTap.bg ◦ Other service manual resources online : Fixya ◦ eServiceinfo