Service Manuals, User Guides, Schematic Diagrams or docs for : Loewe Assembly_Instructions 89649L00_Individual Sound Wall Mount 32902_001_Wall Mount I Sound_6Sprach_04_08_06_
<< Back | HomeMost service manuals and schematics are PDF files, so You will need Adobre Acrobat Reader to view : Acrobat Download Some of the files are DjVu format. Readers and resources available here : DjVu Resources
For the compressed files, most common are zip and rar. Please, extract files with Your favorite compression software ( WinZip, WinRAR ... ) before viewing. If a document has multiple parts, You should download all, before extracting.
Good luck. Repair on Your own risk. Make sure You know what You are doing.
Image preview - the first page of the document
>> Download 32902_001_Wall Mount I Sound_6Sprach_04_08_06_ documenatation <<
Text preview - extract from the document
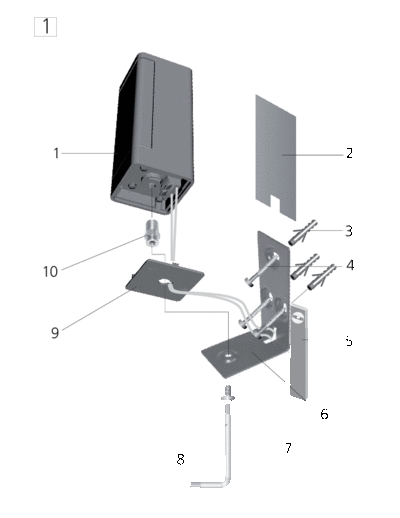
1


    1               2


                    3

10                  4


 9                  5


                6

            7
        8
Wallmount I Sound                                                          Wallmount I Sound
Veiligheidsvoorschriften!                                                  Safety instructions !
Neem de aanwijzingen in de handleiding in acht.                            Observe the information in the manual.
Wees voorzichtig bij het werken met gereedschap.                           You should always take care when using tools.
Stel de apparatuur zo op dat ze geen gevaar vormt voor                     Install your equipment combination so that it cannot
spelende kinderen en ook niet kan worden beschadigd.                       endanger children playing or be damaged by them.


Inhoud van de levering                                                     Scope of delivery
twee bevestigingsbouten (afb. 1, pos. 10)                                  two retaining bolts (fig. 1, item 10)
twee bevestigingshaken met afdekplaat (afb. 1, pos. 6 en 2)                two fastening brackets with cover (fig. 1, items 6 and 2)
twee schroeven (afb. 1, pos. 7)                                            two screws (fig. 1, item 7)


Montage
                                                                           Assembly
Zie ook het schema op de achterzijde
en handel als volgt:                                                       See the figures overleaf
                                                                           and proceed as follows:
Bevestiging van de Wallmount I Sound
   Selecteer een plaats voor de bevestiging van uw Wallmount I Sound.
   Pak de bevestigingshaak (fig. 1, pos. 6) op.                            Fixing the Wallmount I Sound
   De bevestigingshaak met behulp van een waterpas loodrecht tegen de         Select the place where you wish to install your Wallmount I Sound.
   muur houden. Geef de positie op de wand aan door middel van een            Take the fastening bracket (fig. 1, item 6).
   markering in de drie openingen van de bevestiginghaak.                     Hold the fastening bracket vertically against the wall with the aid of
   In het voorbeeld betreft het de markeringen op een muur met                a spirit level. Mark the fastening points on the wall through the three
   metselwerk.                                                                holes in the fastening bracket.
   Het bevestigingsmateriaal (schroeven en pluggen) zijn op basis van de      In the example, the specifications are for a masonry wall.
   veelzijdige wandmaterialen niet meegeleverd. Koop dit materiaal voor       Fastening material (screws and plugs) are not included because
   uw wand in een gespecialiseerde winkel.                                    of the wide variety of wall materials. Please buy the appropriate
   In het voorbeeld worden drie gaten met een diameter van 6 mm               fastening material for your wall at a hardware store.
   geboord, worden de pluggen (afb. 1, pos. 3, afmeting 6 x 30)               Here in the example, you would drill three holes with a diameter
   geplaatst en wordt de bevestigingshaak met platkopschroeven (afb. 1,       of 6mm, insert the plugs (fig. 1, item 3, size 6 x 30) and screw the
   pos. 4, afmeting 4 x 30) vastgeschroefd.                                   fastening bracket tight with flat round head screws (fig. 1, item 4,
   Pak de luidspreker (fig. 1, pos. 1) op.                                    size 4 x 30).
   Draai de bevestigingsbout (afb. 1, pos 10) onder in de luidspreker in      Take the loudspeaker (fig. 1, item 1).
   de schroefopening in. Draai de bevestigingsbout met behulp van een         Turn the retaining bolt (fig. 1, item 10) into the thread in the bottom
   schroefsleutel (sleutelwijdte 10) vast.                                    of the loudspeaker. Tighten the retaining bolt with a wrench (size
   De aansluitleidingen door de openingen van de bevestigingshaak en          10).
   de afdekking, naar de luidspreker doorvoeren.                              Feed the connecting cables through the openings in the fastening
   De leidingen aan de luidspreker aansluiten.                                bracket and the cover to the loudspeaker.
   Druk de betreffende afsluitklem omlaag en schuif de leiding in de          Connect the cables to the speaker.
   daarbij behorende aansluitopening (rode afsluitklem
◦ Jabse Service Manual Search 2026 ◦ Jabse Pravopis ◦ onTap.bg ◦ Other service manual resources online : Fixya ◦ eServiceinfo