Service Manuals, User Guides, Schematic Diagrams or docs for : Philips LCD TV (and TPV schematics) TPF1.3A la philips_tpf13a_la_chassis_isp_instruction_176

<< Back | Home

Most service manuals and schematics are PDF files, so You will need Adobre Acrobat Reader to view : Acrobat Download Some of the files are DjVu format. Readers and resources available here : DjVu Resources
For the compressed files, most common are zip and rar. Please, extract files with Your favorite compression software ( WinZip, WinRAR ... ) before viewing. If a document has multiple parts, You should download all, before extracting.
Good luck. Repair on Your own risk. Make sure You know what You are doing.


Image preview - the first page of the document
philips_tpf13a_la_chassis_isp_instruction_176


>> Download philips_tpf13a_la_chassis_isp_instruction_176 documenatation <<

Text preview - extract from the document
50           TPF1.3A LA                                                                                                            8. Alignments

8.4 ISP Instructions


Configuration and procedure
"Easywriter " The software is provided by Novatek to upgrade the
firmware of CPU.
It is a windows-based program, which cannot be run in MS-DOS.
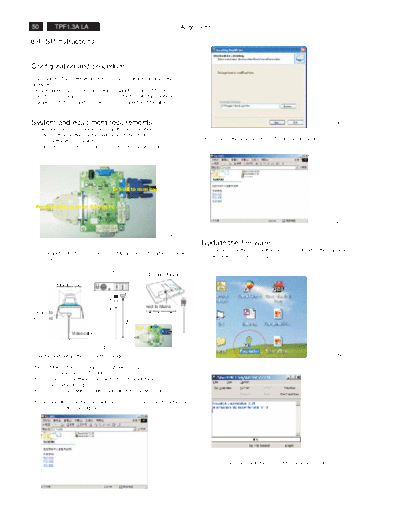
DDC2BI_ISP TOOL (3138 149 53161) is for the interface between
"Parallel Port of PC" and "15 pin-D-SUB connector of Monitor".


System and equipment requirements                                                                                                                                                                         Fig. 4
1.     An i486 (or above) personal computer or compatible.
2.     Microsoft operation system Windows 95/98/2000/XP.
3.     ISP Software " Easywrite "                                                                                                           Step 5 :Copy the hex code to C:\Ta1000 as shown in Fig. 5 .
4.     DDC2BI_ISP TOOL (3138 106 10396) as shown in Fig. 1


                                                                                                                                                               2oTA1000


                                                     D-SUB to monitor


     Parallel Port to Print Port in PC


                                                                                                                                                                                                     Fig. 5

                                                                                                        Fig. 1
                                                                                                                                            Update the firmware
                                                                                                                                            1.   Double click the Easywriter.exe icon in desktop then appears
5.     Connect DDC2BI_ISP TOOL and Mains cord to Monitor as shown
                                                                                                                                                 window as shown in Fig.7 .
       in Fig. 2.

                                               PC
                                                                                      Ta1000 -Monitor (B)

             Monitor (A)                                                                                                          D-Sub
                                                                                               - - - - - - - - - - - - - - - ->
                                     To video card


                                                         To printer port (LTP1)


                                                                                  Connect to Mains
Connect to                                                                        cord at this moment.
Mains cord

                                                                                  ISP box
                   Video cable


                                 Fig.2
6. Install and setup the Easywriter program                                                                                                                                                               Fig. 6

Step 1 : Make a folder in your PC as shown in Fig. 3.
         For example : C:\Ta1000
Step 2 : Copy ISP Software Easywriter.zip into your folder
         as shown in Fig.3.
Step 3 : Unzip Easywriter.zip into your folder as shown in Fig. 3.

Step 4 : Double click the EasywriterV2.09a_user.exe icon to install the
         Application as Fig. 4.


                                                                                                                                                                                                    Fig. 7

                                                                                              Fig. 3
                                                                                                                                            2.   Press the Load hex then select the hex as shown in Fig. 8.
                                                            8. Alignments                                      TPF1.3A LA               51


                                                                     If there is a warring message coming as shown in Fig 12. , you
                                                                     have to check the AC power, Video cable, or Novatek MCU.


                                                          Fig. 8


3 Press the AUTO to running program , the firmware be updated
as shown in Fig. 9~10.


                                                                                                                              Fig. 12

                                                                     5 Check the firmware version

                                                                     1). Turn off monitor.
                                                                     2). Press power " " button.Then quickly push " + " and " - "of
                                                       Fig. 9
                                                                          Volume ,and hold this two buttons , then the screen comes out
                                                                         "Waiting For Automatic Adjustment ",then the screen will be black
                                                                          for one second untill comes out "Windows screen"] => then
                                                                         release this two buttons.
                                                                     3). Press "MENU" button, wait until the OSD menu come on the
                                                                         Screen of the monitor,You will find, after upgrade, the version
                                                                         have already been changed as shown in
                                                                         Fig. 13 and Fig. 14.


                                                      Fig. 10


4   Press the file --> exit to end program , as shown in Fig. 11.                                                                 Fig. 13

                                                                                        Factory Mode indicator


                                                                                                                                 Fig. 14
                                                      Fig. 11
                                                                                        Factory Mode indicator

                                                                     4) Turn off the monitor, exit the factory mode.


◦ Jabse Service Manual Search 2024 ◦ Jabse PravopisonTap.bg ◦ Other service manual resources online : FixyaeServiceinfo