Service Manuals, User Guides, Schematic Diagrams or docs for : Philips Monitor Monitor CD 2001[1].part02 Monitor CD 2001 E-MANUALS Philips crt 107b2 pdf p04
<< Back | HomeMost service manuals and schematics are PDF files, so You will need Adobre Acrobat Reader to view : Acrobat Download Some of the files are DjVu format. Readers and resources available here : DjVu Resources
For the compressed files, most common are zip and rar. Please, extract files with Your favorite compression software ( WinZip, WinRAR ... ) before viewing. If a document has multiple parts, You should download all, before extracting.
Good luck. Repair on Your own risk. Make sure You know what You are doing.
Image preview - the first page of the document
>> Download p04 documenatation <<
Text preview - extract from the document
  4     107B2 CM24 GSIII                                             Installtion
      Go to cover page

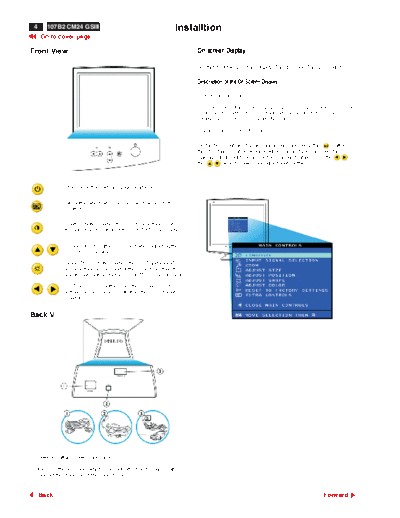
Front View                                                                 On-screen Display

                                                                           Description of the On-Screen Display The OSD Tree The OSD Controls

                                                                           Description of the On Screen Display

                                                                           What is the On-Screen Display ?

                                                                           This is a feature in all Philips monitors which allows an end-user to adjust screen performance of
                                                                            monitors directly thought an on-screen instruction window. The user interface provides user-
                                                                           friendliness and ease-of-use when operating the monitor.

                                                                           Basic and simple instruction on the control keys.


                                                                           On the front controls of your monitor, once you press the    button,
                                                                           the OSD Main Controls window will pop up and you can now start
                                                                           making adjustment to your monitor's various features. Use the        or
                                                                           the         keys to make your adjustments within.


                 POWER button switches your monitor on


                 OK button which when pressed will take you to the OSD
                 controls


                 Contrast hotkey. When the UP arrow buttons is pressed,
                 the adjustment control for the CONTRAST will show up.


                UP and DOWN buttons are used when adjusting the
                OSD of your monitor

                BRIGHTNESS hotkey. When the LEFT and RIGHT
                arrow buttons are pressed at the same time, then the
                adjustment controls for the BRIGHTNESS will show up.

                LEFT and RIGHT buttons, like the UP and DOWN
                buttons, are also used in adjusting the OSD of your
                monitor.


Back View


1. Power In - attach power cable here.

2. Video In - this is a cable which is already attached to your monitor.
   Connect the other end of the cable to your PC.


      Back                                                                                                                                                Forward
◦ Jabse Service Manual Search 2026 ◦ Jabse Pravopis ◦ onTap.bg ◦ Other service manual resources online : Fixya ◦ eServiceinfo