Service Manuals, User Guides, Schematic Diagrams or docs for : Samsung LCD TV LN46N71B 13_Operation Instruction & Installation
<< Back | HomeMost service manuals and schematics are PDF files, so You will need Adobre Acrobat Reader to view : Acrobat Download Some of the files are DjVu format. Readers and resources available here : DjVu Resources
For the compressed files, most common are zip and rar. Please, extract files with Your favorite compression software ( WinZip, WinRAR ... ) before viewing. If a document has multiple parts, You should download all, before extracting.
Good luck. Repair on Your own risk. Make sure You know what You are doing.
Image preview - the first page of the document
>> Download 13_Operation Instruction & Installation documenatation <<
Text preview - extract from the document
                                                                              10 Operating Instructions and Installation


10 Operating Instructions and Installation
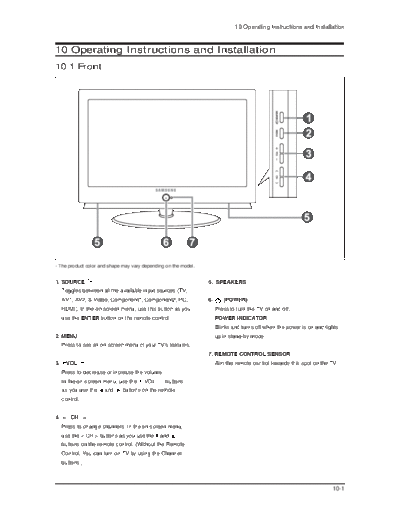
10-1 Front


- The product color and shape may vary depending on the model.


1. SOURCE                                                        5. SPEAKERS
     Toggles between all the available input sources (TV,
     AV1, AV2, S-Video, Component1, Component2, PC,              6.      (POWER)
     HDMI). In the on-screen menu, use this button as you             Press to turn the TV on and off.
     use the ENTER button on the remote control.                      POWER INDICATOR
                                                                      Blinks and turns off when the power is on and lights
2. MENU                                                               up in stand-by mode.
     Press to see an on-screen menu of your TV's features.
                                                                 7. REMOTE CONTROL SENSOR
3.     VOL                                                            Aim the remote control towards this spot on the TV.
     Press to decrease or increase the volume.
     In the on-screen menu, use the    VOL       buttons
     as you use the   and     buttons on the remote
     control.


4. < CH >
     Press to change channels. In the on-screen menu,
     use the < CH > buttons as you use the    and
     buttons on the remote control. (Without the Remote
     Control, You can turn on TV by using the Channel
     buttons.)


                                                                                                                       10-1
10 Operating Instructions and Installation

10-2 Connection Panel

10-2-1 Rear Panel Jacks


- The product color and shape may vary depending on the model.


1. AV IN 1                                                       5. SERVICE
  Video and audio inputs for external devices, such                Connector for service only.
  as a camcorder or VCR.
                                                                 6. AUDIO OUT (R/L)
2. COMPONENT IN 1, 2                                               Connect to the audio input jacks on your Amplifier/
  Connect Component video/audio.                                   Home theater.


3. HDMI/DVI IN / DVI IN (AUDIO R/L)                              7. PC IN
  Connect to the HDMI jack of a device with an HDMI                Connect to the video and audio output jacks on
  output. Use the HDMI/DVI IN terminal for DVI                     your PC.
  connection to an external device. You should use
  the DVI to HDMI cable or DVI-HDMI adapter (DVI to              8. POWER INPUT
  HDMI) for video connection, and the DVI IN                       Connect the supplied power cord.
  'R-AUDIO-L' terminal for audio.
  - HDMI/DVI IN terminal does not support PC.                    9. KENSINGTON LOCK
  - No sound connection is needed for an HDMI to                   The Kensington lock (optional) is a device used to
    HDMI connection                                                physically fix the system when used in a public place.
                                                                   If you want to use a locking device, contact the dealer
4. ANT IN                                                          where you purchased the TV.
  Connect to an antenna or cable TV system.                        - The place of the Kensington Lock may be different
                                                                    depending on its model.


10-2
                                                             10 Operating Instructions and Installation

10-2 Connection Panel

10-2-2 Side Panel Jacks

                     1. AV IN 2
                          Video and audio inputs for external devices.
                          S-VIDEO
                          Video inputs for external devices with an S-Video output.


                     3.        HEADPHONE
                          Connect a set of external headphones for private listening.


                                                                                                  10-3
10 Operating Instructions and Installation

10-3 Remote Control


- This is a special remote control for the visually impaired, and has Braille points on the Power, Channel and Volume buttons.


10-4
                                                        10 Operating Instructions and Installation

1. POWER                                       22. UP / DOWN / LEFT / RIGHT /
   Turns the TV on and off.                       ENTER
2. NUMERIC BUTTONS                                Use to select on-screen menu items
   Press to change the channel.                   and change menu values.
3. _                                           23. INFO
   Press to select channels over 100.             Press to display information on the TV
   For example, to select channel 121,            screen.
   press " - ", then " 2 ", then " 1 ".        24. CAPTION
4. CH MGR                                         Controls the caption decoder.
   Used to display Channel Lists on the        25. STILL
   screen.                                        Press to stop the action during a
5. TV                                             particular scene.
   Selects the TV mode directly                   Press again to resume normal video.
6. VOL / VOL                                   26. P.SIZE
   Press to increase or decrease the              Press to change the screen size.
   volume.                                     27. PIP FUCTIONS
7.     (MUTE)                                     SOURCE : Press to select a signal
   Press to temporarily cut off the sound.        from an external source in PIP.
8. MENU                                           POSITION : Change the position of
   Displays the main on-screen menu.              the PIP screen.
9. S.MODE                                         CH : Displays the available channels in
   Sound mode selection.                          sequence. (These buttons change
10. PIP                                           channels in the PIP window only
   Picture-in Picture ON/OFF.
11. P.MODE
   Picture effect selection.
12. E.SAVING
   Adjusts screen brightness to save energy.
13. DNIe(Digital Natural Image engine)
   DNIe Demo On/Off
14. MTS
   Press to choose stereo, mono or Separate
   Audio Program(SAP broadcast).
15. SRS
   Selects SRS TruSurround XT mode.
16. SOURCE
   Press to display all of the available
   video sources.
17. PRE-CH
   Tunes to the previous channel.
18. SLEEP
   Press to select a preset time interval
   for automatic shut off.
19. PC
   Selects the PC mode directly
20. CH / CH
   Press to change channels.
21. EXIT
   Press to exit the menu.


                                                                                             10-5
10 Operating Instructions and Installation

Memo


10-6
◦ Jabse Service Manual Search 2026 ◦ Jabse Pravopis ◦ onTap.bg ◦ Other service manual resources online : Fixya ◦ eServiceinfo