Service Manuals, User Guides, Schematic Diagrams or docs for : Samsung Laptop NP-R40 Схема и сервис мануал на Samsung NP-R40 06_Disassembly & Reassembly
<< Back | HomeMost service manuals and schematics are PDF files, so You will need Adobre Acrobat Reader to view : Acrobat Download Some of the files are DjVu format. Readers and resources available here : DjVu Resources
For the compressed files, most common are zip and rar. Please, extract files with Your favorite compression software ( WinZip, WinRAR ... ) before viewing. If a document has multiple parts, You should download all, before extracting.
Good luck. Repair on Your own risk. Make sure You know what You are doing.
Image preview - the first page of the document
>> Download 06_Disassembly & Reassembly documenatation <<
Text preview - extract from the document
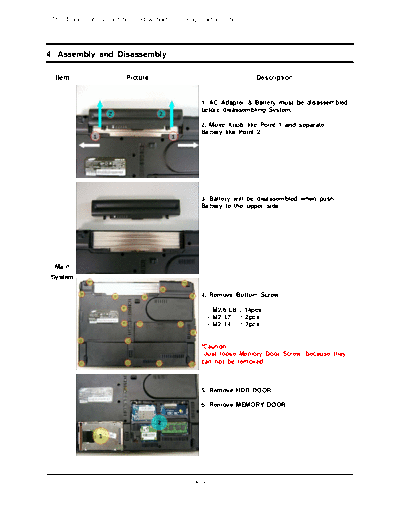
- This Document can not be used without Samsung's authorization -
4. Assembly and Disassembly
Item Picture Description
1. AC Adapter & Battery must be disassembled
before disassembling System.
2. Move Knob like Point 1 and separate
Battery like Point 2.
3. Battery will be disassembled when push
Battery to the upper side.
Main
System
4. Remove Bottom Screw
- M2.6 L8 : 14pcs
- M2 L7 : 2pcs
- M2 L4 : 2pcs
*Caution
Just loose Memory Door Screw, because they
can not be removed.
5. Remove HDD DOOR
6. Remove MEMORY DOOR
4-1
- This Document can not be used without Samsung's authorization -
4. Assembly and Disassembly
Item Picture Description
7. Push HDD to Arrow mark side gripping
handle to remove HDD.
*Caution
Be careful when push the HDD to the rear
side.
HDD must be removed before turning upside
down the system.
8. Remove Wireless LAN Card after
disassembling Wireless LAN Antenna
*Caution
Firenze2 have just one Wireless LAN Antenna
Main
System
9. Lift up Memory by doing like Point 1, and
pull out the Memory from Socket.
10. Lift up DMB module from Point 1 after
remove 2 DMB Screws.
- M2 L4 : 2pcs
*Caution
Just turn upside down the DMB Module to
disassemble Antenna. Don't lift up highly.
4-2
- This Document can not be used without Samsung's authorization -
4. Assembly and Disassembly
Item Picture Description
11. Disassemble DMB Antenna and remove
DMB Module completely.
12. Bottom view after remove HDD, Wireless
LAN, Memory, DMB Module.
Main
System
13. Lift up Top cover from right side.
*Caution
Lift up Top cover after fully openning the lid.
15. Disassemble 3 Hooks by sequence of 1, 2,
3 in the picture to remove KEYBOARD
4-3
- This Document can not be used without Samsung's authorization -
4. Assembly and Disassembly
Item Picture Description
16. Use tweezers, wooden cutter, '-' driver to
disassemble Keyboard.
*Caution
1. Be careful of injury and scratch of Top
surface when use instruments.
2. Don't lift up Keyboard highly.
17. Lift up FPC Connector cover like a picture
and disassemble Keyboard FPC.
*Caution
Don't lift up FPC Connector cover highly.
That may cause Connector crash.
Main
System
18. Remove 3 screws to disassemble Top.
- M2 L4 : 1pcs
- M2 L6 : 2pcs
19. Disassemble Touchpad FFC after lifting up
FPC Connector cover.
*Caution
Don't lift up FPC Connector cover highly.
That may cause Connector crash.
4-4
- This Document can not be used without Samsung's authorization -
4. Assembly and Disassembly
Item Picture Description
20. Disassemble Speaker Cable by pulling out
the connector like a picture.
21. Disassemble LCD Cable by lifting up
transparent handle.
*Caution
If lift up Top without disconnection of LCD
Cable, that may cause LCD connector crash.
Main
System
22. Pull out the Wireless LAN Antenna from
bottom side carefully.
23. Pull out the Wireless LAN Antenna like a
picture carefully.
4-5
- This Document can not be used without Samsung's authorization -
4. Assembly and Disassembly
Item Picture Description
25. Disassembly LCD Ass'y from System after
remove 2 screws.
- M2 L6 : 2pcs
26. After disassembly LCD Ass'y.
Main
System
27. Turn upside down the System and pull out
the ODD like a picture.
28. Remove 1 screw after pulling out the ODD
for disassemble Top.
- M2 L3 : 1pcs
4-6
- This Document can not be used without Samsung's authorization -
4. Assembly and Disassembly
Item Picture Description
29. Lift up Top from right side.
30. Remove 2 screws to disassemble Main
Board from Bottom.
Disconnect RJ11 Cable and Bluetooth Cable.
- M2 L4 : 2pcs
Main
System
31. Lift up the Main board from right side.
*Caution
If lift up from left side, that may cause crash
of some ports.
32. Bottom after removing the Main Board.
4-7
- This Document can not be used without Samsung's authorization -
4. Assembly and Disassembly
Item Picture Description
33. Disassemble Bluetooth with Cable after
removing 1 screw.
- M2 L4 : 1pcs
*Caution
Be careful not to crash the Bluetooth Module,
when disassemble from hook.
34. Lift up RJ11 Connector like a Point 1 and
pull out the Cable like a Point 2.
Main
System
35. Disassemble DMB Antenna after removing
2 screws.
- M2 L4 : 2pcs
36. Bottom after removing Main Board,
Bluetooth, RJ11 Cable and DMB Antenna.
4-8
- This Document can not be used without Samsung's authorization -
4. Assembly and Disassembly
Item Picture Description
37. Remove 6 screws and pull out the FAN
Cable to the arrow mark side.
Lift up the Thermal Duct.
- M2 L4 : 6pcs
*Caution
Be care of not to crash some other part on
Main Board when lift up the Thermal Duct.
38. Remove Heatsink after loosing 4 Screws.
*Caution
- Screws can not be seperated from Heatsink.
- Be care of not to distort Main Board when
loose 4 screws.
Main
System
39. Turn screw like a picture and lift up the
CPU.
*Caution
Be care of not to bend CPU Pin.
40. Remove 4 screws to disassemble PCMCIA
Frame after detaching the insulator.
- M2 L6 : 4pcs
4-9
- This Document can not be used without Samsung's authorization -
4. Assembly and Disassembly
Item Picture Description
41. Lift up the PCMCIA Frame like a picture.
*Caution
Be care of not to bend PCMCIA Pin.
42. Disconnect the MDC with Cable like a
picture after removing 2 screws.
Main - M2 L4 : 2pcs
System
43. The Main Board after removing the Thermal
Duct, Heatsink, CPU, PCMCIA Frame, and MDC.
1. Remove 2 screws to disassemble Speaker.
- M2 L4 : 2pcs
Top
Ass'y
4-10
- This Document can not be used without Samsung's authorization -
4. Assembly and Disassembly
Item Picture Description
2. Remove 2 screws to disassemble Speaker.
- M2 L4 : 2pcs
3. Remove Speaker after detach 2 adhesives.
*Caution
- Be care of not to crash Speaker Cable.
- Be care of not to damage Speaker
diaphragm.
Top
Ass'y
4. Remove Touchpad FFC after detaching 2
adhesives and lifting up the FFC Connector
cover.
5.
1) Remove 2 screws.
2) Push the Touchpad Bracket like a Point 2.
3) Lift up the Touchpad Bracket like a Point 3.
- M2 L3 : 2pcs
*Caution
Lift up the Bracket carefully to protect from
damage of Touchpad Module.
4-11
- This Document can not be used without Samsung's authorization -
4. Assembly and Disassembly
Item Picture Description
6. Top Ass'y after removing Speaker and
Touchpad Bracket
TOP
Ass'y
*Caution
Do not detach Touchpad Module, because
that is attached with Top by double adhesive.
1. Remove 5 screws after detaching the 5
Rubber.
- M2 L6 : 5pcs
2. Use tweezers, wooden cutter or '-' driver
when remove rubbers.
LCD
Ass'y *Caution
Be careful of injury and scratch of LCD Front
surface when use instruments.
3. Disassemble the LCD Front like a picture.
*Caution
Be care of not distort the LCD Front.
4-12
- This Document can not be used without Samsung's authorization -
4. Assembly and Disassembly
Item Picture Description
4. Disassemble the LCD Module and Inverter
from LCD Back after removing 6 screws.
- M2 L6 6pcs
5. Disassemble the Bracket Upper after
removing 3 screws.
- M2 L4 : 3pcs
*Caution
Do not detach the Wireless LAN Antenna
because that is attached with LCD Back by
double adhesive.
LCD
Ass'y
6. Lift up the Knob latch after removing the
Spring like a picture.
7. LCD Back after removing the LCD Module,
Bracket Upper and Knob Latch.
4-13
- This Document can not be used without Samsung's authorization -
4. Assembly and Disassembly
4-2. P50 Assembly and Disassembly
Item Picture Description
8. Disconnect the LCD Cable from Inverter like
a picture.
9. Disconnect the LCD Module from Inverter
like a picture.
LCD
Ass'y
10. The picture after detaching inverter from
LCD Module.
11. Disconnect the LCD Cable from LCD
Module like a picture after detaching the silver
adhesive.
*Caution
Do not lift up the LCD Cable because LCD
panel board is very fragile.
4-14
- This Document can not be used without Samsung's authorization -
4. Assembly and Disassembly
Item Picture Description
12. Disassemble the LCD L, R Bracket after
removing 8 screws.
- M2 L3 : 8pcs
*Caution
Be care of not scratch the LCD surface when
remove screws.
LCD
Ass'y
13. LCD Module after removing LCD Cable, L,
R Bracket and Inverter
4-15
◦ Jabse Service Manual Search 2026 ◦ Jabse Pravopis ◦ onTap.bg ◦ Other service manual resources online : Fixya ◦ eServiceinfo