Service Manuals, User Guides, Schematic Diagrams or docs for : Samsung Laptop NP-R60+ Схема и сервис мануал на Samsung NP-R60+ NP-R60FE0A_SER_SM_EN_20080602190217734_05_Disassembly_and_Reassembly
<< Back | HomeMost service manuals and schematics are PDF files, so You will need Adobre Acrobat Reader to view : Acrobat Download Some of the files are DjVu format. Readers and resources available here : DjVu Resources
For the compressed files, most common are zip and rar. Please, extract files with Your favorite compression software ( WinZip, WinRAR ... ) before viewing. If a document has multiple parts, You should download all, before extracting.
Good luck. Repair on Your own risk. Make sure You know what You are doing.
Image preview - the first page of the document
>> Download NP-R60FE0A_SER_SM_EN_20080602190217734_05_Disassembly_and_Reassembly documenatation <<
Text preview - extract from the document
- -
- This Document can not be used without Samsung's authorization -
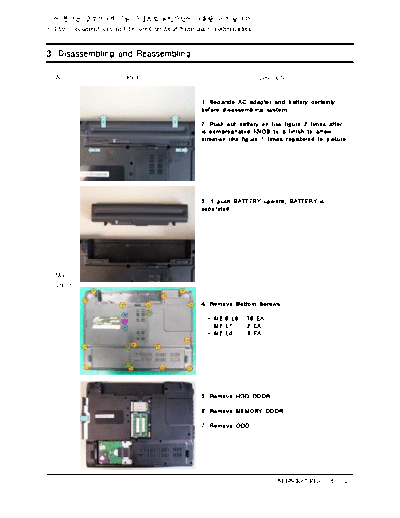
3. Disassembling and Reassembling
Area Picture Description
1. Separate AC adaptor and battery certainly
before disassembling system.
2. Push out battery on like figure 2 times after
is compregnated KNOB to a finish to arrow
direction like figure 1 times registered to picture.
3. If push BATTERY upward, BATTERY is
separated.
Main
System
4. Remove Bottom Screws.
- M2.6 L8 : 16 EA
- M2 L7 : 2 EA
- M2 L4 : 3 EA
5. Remove HDD DOOR.
6. Remove MEMORY DOOR.
7. Remove ODD.
SENS R60 Plus < 3 - 1 >
- -
- This Document can not be used without Samsung's authorization -
3. Disassembling and Reassembling
Area Picture Description
8. Separate from Connector catches handle with
picture and pushes HDD to arrow direction.
*Caution
When leave out HDD to back, do not inflict
unreasonable force.
Remove from HDD certainly before upset system.
9. Separate first Wireless LAN Antenna, and
after that Wireless LAN CardScrew solves and
lifts and removes .
- M2 L4 : 1 EA
*Caution
PRAHA model have only one Wireless LAN
Main Antenna
System
10. After Memory lifts Memory pulling Socket
with picture to right and left, Memory extracts
forward and separate.
11. Remove ODD side Screw.
- M2 L3 : 1 EA
SENS R60 Plus < 3 - 2 >
- -
- This Document can not be used without Samsung's authorization -
3. Disassembling and Reassembling
Area Picture Description
12. After remove HDD, Wireless LAN, Memory,
ODD Module image
13. When overturn System, use Hook of where
is registered to picture for Top Cover and
Keyboard separation.
Main
System
14. Lift by "-" screw driver using Hole between
"Pause Break" height and "Insert" height to
remove Top Cover.
15. At Keyboard Hook separation tweezers or
tree knifedo to use '-' screw driver.
*Caution
1. Take care so that safety accident and Top
surface at tool use may not rake.
2. Keyboard lifts furtively and uncovers FPC
because was linked by System and FPC.
SENS R60 Plus < 3 - 3 >
- -
- This Document can not be used without Samsung's authorization -
3. Disassembling and Reassembling
Area Picture Description
16. Lifts Keyboard FPC and Linked Connector
Cover with picture and separates Keyboard.
*Caution
Observe because Connector is damaged in
case of lift Connector Cover perforce.
17. Remove Cable plain of your part to disjoint
Top.
Main
System
18. Separate Touchpad FFC after lift FFC
Connector's Cover on.
*Caution
Observe because Connector is damaged in
case of lift Connector Cover perforce.
19. Pulls Connector to arrow direction and
separates Speaker Cable.
SENS R60 Plus < 3 - 4 >
- -
- This Document can not be used without Samsung's authorization -
3. Disassembling and Reassembling
Area Picture Description
20. Catches LCD Cable and pulls to left and
separates Cable.
*Caution
Because Main Board's Connector drops easily
in case of lift Top without separating LCD Cable
LCD Cable separation availabilityTop exclusion
certainly confirm.
21. Pull Wireless LAN Antenna carefully vertically.
*Caution
Is expired because Wireless LAN Antenna takes
or work so that may not be damaged with
meticulous care.
Main
System
22. Extracts Wireless LAN Antenna to arrow
direction carefully and separates with Top.
*Caution
Is expired because Wireless LAN Antenna takes
or work so that may not be damaged with
meticulous care.
23. Separate LCD Ass' y after remove two
Screws registered to picture.
- M2.6 L8 : 2 EA
SENS R60 Plus < 3 - 5 >
- -
- This Document can not be used without Samsung's authorization -
3. Disassembling and Reassembling
Area Picture Description
24. After separate LCD Ass' y image
25. Lifts on and separates Top from right side
with picture.
Main
System
26. Separate Bluetooth Cable at confidential talk
to arrow direction after remove five Screws to
separate Main Board, Fan, Bluetooth.
- M2 L4 : 5 EA
27. Fan separates all Cables at confidential talk
to arrow direction for separation.
SENS R60 Plus < 3 - 6 >
- -
- This Document can not be used without Samsung's authorization -
3. Disassembling and Reassembling
Area Picture Description
28. Lifts Main Board from right side part and
separates from Bottom.
*Caution
Lift from right side certainly because there is
Port damage worry in case of lift perforce from
left side
29. Bottom after Main Board exclusion
Main
System
SENS R60 Plus < 3 - 7 >
- -
- This Document can not be used without Samsung's authorization -
3. Disassembling and Reassembling
Area Picture Description
1. Remove Speaker.
Top *Caution
Ass'y If Touchpad Module is not all-important
occasion because was fixed by Top and two
faces tape, Module does not separate.
Press resources are not Bunrigadoe because
become anastomosis.
1. Screw exclusion after LCD Front's Rubber 5
exclusion
- M2 L6 : 5 EA
2. Do to use tweezers or tree sword, '-' screw
driver at Rubber removal.
LCD
Ass'y
3. Twists hors furtively in inside with picture and
separates Front.
*Caution
Inflict force perforce and take care so that
Front may not bend.
SENS R60 Plus < 3 - 8 >
- -
- This Document can not be used without Samsung's authorization -
3. Disassembling and Reassembling
Area Picture Description
4. Separate + Inverter from LCD Back to LCD
Module removing 7 Screws.
- M2 L6 : 7 EA
5. Removes 2 Screws and separates Bracket
Upper.
- M2 L4 : 2 EA
LCD
Ass'y
6. Separate Knob Latch after remove Spring
landing on pulling Spring's right furtively.
7. LCD Back after LCD Module, Bracket Upper,
Knob Latch exclusion
*Caution
Because Wireless LAN Antenna was fixed by
two faces tape to LCD Back, Antenna does not
separate except all-important occasion.
SENS R60 Plus < 3 - 9 >
- -
- This Document can not be used without Samsung's authorization -
3. Disassembling and Reassembling
Area Picture Description
8. Separate Connector 3 places in LCD Module.
9. Has pushed Connector to arrow direction and
separates LCD Module and Inverter.
LCD
Ass'y
10. Pulls Connector to arrow direction and
separates LCD Module and Inverter.
11. Separate LCD Module and LCD Cable
pushing LCD Cable to arrow direction after silver
color tape exclusion for protection.
SENS R60 Plus < 3 - 10 >
- -
- This Document can not be used without Samsung's authorization -
3. Disassembling and Reassembling
Area Picture Description
12. Removes 6 side Screws and removes right
and left Bracket.
- M2 L3 : 6 EA
*Caution
Take care so that LCD surface at Screw
exclusion may not rake.
13. LCD Module after LCD Cable, right and left
Bracket, Inverter exclusion
LCD
Ass'y
SENS R60 Plus < 3 - 11 >
- -
- This Document can not be used without Samsung's authorization -
3. Disassembling and Reassembling
Area Picture Description
1. Main Board
2. Remove 8 Screws for HeatSink separation.
- Special Screw : 8 EA
*Caution
HeatSink Screws couldn't be disassembled.
Main
Board
3. CPU & MDC part
4. Lift CPU by right angle after turn Screw to
direction such as the picture for CPU separation.
*Caution
Take care so that CPU Pin may not bend.
SENS R60 Plus < 3 - 12 >
- -
- This Document can not be used without Samsung's authorization -
3. Disassembling and Reassembling
Area Picture Description
5. Separate relevant Screw to separate MDC.
- M2 L6 : 1 EA
6. Cancel MDC cable and connection between
baud.
Main
Board
7. Remove 2 Screws to separate EXPRESS
Frame.
- M2 L6 : 2 EA
8. Lift metal Geolrimbu 2 places vertically to
separate EXPRESS Frame with picture.
*Caution
Take care so that metal Geolrimbu may not
bend forever.
SENS R60 Plus < 3 - 13 >
- -
- This Document can not be used without Samsung's authorization -
3. Disassembling and Reassembling
Area Picture Description
9. EXPRESS Frame with picture separates
confidential talk to right.
10. After remove Thermal Duct, Heatsink, CPU,
EXPRESS Frame, MDC Main Board image
Main
Board
SENS R60 Plus < 3 - 14 >
◦ Jabse Service Manual Search 2026 ◦ Jabse Pravopis ◦ onTap.bg ◦ Other service manual resources online : Fixya ◦ eServiceinfo