Service Manuals, User Guides, Schematic Diagrams or docs for : Samsung Monitor Monitor 943NXW LS19MYNKBBEDC Disassembly & Reassembly
<< Back | HomeMost service manuals and schematics are PDF files, so You will need Adobre Acrobat Reader to view : Acrobat Download Some of the files are DjVu format. Readers and resources available here : DjVu Resources
For the compressed files, most common are zip and rar. Please, extract files with Your favorite compression software ( WinZip, WinRAR ... ) before viewing. If a document has multiple parts, You should download all, before extracting.
Good luck. Repair on Your own risk. Make sure You know what You are doing.
Image preview - the first page of the document
>> Download Disassembly & Reassembly documenatation <<
Text preview - extract from the document
                                                                                                3. Disassembly and Assembly

3. Disassembly and Assembly
This section describes the disassembly and reassembly sequences for this monitor.
    Warning:    As this monitor has parts that are sensitive to static electricity, be careful when handling them.

3-1. SIMPLE STAND Disassembly
    Caution:       1. Turn the monitor off before beginning the disassembly process.
                   2. Disassemble the monitor carefully as directed in the following procedures.
                   3. When disassembling the monitor, do not use any metal tools except for the provided jig.

                     Description                                               Photo                                 Screws
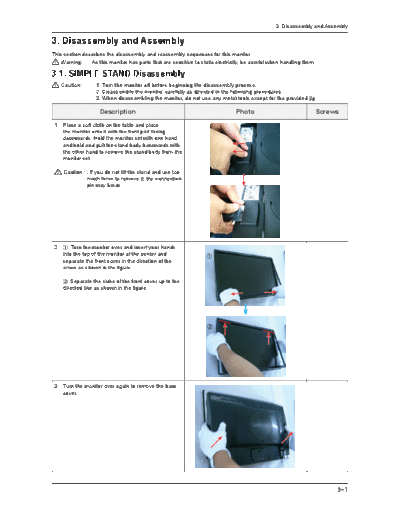
 1. Place a soft cloth on the table and place
    the monitor onto it with the front part facing
    downwards. Hold the monitor set with one hand
    and hold and pull the stand body backwards with
    the other hand to remove the stand body from the
    monitor set.

     Caution : : If you do not tilt the stand and use too
               much force to remove it, the connection
               pin may break.


 2.  Turn the monitor over and insert your hands
    into the top of the monitor at the center and
    separate the front cover in the direction of the
    arrow as shown in the figure.

     Separate the sides of the front cover up to the
    directed line as shown in the figure.


 3. Turn the monitor over again to remove the back
    cover.


                                                                                                                          3-1
3. Disassembly and Assembly


                   Description                                 Photo          Screws
4. Remove the SHIELD-LAMP using the provided JIG.

      Caution: The SHIELD-LAMP is sharp.


5. Remove the LVDS, LAMP wire, FUNCTION
   cable, and SPEAKER cable, and then remove                           LVDS
   the SHIELD-COVER.


                                                     LAMP
                                                     WIRE


                                                            FUNCTION


6. Remove the LCD panel..


7. Remove the four (4) screws shown in the figure.


8. Remove the four (4) screws shown in the figure
   and remove the Bracket support.


3-2
                                                                3. Disassembly and Assembly


                  Description                           Photo                 Screws
 9. Remove the main PCB and IP boards from the
    SHIELD-cover.


 The assembly is in the reverse order of disassembly.


                                                                                      3-3
3. Disassembly and Assembly

3-2. HAS STAND Disassembly
                   Description                                           Photo            Screws
1. If the Stopper PIN at the back of the stand is
   not removed, place a soft cloth on the table and
   place the monitor on it, and then hold the monitor
   set and remove the Stopper PIN at the back of
   the stand.


2. Turn the monitor over. Remove the two (2) screws
   that hold the stand in place and then remove the
   stand.

      Caution: When removing the screws, hold
               the stand body with one hand
               so that the stand does not fall.


3. The following steps are the same as steps 2 to 9 for disassembling the SIMPLE stand.


 The assembly is in the reverse order of disassembly.


3-4
◦ Jabse Service Manual Search 2026 ◦ Jabse Pravopis ◦ onTap.bg ◦ Other service manual resources online : Fixya ◦ eServiceinfo