Service Manuals, User Guides, Schematic Diagrams or docs for : Samsung Monitor Samsung_SP-S4243_PDP_buzzing_noise_repair_tips
<< Back | HomeMost service manuals and schematics are PDF files, so You will need Adobre Acrobat Reader to view : Acrobat Download Some of the files are DjVu format. Readers and resources available here : DjVu Resources
For the compressed files, most common are zip and rar. Please, extract files with Your favorite compression software ( WinZip, WinRAR ... ) before viewing. If a document has multiple parts, You should download all, before extracting.
Good luck. Repair on Your own risk. Make sure You know what You are doing.
Image preview - the first page of the document
>> Download Samsung_SP-S4243_PDP_buzzing_noise_repair_tips documenatation <<
Text preview - extract from the document
SERVICE BULLETIN
ELECTRONICS
Product : PDP TV Bulletin No. 07-PDP_TV-U002
Model : SPS42**/HPS42**/HPS50** Bulletin Date JAN.29.2007
PL**E7/PL**P7
Buyer : AMERICA
Subject : Service Guide for PDP Buzzing Noise
Background
If you can hear the buzzing sound although PDP TV is adjusted volume to "0", please service as the following.
Solution
First, need to check what is making a buzzing noise
-> If noise is coming from the vibration of back cabinet, need to attach a spacer felts
-> If noise source is X, Y main board of PDP module, need to attach a damping sheet.
-> If noise source is SMPS, need to change a SMPS board
* Please refer to the follows for each working instruction
* Spacer felts is for the only 50" model, and damping sheet, SMPS is for the both of 42" and 50"
How to attatch Damping sheets or Spacer-Felts
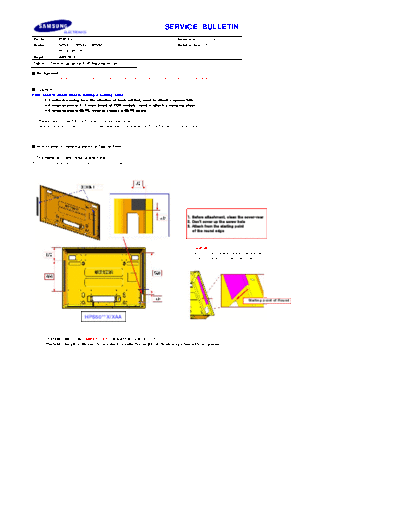
1. The methode of attaching Spacer Felts.
Attach two Spacer Felts on the Back-Cover as the below picture.
1. Before attachment, clean the cover-rear
2. Don't cover up the screw hole
3. Attach from the starting point
of the round edge
< Caution>
Watch out the interference with the bracket
and don't overlap with the screw hole
Starting point of Round
Ed
HPS50**X/XAA
The fabric part code : AA63-60131F (Spacer Felt, 280*50*0.5T)
The fabric length is 280mm. So you need to make the length on the above pictrue with two pieces
2 The methode of attaching Damping Sheet
Be sure to separate the power cord before disassembling the unit.
1. Remove 4 screws and then pull the stand down to remove it from the unit.
Please lay the PDP unit face down on a soft surface when removing the stand.
2. Remove 4 screws( ), 14 screws( ) and 4 screws( ).
Remove the Rear Cover.
3. Remove 8 screws for removing 2 wall brackets.
Y- X-
4. Attatch 8 damping sheets on X-Main and Y-Main board as the below picture.
Attatch on the center of Attatch on the center of
H/S H/S
Apart from capacitor about
Apart from capacitor about
1mm
1mm
Attatch on the center of
Attatch on the center of
H/S
H/S
Y-Main X-Main
B d B d
Apart from capacitor about
1mm
Align with the end of H/S
edge
5. Reassembly procedures are in the reverse order of disassembly procedures.
Application Reference ( ) Only Defected sets ( ) Whole sets ( )
Attachment Schematic Diagram ( ) Drawing ( ) None ( )
Published by Jungwoo Kim / VD Div. Global CS team ([email protected])
◦ Jabse Service Manual Search 2026 ◦ Jabse Pravopis ◦ onTap.bg ◦ Other service manual resources online : Fixya ◦ eServiceinfo