Service Manuals, User Guides, Schematic Diagrams or docs for : Samsung TV tx14n34xxeu
<< Back | HomeMost service manuals and schematics are PDF files, so You will need Adobre Acrobat Reader to view : Acrobat Download Some of the files are DjVu format. Readers and resources available here : DjVu Resources
For the compressed files, most common are zip and rar. Please, extract files with Your favorite compression software ( WinZip, WinRAR ... ) before viewing. If a document has multiple parts, You should download all, before extracting.
Good luck. Repair on Your own risk. Make sure You know what You are doing.
Image preview - the first page of the document
>> Download tx14n34xxeu documenatation <<
Text preview - extract from the document
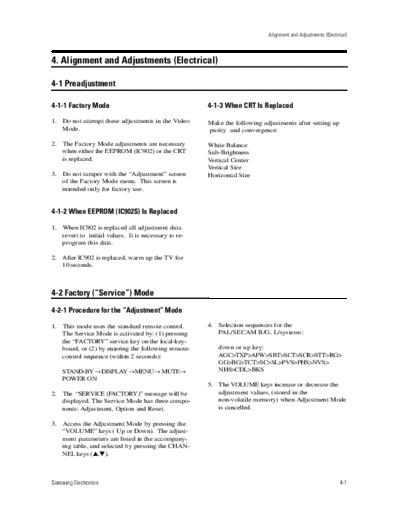
Alignment and Adjustments (Electrical)
4. Alignment and Adjustments (Electrical)
4-1 Preadjustment
4-1-1 Factory Mode 4-1-3 When CRT Is Replaced
1. Do not attempt these adjustments in the Video Make the following adjustments after setting up
Mode. purity and convergence:
2. The Factory Mode adjustments are necessary White Balance
when either the EEPROM (IC902) or the CRT Sub-Brightness
is replaced. Vertical Center
Vertical Size
3. Do not tamper with the "Adjustment" screen Horizontal Size
of the Factory Mode menu. This screen is
intended only for factory use.
4-1-2 When EEPROM (IC902S) Is Replaced
1. When IC902 is replaced all adjustment data
revert to initial values. It is necessary to re-
program this data.
2. After IC902 is replaced, warm up the TV for
10 seconds.
4-2 Factory ("Service") Mode
4-2-1 Procedure for the "Adjustment" Mode
1. This mode uses the standard remote control. 4. Selection sequences for the
The Service Mode is activated by: (1) pressing PAL/SECAM B/G, L/systems:
the "FACTORY" service key on the local-key-
board, or (2) by entering the following remote- down or up key:
control sequence (within 2 seconds): AGC>TXP>AFW>SBT>SCT>SCR>STT>RG>
GG>BG>TCT>SC>SL>PVS>PHS>NVS>
STAND-BY DISPLAY MENU MUTE NHS>CDL>BKS
POWER ON
5. The VOLUME keys increase or decrease the
2. The "SERVICE (FACTORY)" message will be adjustment values, (stored in the
displayed. The Service Mode has three compo- non-volatile memory) when Adjustment Mode
nents: Adjustment, Option and Reset. is cancelled.
3. Access the Adjustment Mode by pressing the
"VOLUME" keys ( Up or Down). The adjust-
ment parameters are listed in the accompany-
ing table, and selected by pressing the CHAN-
NEL keys (L,M).
Samsung Electronics 4-1
Alignment and Adjustments (Electrical)
4-2-2 Main Adjustment Parameters
OSD ABBREVIATION RANGE INITIAL DATA
AGC 63 28
XP 7 5
QSS 1 1
SBT 23 6
SCT 23 10
SCR 13 6
STT 13 9
RG 63 38
GG 63 32
BG 63 32
TCT 1 0
SC 63 11
SL 63 30
VA 63 38
PVS 63 27
PHS 63 40
NVS 63 38
NHS 63 22
CDL 15 4
SCL 3 1
PWL 15 12
OMD 63 26
BLR 63 31
BLB 63 27
AGC2T 31 15
PF 3 2
RP 3 2
YD 15 5
NOTE : PVS, PVA, PHS, NVS, NVA,NHS parameters must be aligned using both the 50 Hz and 60 Hz
vertical-field rates.
4-2-3 AGING Mode (Reference Only)
This pattern is used for pre-heating the CRT during manufacturing--it is accessed in the
factory by twice pressing the "FACTORY" key .
Even if the TV power is cut off, the Aging Mode is not cancelled.
The "AGING" marking is displayed on the screen.
The AGINGmode is cancelled by repressing the "FACTORY" key.
4-2 Samsung Electronics
Alignment and Adjustments (Electrical)
4-2-4 Option
BYTE ITEM 0
1 LANGUAGE EUROPE/URSSIA
2 SYSTEM CF/CI/CW/CX/CB/CII
3 TUNER 1/2
4 HELP MESSAGE ON/OFF
5 VCR HEAD 2HD/2HDLP/4HD/HIFI
6 G-CODE SHOWVIEW/VIDEO PLUS/NONE
7 ATS OPTION ON/OFF
8 VPS/PDC PDC/VPS/NONE
9 TTX ON/OFF
4-3 Reset
BYTE ITEM 0
1 Contrast
2 Bright
3 Sharpness
4 Color
5 Tint
6 Volume
7 Program Number
8 Color System
9 Sound System
3DB LNA
Panel Lock
Language
Clock
Timer
On Time
Sleep
PICTURE MODE
Samsung Electronics 4-3
Alignment and Adjustments (Electrical)
4-4 Other Adjustments
4-4-1 General 4-4-2 Automatic Degaussing
1. Usually, a color TV needs only slight A degaussing coil is mounted around the
touch-up adjustment upon installation. picture tube, so that external degaussing after
Check the basic characteristics such as height, moving the TV should be unnecessary. But
horizontal and vertical sync and focus. the receiver must be properly degaussed upon
installation.
2. The picture should have good black and white
details. There should be no objectionable The degaussing coil operates for about 1
color shading; if color shading is present, second after the power is switched ON. If the
perform the purity and convergence adjust- set has been moved or turned in a different
ments described below. direction, disconnect its AC power for at least
10 minutes.
3. Use the specified test equipment or its
equivalent. If the chassis or parts of the cabinet become
magnetized, poor color purity will result. If
4. Correct impedance matching is essential. this happens, use an external degaussing coil.
Slowly move the degaussing coil around the
5. Avoid overload. Excessive signal from a sweep faceplate of the picture tube and the sides and
generator might overload the front-end of the front of the receiver. Slowly withdraw the coil
TV. When inserting signal markers, do not to a distance of about 6 feet before removing
allow the marker generator to distort test power.
results.
6. Connect the TV only to an AC power source 4-4-3 High Voltage Check
with voltage and frequency as specified on the
backcover nameplate.
CAUTION: There is no high voltage
7. Do not attempt to connect or disconnect any adjustment on this chassis. The B+ power
wires while the TV is turned on. Make sure supply must be set to +125 volts (Full color
that the power cord is disconnected before bar input and normal picture level).
replacing any parts.
1. Connect a digital voltmeter to the second
8. To protect against shock hazard, use an anode of the picture tube.
isolation transformer.
2. Turn on the TV. Set the Brightness and
Contrast controls to minimum (zero beam
current).
3. The high voltage should not exceed 27.5KV.
4. Adjust the Brightness and contrast controls to
both extremes. Ensure that the high voltage
does not exceed 27.5KV under any conditions.
4-4 Samsung Electronics
Alignment and Adjustments (Electrical)
4-4-4 FOCUS Adjustment
1. Input a black and white signal.
2. Adjust the tuning control for the clearest picture.
3. Adjust the FOCUS control for well defined scanning lines in the center area of the screen.
4-4-5 Screen Adjustment
1. Turn to the ACTIVE channel.
2. Adjust the VR screen for a normal picture is (no blooming or flyback line).
3. Adjust the FOCUS control for well defined scanning lines in the center area of the screen.
4-4-6 Purity Adjustment
1. Warm up the receiver for at least 20 minutes.
2. Plug in the CRT deflection yoke and tighten the clamp screw.
3. Plug the convergence yoke into the CRT and set in as shown in Fig. 4-1.
4. Input a black and white signal.
5. Fully demagnetize the receive by applying an external degaussing coil.
6. Turn the CONTRAST and BRIGHTNESS controls to maximum.
7. Loosen the clamp screw holding the yoke. Slide the yoke backward or forward to provide
vertical green belt. (Fig. 4-2).
8. Tighten the convergence yoke.
9. Slowly move the deflection yoke forward, and adjust for the best overall green screen.
10. Temporarily tighten the deflection yoke.
11. Produce blue and red rasters by adjusting the low-light controls. Check for good purity
in each field.
12. Tighten the deflection yoke.
Samsung Electronics 4-5
Alignment and Adjustments (Electrical)
4 Pole Magnet 2 POLE
PURITY
6 Pole Magnet 2 Pole Magnet
Clamper
Screw ADJUST
(VERTICA
YOKE
CLAMP
SCREW
6 POLE
CONVERGENCE
4 POLE
CONVERGENCE
Fig. 4 -1 Convergence Magnet Assembly
Vertical Green Belt
31m/m
Fig.4-2 Center Convergence Adjustment
4-4-7 White Balance Adjustment
4-4-7 (A) HIGH-LIGHT ADJUSTMENT
1. Input either a Lion Head or a "pure white" pattern.
2. Warm up the TV for 30 minutes.
3. Check the data in the Service Mode
4. Adjust RG, BG in the Factory Mode.
4-4-7 (B) LOW-LIGHT ADJUSTMENT
1. Automatically accomplished during the high-light adjustment.
4-6 Samsung Electronics
Alignment and Adjustments (Electrical)
4-4-8 Center Convergence Adjustment 5. Turn the both tabs at the same time, keeping
the angle constant, and superimpose the red
1. Warm up the receiver for at least 20 minutes. and blue horizontal line in the center of the
screen.
2. Adjust the two tabs of the 4 pole magnets to
change the angle between them. Superimpose 6. Adjust the two-tab pairs of the 6-pole magnets
the red and blue vertical lines in the center to superimpose the red and blue line onto the
area of the screen. green. (Changing the angle affects the vertical
lines, and rotating both magnets affects the
3. Adjust the Brightness and Contrast controls for horizontal lines.)
a well defined picture.
7. Repeat adjustments 2~6, if necessary.
4. Adjust the two-tab pairs of the 4 pole magnets,
and change the angle between them. 8. Since the 4-pole magnets and 6-pole magnets
Superimpose the red and the blue vertical interact, the dot movement is complex
lines in the center area of the screen. (Fig. 4-3).
BLUE RED RED/BLUE GREEN
BLUE RED/BLUE
RED GREEN
4-Pole Magnet Movement 6-Pole Magnet Movement
Fig 4-3 Center Convergence Adjustment
4-4-9 Dual Tuner AFT Adjustment
Test Equipment
1. TV Generator(PM5518, PM5418, ETC)
2. DC VOLTMETER
1. Connect DC Voltmeter to AFT terminal of TUNER IF-MODULE.
2. After selecting P00, input to IF1 terminal of TU002(38.9 MHz Using PM5518)
3. After selecting P00, set to 2.5V◦ Jabse Service Manual Search 2026 ◦ Jabse Pravopis ◦ onTap.bg ◦ Other service manual resources online : Fixya ◦ eServiceinfo