Service Manuals, User Guides, Schematic Diagrams or docs for : Tektronix Make_your_own_Tektronix_TM-500_extender
<< Back | HomeMost service manuals and schematics are PDF files, so You will need Adobre Acrobat Reader to view : Acrobat Download Some of the files are DjVu format. Readers and resources available here : DjVu Resources
For the compressed files, most common are zip and rar. Please, extract files with Your favorite compression software ( WinZip, WinRAR ... ) before viewing. If a document has multiple parts, You should download all, before extracting.
Good luck. Repair on Your own risk. Make sure You know what You are doing.
Image preview - the first page of the document
>> Download Make_your_own_Tektronix_TM-500_extender documenatation <<
Text preview - extract from the document
Make your own Tektronix TM-500 extender using the Jamma Board JB-3.
Written by Jan de Rie
This document details how to make your own Tektronix TM-500 extender. Such an
extender allows you to operate a TM-500 plug-in outside of the cabinet, which is
necessary when you are doing measurements on a plug-in, e.g., for repairs.
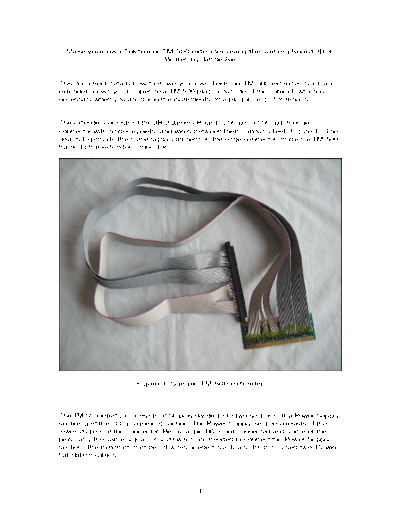
The extender consists of the JB-3 Jamma Board, a 56-pin 0.156" pitch edge
connector with solder eyelets, and wires between them, about 3 feet (Figure 1). The
goal is to provide the same signals present on the edge connector inside the TM-500
frame to the extender connector.
Figure 1: Sample TM-500 extender
The TM-500 interface consists of 56 pins divided into two sections: the Power Supply
section and the I/O assignment section. The Power Supply section consists of the
lower 26 pins of the connector. Because pin B6 is not connected and some of the
pins carry the same signal, only 20 wires are needed to connect the Power Supply
section (the minimum number of wires needed is actually 19, but I used two 10-wire
flat ribbon cables).
-1-
Tektronix decided to number the pins inside the connector from the bottom to the
top, using an A side (left) and a B side (right) when you are facing the front of the
connector. Figure 2 shows the pin numbering. Unfortunately, the edge connectors I
have seen use a somewhat different numbering system, as does the JB-3 Jamma
Board, so we need to be prepared for some mental mapping.
Figure 2: TM-500 Power Module Interface Pin Assignment
The edge connectors seem to number the pins by using letters on the left side and
numbers on the right side, again, when you are facing the connector. When the
Jamma Fingerboard is properly installed in the TM-500 frame (insert the "NON-
JAMMA PCB/Device side into the connector inside the frame), the connectors to the
pins on the left side are labeled 1 to 28 and the connectors to the pins on the right
side are labeled A..f. Table 1 shows the mapping between all three references.
-2-
Table 1: Mapping between Edge Connector and JB-3 Jamma board
Tektronix Interface Edge Connector JB-3 Jamma board
A1 A 1
B1 1 A
A2 B 2
B2 2 B
A3 C 3
B3 3 C
A4 D 4
B4 4 D
A5 E 5
B5 5 E
A6 F 6
B6 6 F
A7 H 7
B7 7 H
A8 J 8
B8 8 J
A9 K 9
B9 9 K
A10 L 10
B10 10 L
A11 M 11
B11 11 M
A12 N 12
B12 12 N
A13 P 13
B13 13 P
A14 R 14
B14 14 R
A15 S 15
B15 15 S
A16 T 16
B16 16 T
A17 U 17
B17 17 U
A18 V 18
B18 18 V
A19 W 19
B19 19 W
A20 X 20
B20 20 X
A21 Y 21
B21 21 Y
A22 Z 22
B22 22 Z
A23 A 23
B23 23 a
A24 B 24
B24 24 b
A25 C 25
B25 25 c
A26 D 26
B26 26 d
A27 E 27
B27 27 e
A28 F 28
B28 28 f
-3-
The Power Supply section signals can be extended from the TM-500 frame connector
to the extender connector with 20 wires. This can be done by using one wire for the
pairs of pins listed in Table 2. Since pin B6 (6 on the Edge Connector, F on the JB-3
board) is not connected, we save a total of six wires this way, reducing the number
of wires needed from 26 to 20. Figure 3 shows the shared pins/wires. Note that the
labelling in this figure matches the labelling on the Edge Connector.
Figure 3: Shared pins in the Power Supply Section
-4-
Table 2: Pin pairs using just one wire
Tektronix Edge JB-3 Jamma
Interface Connector board
A2-B2 B-2 2-B
A3-B3 C-3 3-C
A4-B4 D-4 4-D
A8-B8 J-8 8-J
A12-B12 N-12 12-N
Because these wires may carry significant current, it is not a good idea to use
standard AWG-28 flat ribbon cable. I have used AWG-24 ribbon cable with good
success, but even thicker wires may be needed for some plug-ins.
Please be very careful with the AC lines shown in figures 1 and 2. If there is a short
between those pins, the TM-500 frame fuse will blow immediately.
The I/O assignment section is optional and is only used when two or more plug-ins
talk together (or with a wide plug-in). This section consists of 30 pins, and 30 wires
need to be soldered between the JB-3 Jamma board and the Edge Connector solder
eyelets. Keep in mind that, with the Power Supply section, the identifications on the
Edge Connector and the JB-3 Jamma board are reversed, so make sure to solder
Connector `R' to Jamma `14', etc. Standard AWG-28 flat ribbon cable is adequate for
these lines.
The JB-3 Jamma board may be purchased from www.jammaboards.com. The Edge
Connector (56 pins, 0.156" pitch) is available from multiple sources, including
jammaboards. Any wire AWG-24 or thicker can be used. I strongly suggest using
stranded wire. 10-wire AWG-24 flat ribbon cable works like a charm; if you want a 3
feet extender, you'll need 6 feet (2 * 3 feet).
Jan de Rie
[email protected]
-5-
◦ Jabse Service Manual Search 2026 ◦ Jabse Pravopis ◦ onTap.bg ◦ Other service manual resources online : Fixya ◦ eServiceinfo