Service Manuals, User Guides, Schematic Diagrams or docs for : Yamaha RX RX-A3010 & V3071 RXA3010_DIS

<< Back | Home

Most service manuals and schematics are PDF files, so You will need Adobre Acrobat Reader to view : Acrobat Download Some of the files are DjVu format. Readers and resources available here : DjVu Resources
For the compressed files, most common are zip and rar. Please, extract files with Your favorite compression software ( WinZip, WinRAR ... ) before viewing. If a document has multiple parts, You should download all, before extracting.
Good luck. Repair on Your own risk. Make sure You know what You are doing.


Image preview - the first page of the document
RXA3010_DIS


>> Download RXA3010_DIS documenatation <<

Text preview - extract from the document
                         RX-A3010/RX-V3071


                           DISASSEMBLY PROCEDURES /
                          (Remove parts in the order as numbered.)
RX-A3010/RX-V3071


                          Disconnect the power cable from the AC outlet.

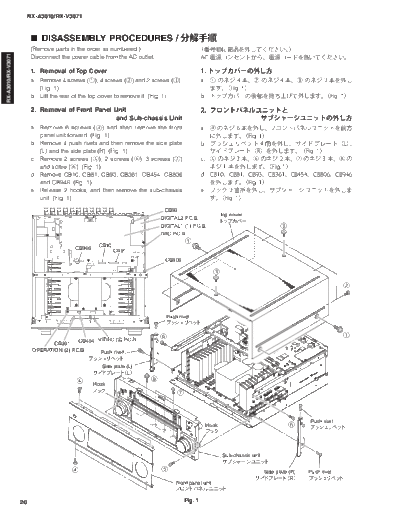
                          1. Removal of Top Cover
                          a. Remove 4 screws ( ), 4 screws ( ) and 2 screws ( ).
                             (Fig. 1)
                          b. Lift the rear of the top cover to remove it. (Fig. 1)

                          2. Removal of Front Panel Unit
                                                     and Sub-chassis Unit
                          a. Remove 6 screws ( ) and then remove the front
                             panel unit forward. (Fig. 1)
                          b. Remove 4 push rivets and then remove the side plate
                             (L) and the side plate (R). (Fig. 1)
                          c. Remove 2 screws ( ), 2 screws ( ), 3 screws ( )
                             and screw ( ). (Fig. 1)
                          d. Remove CB10, CB81, CB93, CB361, CB454, CB806
                             and CB946. (Fig. 1)
                          e. Release 2 hooks, and then remove the sub-chassis
                             unit. (Fig. 1)

                                                                            CB93
                                                                                                     Top cover
                                                                           DIGITAL2 P.C.B.
                                                                           DIGITAL1 (1) P.C.B.
                                                                           DAC P.C.B.

                                                    CB10
                                          CB946            CB81
                                                                            CB806


                                                                             Push rivet


                                           CB454 VIDEO (3) P.C.B.
                                 CB361
                          OPERATION (2) P.C.B.    Push rivet

                                                    Side plate (L)


                                                  Hook


                                                                                                                                          Push rivet
                                                                                              Hook


                                                                                                      Sub-chassis unit


                                                                                                                         Side plate (R)   Push rivet

                                                                                 Front panel unit


                    20                                                               Fig. 1
                                                                                                               RX-A3010/RX-V3071


3. Removal of DIGITAL2 P.C.B.


                                                                                                                                        RX-A3010/RX-V3071
a. Remove screw ( ). (Fig. 3)
b. Remove screw ( ). (Fig. 2)
c. Remove CB512 and then remove the DIGITAL2 P.C.B.
   which is connected directly to the DIGITAL1 (1) P.C.B.
   with board-to-board connectors. (Fig. 2)


4. Removal of DIGITAL1 (1) P.C.B.
a. Remove 2 screws ( ) and screw ( ). (Fig. 2)
b. Remove 9 screws ( ) and 3 screws ( ). (Fig. 3)
c. Remove CB21, CB22, CB84, CB86


◦ Jabse Service Manual Search 2024 ◦ Jabse PravopisonTap.bg ◦ Other service manual resources online : FixyaeServiceinfo