Service Manuals, User Guides, Schematic Diagrams or docs for : panasonic Cam AG-DVC30E 4394 - ajustements mécaniques (section 3)
<< Back | HomeMost service manuals and schematics are PDF files, so You will need Adobre Acrobat Reader to view : Acrobat Download Some of the files are DjVu format. Readers and resources available here : DjVu Resources
For the compressed files, most common are zip and rar. Please, extract files with Your favorite compression software ( WinZip, WinRAR ... ) before viewing. If a document has multiple parts, You should download all, before extracting.
Good luck. Repair on Your own risk. Make sure You know what You are doing.
Image preview - the first page of the document
>> Download 4394 - ajustements mécaniques (section 3) documenatation <<
Text preview - extract from the document
MECHANICAL ADJUSTMENT
CONTENTS
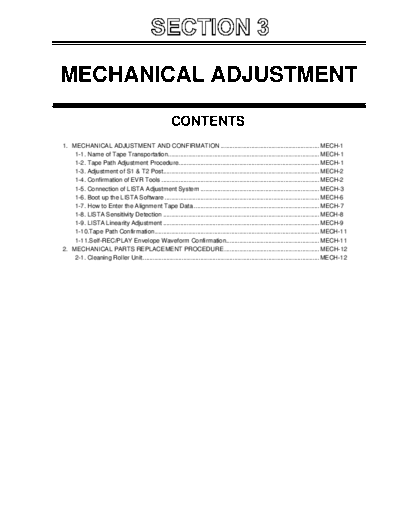
1. MECHANICAL ADJUSTMENT AND CONFIRMATION .......................................................... MECH-1
1-1. Name of Tape Transportation......................................................................................... MECH-1
1-2. Tape Path Adjustment Procedure................................................................................... MECH-1
1-3. Adjustment of S1 & T2 Post............................................................................................ MECH-2
1-4. Confirmation of EVR Tools ............................................................................................. MECH-2
1-5. Connection of LISTA Adjustment System ...................................................................... MECH-3
1-6. Boot up the LISTA Software ........................................................................................... MECH-6
1-7. How to Enter the Alignment Tape Data .......................................................................... MECH-7
1-8. LISTA Sensitivity Detection ............................................................................................ MECH-8
1-9. LISTA Linearity Adjustment ............................................................................................ MECH-9
1-10.Tape Path Confirmation................................................................................................. MECH-11
1-11.Self-REC/PLAY Envelope Waveform Confirmation....................................................... MECH-11
2. MECHANICAL PARTS REPLACEMENT PROCEDURE ........................................................ MECH-12
2-1. Cleaning Roller Unit ........................................................................................................ MECH-12
1. MECHANICAL ADJUSTMENT AND CONFIRMATION
1-1. Name of Tape Transportation
S1 Post Cylinder T1 Post T2 Post
Tension Post
T3 Post
S2 Post Capstan Shaft
Pinch Roller
LOADING condition
1-2. Tape Path Adjustment Procedure
START
LISTA Connection & Boot Up Confirmation of Tape Path
LISTA Sensitivity Detection Self-REC/PLAY ENV Confirmation
LISTA Linearity Adjustment END
MECH-1
1-3. Adjustment of S1 & T2 Post
LISTA linearity and Envelope waveform are adjusted by S1 and T2 post. When removing the Mech. Cover (R) and
(L), which is shown in the following figure, without opening a cassette cover, it is possible to do an adjustment.
Mech. Cover (R) side: S1 Post
Mech. Cover (L) side: T2 Post
Mech. Cover (L) Mech. Cover (R)
1-4. Connection of EVR Tools
To performing the confirmation of envelope (item "1-11. Self-REC/PLAY Envelope Confirmation"), the following
tools are required.
NAME Part Number Pcs. Remark
Measuring Board VFK1308P 1
EVR Connector Board VFK1309A 1 NOTE: VFK1309 also can be use
Connection Adapter VFK1763 1 60 to 30pin
30pin Flat Cable VFK1317 2
DC Cable VJA1128 or LSJA0310 1 For Unit
DC Cable VJA0941 1 For Measuring Board
AC Adapter ----- 2
To confirm the envelope output, connect the Connection and Measuring Boards as described below.
1. Unscrew 2 screws and remove the EVR cover.
SCREW
EVR Cover
2. Connect the 2 pcs. of 30 pin flat cables (VFK1317) between P101/P102 on the Measuring Board (VFK1308P),
and 2 connectors on the EVR Connector Board (VFK1309A). Make sure that the contact surface of 2 pcs. of 30
pin Flat Cables are inner side and direction of the EVR Connector Board is as shown in Figure. Then connect
the Connection Adapter (VFK1763).
Part side VFK1309A
30 pin Flat Cable
VFK1763
Connect VFK1763 with VFK1309A as
shown in picture. Connect the VFK1308P
The unit will not work if the connector VFK1763
is attached backwards.
MECH-2
3. Connect the Connection Adapter (VFK1763) to EVR connector in Unit. Then make sure that the direction of the
VFK1309A and VFK1763 are correct as shown in Figure.
When the VFK1763 is connected
the EVR connector, be careful
that VFK1309A is attached in the
right direction.
1-5. Connection of LISTA Adjustment System
TAPE VFM3000EDS (DV LISTA)
M. EQ Personal Computer (A/D Board should be installed.)
TOOL VFK1481K (LISTA Software), VFK1186 (LISTA Cable), VFK1300 (A/D Converter Board),
VFK1308P (Measuring Board), VFK1409A (Measuring Board) NOTE 2
VFK1317 (30P flat cable): 2pcs, VFK1309A (EVR connector board) NOTE 1
VFK1763 (Connection Adapter), VJA0941 (DC cable): 2pcs, 9P RS232C cross cable.
TP In case of use VFK1409A
F2 : ATF-ERR (VFK1409A), TP2 : TRG/HSW (VFK1409A), GND : GND (VFK1409A)
In case of use VFK1409S
F2 : ATF-ERR (VFK1409S), TP2 : TRG/HSW (VFK1810), GND : GND (VFK1409S)
NOTE 1:
VFK1309 and VFK1309A can be used to perform LISTA adjustment. The VFK1309A is only required for LCD
adjustment (refer to item 1 of Electrical adjustment procedure in section 4.)
NOTE 2:
If you already have VFK1409S (Measuring board), it can be used to perform LISTA adjustment with VFK1810.
Please refer to next explanation for installation of VFK1409S.
MECH-3
VFK1409S
Red colour of Lead wire
TP2 VFK1810
TP1
Black colour of Lead wire
1. Install the two test points of VFK1810 to through hole in this area and solder it at test point
at foil side of VFK1409S to fixed VFK1810.
2. Insert the two lead wires of VFK1810 to through hole.
3. Solder the red color of lead wire to pin1 of P108 on foil side on VFK1409S.
4. Solder the black color of lead wire to pin3 of P106 on foil side on VFK1409S.
1. Set the switches on the Measuring Board as shown below.
SW NAME& No. Setting Position
RS232C SEL (SW101) D-SUB
VTR TEST (SW103) L
BST TEST (SW104) NORMAL
SW105 H
SW106 OFF
SW107 CENTER position
SW108 H
FLUSH1 (SW102) NORMAL
FLUSH2 (SW109) NORMAL
SW NAME& No. Setting Position
RS232C SEL (S110) D-SUB
REC I (S101) NOR
LSI TEST (S102) NOR
S104 NOR
S114 EXT
S201 Right side
S202 Right side
S203 Right side
LISTA ON-OFF ON
MECH-4
2. Connect a PC, the Measuring Board and the camera recorder as shown below.
1) In case of use VFK1409A
9P RS232C CROSS CABLE
Connect the EVR connector of DC6V to 9V
camera recorder. It required 2 pieces PC W/AD board
of VFK1317, VFK1309A and VFK1308P
VFK1763. ATFI
HID 1
(Refer to item "1-4. Connection D GND
of EVR tools.")
LISTA CABLE (VFK1186)
VFK1409A DC6V to 9V
GND Short jumper
TP2
ATFI F2 TP1
Short jumper
2) In case of use VFK1409S
9P RS232C CROSS CABLE
Connect the EVR connector of DC6V to 9V
camera recorder. It required 2 pieces PC W/AD board
of VFK1317, VFK1309A and VFK1308P
VFK1763. ATFI
HID 1
(Refer to item "1-4. Connection D GND
of EVR tools.")
LISTA CABLE (VFK1186)
VFK1409S DC6V to 9V
GND Short jumper
TP2
ATFI F2 TP1
Short jumper
VFK1810
3. Connect the clips of the LISTA cable to test point on the Measuring Board. (Refer to Items "Sensitivity
Detection" and "Linearity Adjustment".)
MECH-5
1-6. Boot up the LISTA Software
1. Boot up the LISTA software on DOS mode.
< How to Install and Boot Up >
Make a directory like C: LISTA and copy all files in the VFK1481K(LISTA Software) to it on PC.
Type "LISTA" and press ENTER key, then boot up the LISTA software VFK1481K.
2. After boot up the LISTA software, <<< FORMAT SELECT >>> display appears. Select the item "DV".
After select the format, <<< VTR SELECT >>> display appears, and select the model "AG-DVC200".
3. Next, select the Serial number of the Alignment tape on the screen. In case of LISTA software is not entered with
data of alignment tape, press the ESC key, then main menu is displayed on the screen. And select the item "<4>
Alignment Tape" for entry the data on the attachment sheet, which is enclosed with alignment tape.
4. In case of LISTA software has entered data of alignment tape, select the serial number of Alignment tape, then
message appears "ok? (y/n)" on the screen. And press " Y " or " ENTER " key, then LISTA main menu is
displayed on screen.
< In case of Alignment Tape entered already > < In case of Alignment Tape does not entered >
MECH-6
1-7. How to Enter the Alignment Tape Data
1. Select the item "<4> Alignment Tape" on the LISTA main menu.
2. Select the item "<2> ENTRY" on the alignment menu.
3. After the screen displays the screen of <>, first input the Serial Number follow
the printed number on the tape label. And input the number "0" or "1" for selected the PAL/NTSC. And after
that enter the tape type, input "0" for DVCPRO, input "1" for DV or input "2" for HDLP.
4. After selecting the tape type, the frame for inputting the DATA and CHECK SUM appears on the screen. Input
the numerical value in numerical order on the data sheet, which is enclosed with alignment tape. If the wrong
number is inputted, the error message on the screen, then confirm that data on the sheet.
5. After the data entry, the screen returns to "LISTA MAIN" menu. Confirm the serial number of the alignment
tape.
<< Alignment Tape Data Entry >> Serial No. Lrc-20 (NTSC) 10 ◦ Jabse Service Manual Search 2026 ◦ Jabse Pravopis ◦ onTap.bg ◦ Other service manual resources online : Fixya ◦ eServiceinfo