Service Manuals, User Guides, Schematic Diagrams or docs for : panasonic Cam DMC-TZ10 PHOTOfun_STUDIO_5HD+5_1HD+5-2HD_Copy_to_DVD
<< Back | HomeMost service manuals and schematics are PDF files, so You will need Adobre Acrobat Reader to view : Acrobat Download Some of the files are DjVu format. Readers and resources available here : DjVu Resources
For the compressed files, most common are zip and rar. Please, extract files with Your favorite compression software ( WinZip, WinRAR ... ) before viewing. If a document has multiple parts, You should download all, before extracting.
Good luck. Repair on Your own risk. Make sure You know what You are doing.
Image preview - the first page of the document
>> Download PHOTOfun_STUDIO_5HD+5_1HD+5-2HD_Copy_to_DVD documenatation <<
Text preview - extract from the document
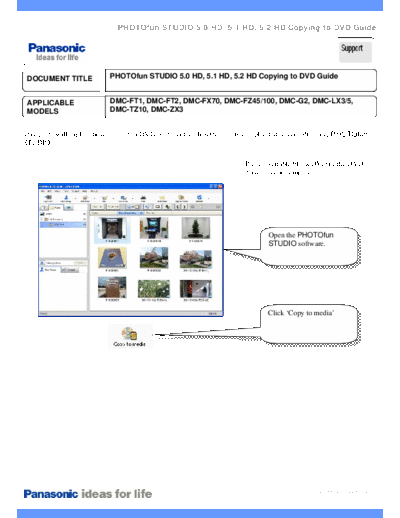
                              PHOTOfun STUDIO 5.0 HD, 5.1 HD, 5.2 HD Copying to DVD Guide


 DOCUMENT TITLE             PHOTOfun STUDIO 5.0 HD, 5.1 HD, 5.2 HD Copying to DVD Guide


 APPLICABLE                 DMC-FT1, DMC-FT2, DMC-FX70, DMC-FZ45/100, DMC-G2, DMC-LX3/5,
 MODELS                     DMC-TZ10, DMC-ZX3


This guide will explain how to create a DVD of the video clips that has been uploaded to your PC using PHOTOfun
STUDIO.

                                                                       Place a suitable blank DVD in the DVD
                                                                       drive of your computer.


                                                                               Open the PHOTOfun
                                                                               STUDIO software.


                                                                               Click `Copy to media'


                                                                                             TECHMB000410062011REV2
PHOTOfun STUDIO 5.0 HD, 5.1 HD, 5.2 HD Copying to DVD Guide


                                   This screen shows the
                                   options of which kind of
                                   files can be copied to
                                   which type of media.

                                   For this guide AVCHD has
                                   been chosen.


                                   The drive containing the
                                   disc will also have a gold
                                   disc next to it as shown.
                                   Highlight this drive and
                                   click `Next'.

                                   If you have not already
                                   inserted a blank disc do so
                                   now and then click
                                   `Refresh' when you can no
                                   longer hear the disc
                                   spinning in the DVD drive.


                                                 TECHMB000410062011REV2
PHOTOfun STUDIO 5.0 HD, 5.1 HD, 5.2 HD Copying to DVD Guide


                                 This page gives the option
                                 to create a high definition
                                 AVCHD disc or convert
                                 the videos to standard
                                 definition DVD format.

                                 For this guide converting
                                 to standard DVD and
                                 setting the order of videos
                                 manually.now and then
                                 click `Refresh' when you
                                 can no longer hear the disc
                                 spinning in the DVD drive.


                                 This screen will show the
                                 videos in the folder
                                 highlighted on the left
                                 hand pane. To copy all
                                 clips select `All files'.


                                  Left click and hold on a
                                  clip and drag the video
                                  down onto the timeline at
                                  the bottom of the screen.

                                  By clicking `Select all' all
                                  of the videos can be placed
                                  on the timeline in one go.

                                  Continue adding to the
                                  timeline until you have
                                  added all the videos you
                                  required and then click
                                  `Next'.

                                                  TECHMB000410062011REV2
PHOTOfun STUDIO 5.0 HD, 5.1 HD, 5.2 HD Copying to DVD Guide


                                  A `Please wait' box will be
                                  shown before proceeding
                                  to the next step.

                                  The time taken will depend
                                  on the number of clips
                                  selected and the speed of
                                  your computer.


                                  On this screen you can edit
                                  how the menu section of
                                  the DVD that you are
                                  creating will look.


                                  By clicking on the default
                                  title you can rename it.


                                                 TECHMB000410062011REV2
PHOTOfun STUDIO 5.0 HD, 5.1 HD, 5.2 HD Copying to DVD Guide


                                   The scene names can be
                                   changed in the same way.


                                   The menu background can
                                   also be altered using the
                                   options on the right.


                                   When you are ready click
                                   `Start Copying'.

                                   The conversion process to
                                   standard DVD may take a
                                   while. Click `Yes'


                                   The DVD making progress
                                   screen will be shown.

                                   During this time the disc
                                   tray may open and close.
                                   This is not a problem with
                                   the disc creation.


                                                TECHMB000410062011REV2
PHOTOfun STUDIO 5.0 HD, 5.1 HD, 5.2 HD Copying to DVD Guide


                                   The display will then
                                   change to the DVD
                                   creation screen.


                                   A box will be displayed
                                   when writing is complete.


                                   The completed copying to
                                   media main screen will
                                   then be displayed.
                                   Click `Close'


                                   Exit the wizard by clicking
                                   `Yes.


                                                TECHMB000410062011REV2
◦ Jabse Service Manual Search 2026 ◦ Jabse Pravopis ◦ onTap.bg ◦ Other service manual resources online : Fixya ◦ eServiceinfo