Service Manuals, User Guides, Schematic Diagrams or docs for : seagate Basic jumper settings for Seagate Barracuda ATA Hard Drives
<< Back | HomeMost service manuals and schematics are PDF files, so You will need Adobre Acrobat Reader to view : Acrobat Download Some of the files are DjVu format. Readers and resources available here : DjVu Resources
For the compressed files, most common are zip and rar. Please, extract files with Your favorite compression software ( WinZip, WinRAR ... ) before viewing. If a document has multiple parts, You should download all, before extracting.
Good luck. Repair on Your own risk. Make sure You know what You are doing.
Image preview - the first page of the document
>> Download Basic jumper settings for Seagate Barracuda ATA Hard Drives documenatation <<
Text preview - extract from the document
Basic jumper settings for Seagate Barracuda ATA Hard Drives
Thank you for purchasing your new ATA hard drive from Other World Computing! Please
review these jumper settings prior to installing your new hard drive into your computer.
You may want to review more detailed information about the installation process, or
the location and configuration of your existing internal ATA drive before proceeding.
Your manual that came with your computer can be of assistance in both of these
determinations.
A few notes about installing an ATA hard drive into your existing system:
Your existing drive is normally configured one of two ways, Master (single drive), or
Cable Select. You will want to determine this before installing your new drive, the easiest
way is to remove the existing drive from your system and visually inspect it's hard drive
jumpers. Most hard drives have a schematic either silk screened onto the case of the
drive, or the schematic is on a label near the jumper pins. If you have difficulty locating
this information, visit the hard drive manufacturer's website.
If your existing hard drive is configured as "Master", then set your new hard drive
to "Slave". If your existing drive is set for "Cable Select", then set your new drive to
"Cable Select" also. You can change the existing jumper settings on the original drive
to suit your needs, but we recommend following these instructions first to verify proper
operation of the new hard drive.
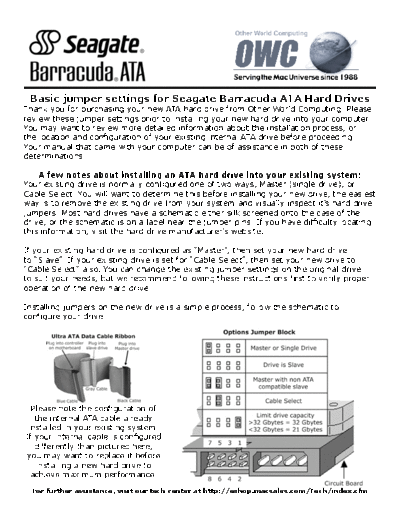
Installing jumpers on the new drive is a simple process, follow the schematic to
configure your drive.
Please note the configuration of
the internal ATA cable already
installed in your existing system.
If your internal cable is configured
differently than pictured here,
you may want to replace it before
installing a new hard drive to
achieve maximum performance.
For further assistance, visit our tech center at http://eshop.macsales.com/Tech/index.cfm
◦ Jabse Service Manual Search 2026 ◦ Jabse Pravopis ◦ onTap.bg ◦ Other service manual resources online : Fixya ◦ eServiceinfo